Audacity
Audacity: ToolBar
Tool Bar
Software name : Audacity
Software version : 2.2.1
The Tool Bars are where you choose tools to directly work on the tracks. There are eight main Tool Bars in the Audacity GUI, shown by default:
- Transport toolbar
- Tools toolbar
- Recording Meter toolbar
- Playback Meter toolbar
- Mixer toolbar
- Edit toolbar
- Device toolbar
- Transcription toolbar
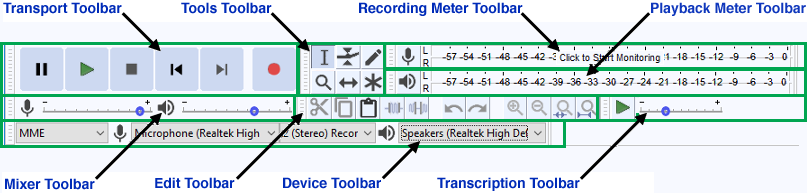
Below we will walk through the individual controls in each toolbar.
Transport Tool Bar
![]()
These controls will be familiar from most Record/Playback devices. Let's look at each button:
| button | action |
 |
Will pause during playback or recording. Press again to unpause. |
| Press the play button to listen to the selected audio (or all audio) in your project. | |
| Press the stop button or hit the spacebar to stop playback immediately. | |
| Press to move playback head to start of track. | |
 |
Press to move playback head to end of track. |
 |
press the record button to record a new track from your computer's sound input device. |
Tools Toolbar

This toolbar groups together a range of commonly-used functions that can also be accessed from the Edit, Select, View and Tracks menus.
| button | action |
| Selection -- Click to select a start point for audio playback, or click and drag to select a range of audio. | |
| |
Envelope -- Allows smooth volume changes to be made over the length of a track by means of embedded volume "control points". Click in the track to create a control point, then set the volume of that point by dragging one of its four vertically arranged "handles". When you create other control points at different levels, a smooth curve is interpolated between them. See tutorial chapter for example. |
| |
Draw Samples -- Draw Tool enables you to manually redraw the waveform in a track; it can thus be used to make volume changes to individual samples or to eliminate clicks, noise etc. |
| Zoom -- Left-click this button zooms in one step at the position of the mouse pointer. Click and drag zooms in to the dragged region. The drag draws a dotted region in the waveform which is fitted to the entire track width when you release the drag. Shift and left-click or right-click zooms out one step at the position of the mouse pointer. Shift and drag zooms out based on the dragged region. The drag draws a dotted region in the waveform and when you release the drag, the audio at the left edge of the dotted region is repositioned at the start of the visible waveform. | |
| |
Time-shift -- When selected, this tool lets you synchronize audio in a project by dragging individual or multiple audio tracks, note tracks or audio clips left or right along the Timeline. Also use this tool to drag individual tracks or clips up or down into another track. |
| Multi-tool -- For advanced users: This combines all five previous tools in one. One tool is available at a time, according to the mouse position and modifier key chosen. The shape of the pointer changes to show which tool is active. If you exit Audacity with Multi-Tool Mode selected, it will be also be enabled next time you launch Audacity. More detail on Multi-Tool Mode here. |
Recording Meter Toolbar
When Audacity first launches, this meter will be inactive and thus display "Click to Start Monitoring", as below.
![]()
If you click on the toolbar, OR click the record button, this meter will activate and monitor the audio input level from whatever input device you have selected (with separate L and R channels if the input is in stereo). As shown below, the meter reads green until just before -6 dB, at which point the tip starts turning yellow. At around -3 dB it turns red, indicating that your recording input is too high or 'hot' and distortion or clipping may occur.
![]()
Dropdown menu: clicking on the microphone icon will invoke a dropdown menu which allows you to enable/disable monitoring (same as clicking inside the meter itself) and can also launch an "Options" dialog, allowing you to set the meter's style, visual orientation, the scale format and other parameters.
Playback Meter Toolbar
![]()
The Playback Meter will activate when you begin Playback on an existing track (with separate L and R channels if the track is stereo). As with the Recording meter, the Playback meter tip turns yellow around -6 dB, and red just before -3 dB, indicating that the volume on your recorded audio is too high, Audacity may have clipped the audio, and/or distortion may occur on most standard playback devices.
Dropdown menu: clicking on the speaker icon will allow you to invoke an "Options" dialog similar to the one for the Recording Meter.
Note: for both meters, a blue line (as shown above in active recording meter) indicates the maximum peak level attained in that channel during the current playback or recording session. This line will remain until a new monitoring session is started.
Mixer Toolbar
![]()
The left-hand slider adjusts the volume level of the input (recording) device you have selected in the Device Toolbar. The right-hand slider adjusts the volume of the output device you have selected for Playback.
Device Toolbar
![]()
The Device Toolbar allows you to select which device you would like to use for input (recording) and for output (playback). The options available in each dropdown will depend on which Audio Host you have chosen in the left-hand dropdown, as well as which physical devices are installed in/attached to your machine and enabled with your sound card. For more on the relationship among these three selectors, for different operating systems, see the official Audacity documentation for the Device Toolbar.
Edit Toolbar
![]()
This toolbar provides alternate access to common tools accessible through the "Edit" and "View" menus. Taking the buttons individually:
| button | action |
| removes the selected audio data and places it on the clipboard. | |
| copies the selected audio data to the clipboard without removing it from the project. | |
| inserts whatever is on the clipboard at the position of the selection cursor in the project. | |
| deletes everything but the selection. | |
| erases the audio data currently selected, replacing it with silence instead of shortening the track. | |
| this will undo the last editing operation you performed to your project. | |
| this will redo any editing operations that were just undone. | |
| zooms in on the horizontal axis of the audio, displaying more detail and less duration. | |
| zooms out, displaying less detail and more duration. | |
| zooms in until the selected audio fills the width of the screen to show the selection in more detail. | |
| fits the entire project in the available screen space. |
Transcription Toolbar
![]()
The Transcription Toolbar is intended to assist with manual text transcription of recorded voice. It has its own Play-at-Speed button which plays (or restarts playback) at the speed set by the Play-at-Speed slider. Playback can be paused and resumed at the adjusted speed using the Pause button ![]() in the Transport Toolbar. Double-clicking on the slider opens up a Playback Speed dialog for more precise adjustment of the playback speed.
in the Transport Toolbar. Double-clicking on the slider opens up a Playback Speed dialog for more precise adjustment of the playback speed.