Audacity
Audacity: EnvelopeTool
Envelope Tool
The envelope tool is among the most useful editing tools for Audacity users. It allows you to alter the volume of individual tracks in Audacity, which is especially important when you are combining ('mixing') several tracks together.
Open Audacity
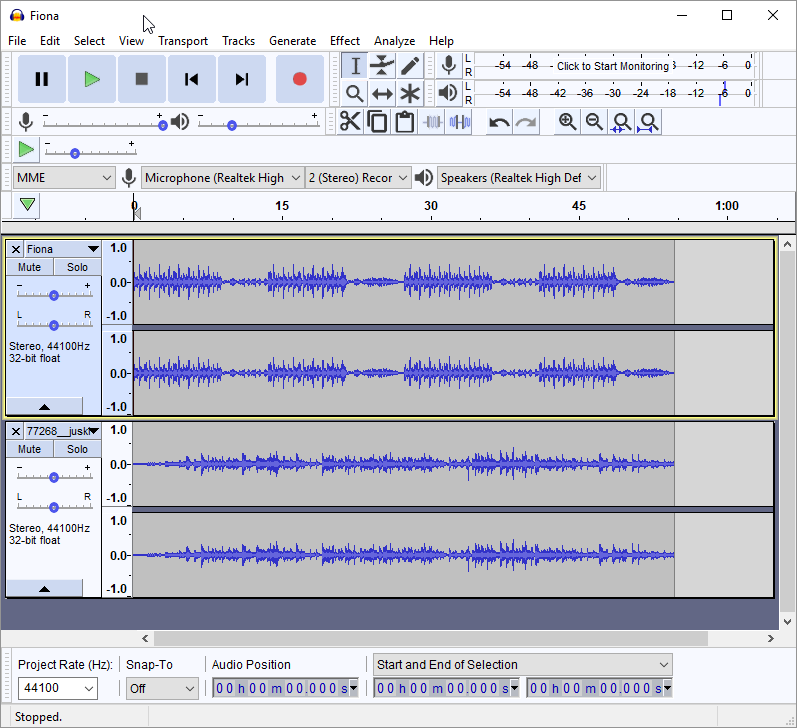
You will first have to have Audacity open with more than one track. We will begin with my 'Fiona' project from the previous tutorial, with some editing of both tracks so that they are now exactly the same length (I doubled the Fiona track end to end, and slightly truncated the blues guitar track). At this point, then, my Audacity project looks like this:
Activating the Envelope Tool
The Envelope Tool has an icon in the Audacity Tools Toolbar, which looks like this:
![]()
When you click on this button, the tracks are surrounded by a blue line. Compare the screenshot above (before activating the Envelope tool) to this one:
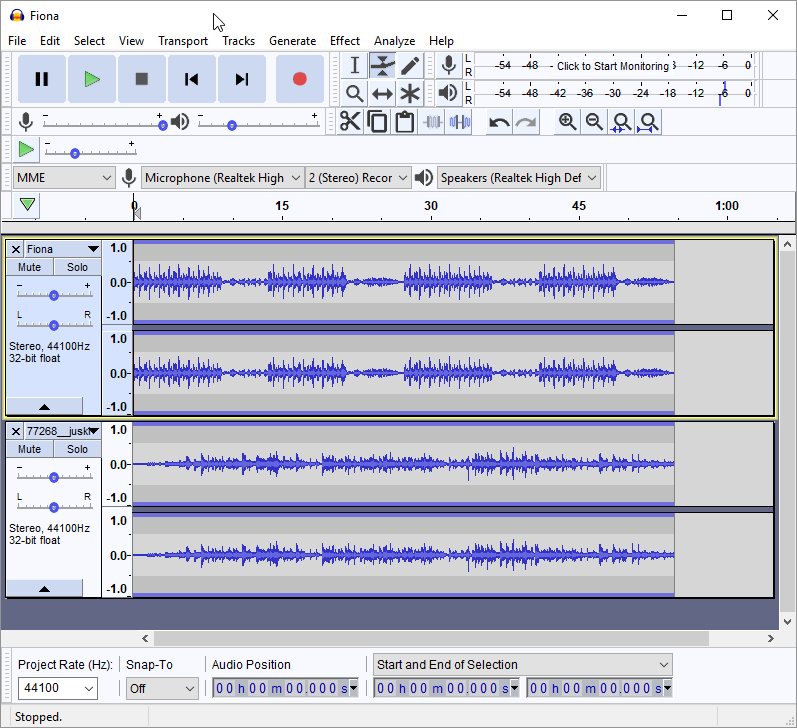
You can see the Envelop tool button depressed, as well as the blue lines around each channel of each track. This indicates that the envelop tool has been activated.
Alter the volume
The blue line actually represents the volume of each channel/track. You can now lower the volume on chosen sections of a track by changing the shape of this blue line (as opposed to altering the volume of the entire track, using the volume control to the left). To do this click on the blue line at any particular point in the top track (in this case 'Fiona'), and you will see small white squares, or control points, appear where you clicked :
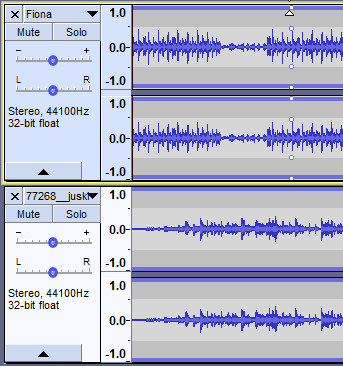
Now you can 'grab' the blue line at the point where these squares appear. To show you how this can change the volume of just one part of the audio, click on the blue line at a separate point near where you first clicked. A second set of blue squares now appears at that new point on the track (top track only):
Now place your mouse cursor on the top white square in this second set (to the right of the first), and while your mouse finger is still down, drag the square downwards to reduce volume:
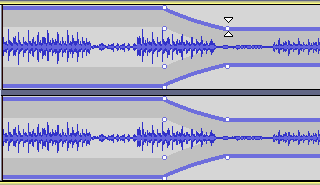
You will notice that this action reduces the amplitude of the wave (ie, the volume) of both the L and R channels of this (Fiona) track uniformly, taking the earlier, left-hand point as its 'hinge'. The separate guitar track beneath the Fiona track is unmodified. If you now play back the project you will hear the volume of the modified (top) track 'fade' smoothly, following the shape of the blue lines, and continue at the lower volume while the lower track plays unmodified.
Mixing 2 tracks together
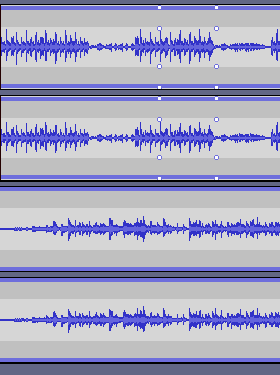
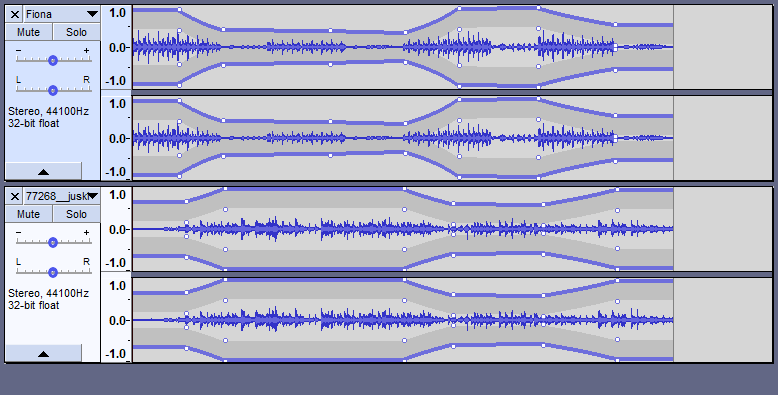
In mixing two tracks together, sometimes you simply want one track to have a single 'fade out' in relation to the other track, as the above example demonstrates. More commonly, though, you might want to 'cross fade' the two tracks in a number of different places--ie, fade one track in while fading the other out--so that different segments of the two audio sources are emphasized at different times. To accomplish this, simply click on the blue lines of either track wherever you want to create a 'hinge point' for fading in or out. The result could look something like the following. Bear in mind that this is still a very simplified example, as this piece is only about 55 seconds total duration -- a 4-6 minute song could have any number of cross-fade operations:
If you have inadvertently added a set of control points (white squares) that you don't need or want for volume adjustment, you can simply grab one of those white squares and drag it entirely up or down out of the track. You can also always use Edit > Undo to undo the most recent operation(s).
Inner Control Points for Greater Volume Gain
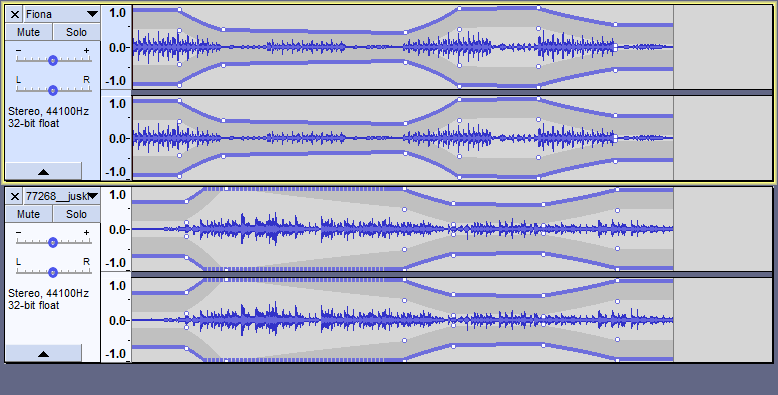
Note that so far we have been using only the outer control points, or the furthest top and bottom white squares, to manipulate the blue envelope lines. The inner control points have the same effect, but these can be used to increase the volume beyond what is visible in the track view. For example, if I wanted my lower (guitar) track to come in louder than it does above, I could use the inner control points to accomplish this by dragging the top one up (or the bottom one down); see this effect applied in the screenshot below. Note that since the entire envelope here cannot be shown in the track view now, the solid blue line has become dotted for that segment.
Finally, we should note that the envelope control only allows the volume of a given track segment to be increased up to the point where the inner control square touches the track border (as shown here). If you want to amplify beyond that range, de-activate the Envelope feature, select the section you want amplified and go to Effects > Amplify..., which will launch a dialog with various amplification options. Be advised, though, that depending on the options chosen, using the Amplify effect can easily produce distortion-level amplification, which is nearly impossible with the Envelope tool unless the original track is already extremely loud.