Video Production
4.2 How Do I Get My Clips Onto The Computer?
Getting what you want on the computer is called Digitizing. This section will cover all you need to know about digitizing and editing your clips.
Prepare your tapes
Before you put your material onto the computer you should review your tapes. Ideally you will have logged and recorded dates and relevant information when filming, if not you can always do it now. The better you know your tapes the easier the edit will be. Logging information might include scenes, whether it was an exterior, dates etc. (See appendix for log sheet.)
Prepare your camera
Connect your camera to the mains and turn it to the playback or video player mode.
Connect to your Computer
For connecting your camera to the computer to transfer video, use the Firewire cable. Not all PCs come with a Firewire connection, so check this out first. Firewire is a cable which allows data to travel very quickly between different pieces of equipment. Your camera will probably use the 4-pin, u-shaped connection and your computer the larger book-shaped 6-pin. Your computer may recognize the camera and automatically start the video editing software.

Figure 4.1: How to connect your editing equipment -

Figure 4.2: Types of Firewire cable.
Connect to your TV
We recommend you also connect your camera to a TV. You can do this by using the "AV" cables provided with most cameras for this purpose coloured red and white or black. You may need an adaptor such as "Scart" for this and have to switch your TV channel to "Aux" or auxiliary channel. Computer screens and TV screens are different so it is very handy for spotting problems and viewing your edit as your audience may view it. For more detail on this go to the "Connecting your camera to a projector/tv" section at the end of this chapter.

Get your computer to see your camera (when it doesn’t want to!)
Sometimes your computer may lose the connection and be unable to see the camera even though it is connected, you can unplug the firewire in this case and reconnect it or restart the software, this will usually work! If something doesn’t seem to work check back through all the cables and check they are well connected and in the right sockets.
Understand USB cables
A USB cable is a cable that connects computers to printers and other equipment. Some cameras can connect using a USB cable which is fine for transferring stills but not high enough quality for video.
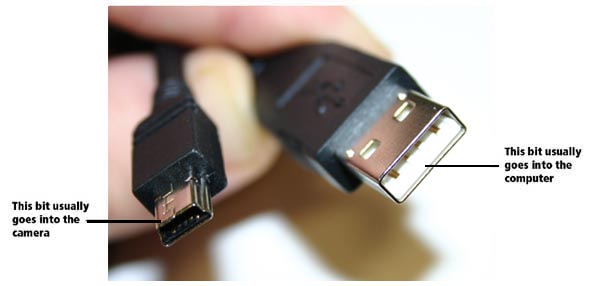
Figure 4.4: Two kinds of USB connectors.
Understand the layout of your editing software
Take time to know your software, if you know what the following terms mean fine, otherwise look them up in the glossary! Browser window, preview window, timeline, transitions or titles. Most video editing software has a similar layout. Even if you aren’t using iMovie or Windows Movie Maker you should still be able to follow using these directions.

Figure 4.5: Windows Movie Maker screen.

Figure 4.6: iMovie screen
Know how to manage your files
The most common question asked by beginners is "now where did we save that clip again?!" Avoid hours of frustration by learning how and where your computer stores files! Getting to know your computers layout is vital if you are to keep track of all your footage. Decide early on you will store everything in one folder and stick to it! Be conscientious, when saving your work, what you are calling your file and where it will be stored! Give it a name you, and others, will easily remember, use a simple number system if you use more than one version of a file.
Understand "non destructive" editing
Any changes you make to the video clips in the timeline do not affect the original clip. This remains the same on the hard drive and in the browser window. So don’t worry about not being able to undo anything, you can always start again with the clip from the browser. If you do make a vital mistake, don’t save your work, close the software and reopen it. It will reopen at the last point you saved it. In the worst case, you can always reimport your files from the camera!
Know the difference between project files and footage clips
The video footage you capture is stored individually on the hard drive. In the software, the footage clips are held together on the timeline by the project file. This points to all the clips and tells the computer how to play them. You need both to complete your movie. (Important if you transfer your files onto another computer.)
Know how to find your files through the root folders
If you want to import files into your edit rather than capture them, this is quite important. Importing a file means you don’t have to capture it off tape, it is already in a digital form such as a CD or on your hard drive. Where this comes in handy is reimporting video files. Because of non destructive editing (see above) your original video file remains on the hard drive untouched even if you delete it from your edit software. If you reimport it as you would a picture or audio file you will find the file untouched! These folders are called the root folders and are sometimes a bit tricky to find but very worth while. Usually you can discover where they are hidden by right clicking (alt>click on Mac) on the file and scrolling to properties.
Save your work
Remember to save your work regularly or risk losing it! Go to the file menu (top left) and scroll down to "save". Or press Ctrl>S for PCs and Apple>S for Mac. In most applications (though not some versions of iMovie, see level 3 for a work around this problem) you can go to the "file>save project as" option, you can then create several versions of your edit as you progress, for example "my movie edit 1". This is handy if you want to try an edit style out which will mean doing so many moves the "undo" function will not be enough. You can always revert to the older version. Remember to keep track of which edit you are working on though, it may be a good idea to delete the versions you don’t need.