Video Production
3.1 How Do You Use A Camera?
Most cameras follow a common layout, but it is important to get to know your camera before you start filming. Either read the manual, or play with the camera until you know what every button and menu does! Here is a list of the basic functions.
Power/mains supply
All cameras can use the mains electricity for power or a supplied battery which will need charging. Some cameras charge the battery separately, some have to be connected to the mains whilst the battery is in place. You can’t film and charge the battery at the same time with this latter type so this limits your filming time unless you film near a plug socket! It is worthwhile to get a spare battery and charger so your filming time is limited.

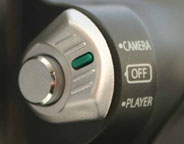
Figure 3.1: Get used to your
camera’s controls.
Camera and playback mode
Most cameras operate in two modes:
- camera mode for recording moving images
- playback mode for playing into a TV or computer.
Filming controls
There are a variety of different options through the various menus which are too fiddly to use while filming. Get to know the shortcut buttons like "Focus" and "Backlight", which are commonly available.
Playback controls
In playback mode your camera is like a video player. It will have controls like play and rewind. Once you find these (they are often well hidden and tiny!) they help you to see what you have filmed and line the tape up so you don’t have big gaps between sections of film or wind up taping over something important.
Stills camera mode
Increasingly there is also a stills camera mode, allowing you to take digital photos, or "stills", on your camera using a separate "photo" button. It is worth noting, however, that stills images, whether on memory card or tape, are NOT good enough for print unless they are printed very small. If you want good stills buy a stills camera.
Tapes
There are a variety of formats available but mini digital video, or "miniDV", is better for economy, quality, and the ability to edit on your computer. They generally come in 30 minute and 60 minute lengths. We don't recommend using the long play option with some cameras, which means you can fit 90 minutes of footage on a 60 minute tape, because it involves a drop in quality and reliability that isn’t worth what little savings you make. (see appendix for more up to date info on formats and cheap places to buy).
Record
The record button both starts and stops recording; it is usually red and when recording there should be some sort of indication on the screen. There is often a red light on the front of the camera letting people know they are being recorded It may be handy to turn the red light off if the subject is nervous! This setting will be available in the camera menus and if it is not available, a small piece of electrical tape over the light will suffice. Always record for at least 10 seconds; anything less is not practical when you edit.
Zoom
Most cameras have a zoom control. This is usually a two way or rocker switch. Some even zoom quicker or slower depending on how far you push the switch. Practice with this to get a smooth action. Whilst it is very handy to be able to magnify the image this way, it magnifies unsteady camera work too. Your images will be much better quality and less shaky if you get close rather than zooming in!
On board microphone (mic)
Whilst not ideal, sometimes it is your only option to use the mic fixed to the camera. Be aware that you are close to the camera/mic so breathing noisily, moving your hands, and/or chewing are not recommended. The microphone may also pick up the sound of the camera mechanisms. Be sure not to rub the mic with your hands! It is also good to be aware of background noise so that you can adjust the mic and environment accordingly. See previous chapter on mics to use and below on using a separate mic.
Auto settings
Usually consumer cameras come set up on fully automatic setting. When you are learning, this is the best option. However, you will soon notice that sometimes the camera won’t focus properly, or the colours will alter. You can learn how to use these settings manually but it is often fiddly and difficult as they are frequently hidden in menus. Menus also make it impossible to change more than one setting simultaneously.
The most important manual settings to use are Focus and White Balance (see appendix). If they are easy to get at, spend some time practising with these. It is possible to set the White Balance before filming. Focus can change as you or your subject move around, so sometimes has to be altered as you film. Unless your camera has a focus ring on the lens, try and set it before you film too, or make do with auto!
Looking after your camera
Apart from the obvious, like keeping sand and water out, the only other two things you need to do are clean the lens and the heads. Use a special cloth or tissue from good photography shops for the lens and a tape head cleaning tape from your local video camera shop. Remembering to keep the lens cap on will help keep it clean and free from scratches. If you have a good quality camera we would also recommend having your camera serviced yearly, it is a good investment and prevents tapes being chewed or unreadable.
Menus
There are lots of extras and special effects available through the various menus. You can simulate most of these on your computer so if you are unsure how you want your final image to look, keep it simple. However if you are sure you only want your final film in black and white, for example, it will save you a lot of time later. Beware of shooting "wide-screen", some TVs and computers struggle with this. If in doubt, test it first!
Editing in camera
A good exercise in camera discipline, this method involves being very accurate with what you are filming and having no mistakes on tape! In practice, this means rehearsing your shots and knowing your camera and subject very well. Editing in camera means that your footage filmed is what you show, no editing afterwards on a computer deleting unwanted bits.
Frame your subject well


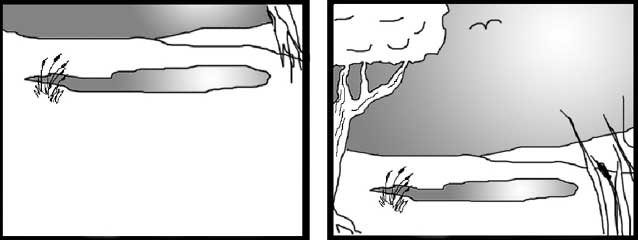
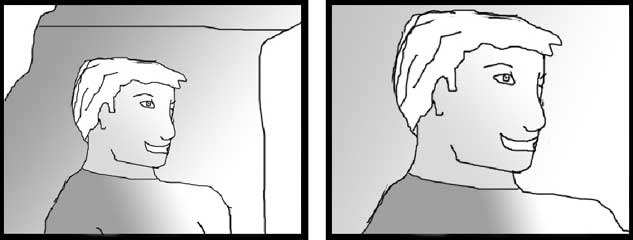
Figure 3.2: This landscape and head shot give you an
idea of how to place your subject in the frame.
Framing is a skill which comes with practice and one you should start studying now. Look at images from different areas, how a press photographer frames their subject is different from how an artist does. However, everyone who creates images for a living, thinks very consciously about what is in the frame. Think how you can show the audience what is important. If you can, get close to your subject so there is no excess information in the frame. If the whole person is important, show their feet to their heads, or can you pan up from their feet ending on their head for the interview? Do you really need their hands in shot or the tree in the background? Always use a variety of close-ups and wide shots to tell the viewer more about the subject. A good rule to follow is that they eyes of your subject should be in the top third of the frame. The simpler and more readable your frame is, the more powerful the message.
Keep it steady
You may decide to make the audience feel tense by using a handheld camera, or give your film that documentary feel but, at all times, aim to keep the image relatively steady. The camera that constantly moves, never settling on a subject is usually held by an amateur. Decide how you will steady the shot, hold the camera well against your body, use a table or door frame to steady your hand, hold the camera against your hip if you want a low angle. Remember pans and zooms, whether hand-held or on a tripod, should only be done to add meaning to your shot.
Create a film using only still shots
This teaches the importance of the steady shot and the significance that can come from a powerful image. The editing software in chapter 4 shows you how you can still create moving images by zooming and panning on high quality still images. It simplifies filming and means beginners can create a very watchable piece with no shaky handheld camerawork.