Introduction to Video Editing With ShotCut
Audio and Video (I): Post-Recording Cleanup, Muting and Separating Audio Tracks
In our chapters to this point, we have mentioned audio tracks largely in passing. All of the examples I have worked with so far -- whether waterfalls filmed by iPhone in Iceland, or screen-capture video demonstrations of software -- have assumed an audio track already present with the raw video clips, captured in the same recording as the video images themselves. There are, indeed, few videography scenarios imaginable these days where some kind of audio wouldn't be captured as well. This might be fairly incidental to the relevant images: the rushing of a waterfall, the murmur of spectators at an event, the sound of traffic; or it could be centrally relevant to the video material itself: the audio portion of an interview or oral presentation, for example, or a musical performance, or the voice narration for a video demonstration of any kind.
The nature of the video and its intended purpose (as an edited, final product) will of course determine what we want to do with this recorded sound. We might want to leave it exactly as is. If the audio represents speech that is crucial to the scene -- as with an interview or a narrated demonstration of some process -- we might want to boost the volume a bit for clarity, and/or perhaps lightly edit or 'clean up' the audio track to remove pauses, hesitations and filler-words. Alternatively we might choose to mute the recorded sound, either partially or completely, either throughout a full video clip or just at certain moments. This might be particularly true if we intended to add some kind of supplementary sound to the video: a musical soundtrack, for example, or a literal 'voice-over' narration which wasn't part of the original recording. In the world of professional film-making, sound editing is an entire complex professional discipline, which has to do both with enhancing, balancing and perfecting the recorded sound from the original 'take' as well as adding in sometimes many different layers of supplementary sound: 'sound effects' that weren't actually recorded with the audio, mood music of varying kinds (amounting to a full-scale musical score in a feature-length film), perhaps a literal voice-over for a documentary or a film noir genre of fictional film; and, of course, actual 'over-dubbing' of the original vocal sound into a foreign language for audiences who prefer not to read sub-titles, or perhaps in a musical if the lead actor or actress doesn't quite have the necessary vocal chops to pull off the singing parts.
In fact, none of the sound-editing procedures I've mentioned here in relation to professional film-making cannot be done now with a good digital video editor (or at least that in conjunction with some other editing software, some reasonable recording equipment, etc). As with editing the visual component of video, so with the sound: the real question is how far we want or need to go down the path toward professional film editing, in order to fulfill the actual purpose of our home-made videos. The present guide will assume that we don't want to go too far down that path, at least for the present. Accordingly, we will confine ourselves here to some fairly basic sound-editing procedures, using Shotcut, that will be useful for most home-video purposes. These include:
1) 'cleanup' editing of an existing voiceover narration (ie one recorded with the original video)
2) muting all or part of the recorded soundtrack for a given video clip
3) adding and mixing in background music as a supplementary soundtrack
4) using Shotcut itself to record a supplementary voiceover narration for the video scene
This is still a lot to cover, so we will devote the present chapter largely to (1), though in the course of that we will touch also on (2). In the following chapter we will delve into (3), and finally cover (4) in a final chapter dealing with audio.
'Cleaning Up' a Recorded Voiceover Narration
The following screenshot appeared in the previous chapter; it represents one of my raw 'takes' for the overall Introduction to my Unity video tutorial series, with the clip loaded into Shotcut's Timeline as the V1 video track:
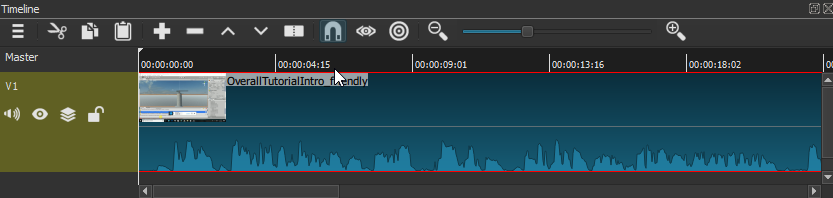
In the last chapter, we focused on the task of adding an introductory white-on-black Title segment to the start of this video track. In reality, however, I first needed to decide how much of this raw 'take' I actually wanted to use, and then confirm that it would actually come first in the sequence of clips that together, with some editing, would constitute my finished 10-minute introductory video for the series. Then I needed to clean up my captured voiceover narration of what I was displaying on the screen (as I did throughout the entire series) -- removing unwanted pauses and hesitations, stammers and filler-words: 'um', 'you-know', 'like', etc, as well as larger back-tracking in the flow of my ideas or actions on-screen.
Now, we should note that many video demos available on Youtube make no effort at this kind of cleanup, at all; it's a matter of personal preference and (to be sure) how much editing time you have. Some video demonstrators doubtless feel that leaving in the hesitations, filler words, digressions, and even occasional software errors and other unexpected behavior makes the demo more lively or accessable to a newbie audience. Personally, I find that the end product is a more watchable and effective demonstration when it's had a degree of vocal cleanup. Of course, at the other extreme, if I were a professional voice artist, working from a written-out script, my 'raw' voice recording would typically not need much cleanup, if any. But I am not; and the odds are decent that readers of this guide will not be either. More importantly, if we were doing a professional-sounding, scripted-out voiceover narration of the on-screen activity, it would much more likely be applied after the fact, as a supplemental audio track separate from the initial video recording. In other words, 'performing' your professional, scripted out narration while simultaneously doing something on the screen -- writing code, fiddling with or gesturing at different UI elements--is extremely difficult to do. And it becomes logically impossible in other video scenarios calling for commentary: if your video is capturing a rare sighting of mink crossing your back yard, or your daughter scoring her first soccer goal, or a political demonstration unfolding unpredictably, then by definition your in-the-moment commentary will be unscripted and perhaps not especially calm or linear. In those cases we really need to choose between keeping the raw, in-the-moment reaction--which might be entirely appropriate depending on the effect we want--or replacing any such captured audio with an over-dubbed, well-considered vocal narration. Think about the voiceover in a classic BBC nature documentary, which is most definitely not done in the actual moment of filming, rhetorical conventions notwithstanding ("Oh, look! It's a young stoat!"). In the next chapter, we will explore the options, in Shotcut, for an overdubbed, after-the-fact voiceover; as well as adding mood music or other sound layers.
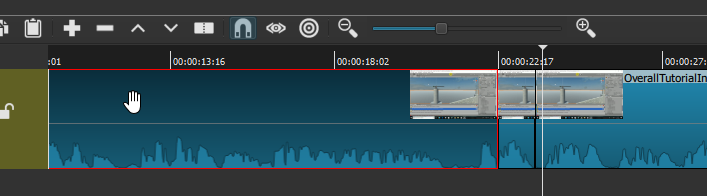
To start, though, we will take the case of a video demonstration; and we will assume that a video demo you've chosen to record, of a process you're enacting yourself and are fairly familar with, will be a case where you can record an in-the-moment, blow-by-blow commentary on what you're doing which will be coherent enough that it can be cleaned up with a little editing. The next question is: can we do this audio editing in place, that is, by trimming out sections of the video track that contains the audio wave-form, or will that kind of trimming cause the video itself to be too jumpy? There's really no way to determine this except case-by-case, for any particular moment of audio we'd like to trim. For example, the screenshot below shows the same V1 track we saw above, but now I have defined a short audio region I'd like to trim -- it's an "um...uh" sequence that comes up with some frequency in my narrations. I defined this precise region by, first, zooming in the track a bit to see more detail, then playing at normal speed until I heard the offending filler-noise; then pausing and walking the Playhead back and forth, using the left and right arrow keys, until I could identify precisely what part of the wave-form represented that sound (after a while you'll find that you can recognize the particular shape of these wave-forms pretty easily). I've then done a Split at Playhead at the beginning and end points of that precise region; we can see both of these splits here:
So, can I now simply delete (or Cut) this segment of the full video track (which would be a ripple-delete, causing all subsequent segments to shift left, leaving no gap)? That depends. In walking the Playhead back and forth, I have also been watching Shotcut's central viewing screen to see how much screen movement actually occurs during this segment. As it happens, in this instance there's none at all, and so this segment is safe to simply ripple-delete from the V1 track. And in fact, it is in the nature of software video demos like this that the great majority of audio moments you'd want to delete are probably safe to do in this manner. When it comes down to viewing software demos in terms of very brief moments, of a second or less in duration, we find that very often there is either no screen movement at all -- we are simply talking, explaining a point -- or else there is a very small, trivial movement of the cursor (part of a larger arc from one region of a UI or perhaps code editor to another) that we can skip over in a way that will not really register with the viewer. After all, this is why screen-capture software can get away with variable-frame recording in the first place. Or, there can be much longer pauses, of several or even tens of seconds duration, where we simply lose our train of thought or hesitate over what to say next or how to phrase it -- but these tend to be precisely the places where we're also not doing anything significant on the screen, because the motion there is mirroring our thought/speech pattern. Again, these segments are typically safe to delete. And even if such a cut results in the effect of your cursor suddenly jumping halfway across the screen, as long as the resulting audio is smooth and the viewer is not looking for important visual information that is suddenly missing, they will tend to be quite forgiving of any such jump.
As a practical matter, I would note that over the course of my full, 10-video demo series for the Unity tutorial, I was able to do several hundred such simple cuts to the video track, representing easily 90% of the audio moments I wanted to clean up (and incidentally, shortening the total viewing time of the series by at least 20%). But what about the remainder? Let's consider the video segment we saw in the last chapter where I was demonstrating how the game looked from the player-jet's perspective:
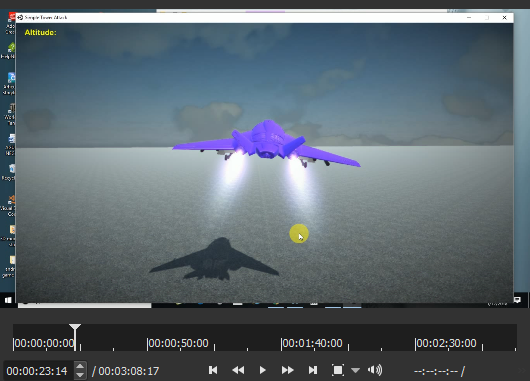
This is a video showing continuous, fluid motion for several full minutes--while the jet took off, turned, made several attacks on the towers and was eventually destroyed by them, all with my running commentary. There were some stammers and filler-words here too -- yet here, any cut in the video long enough to remove even the briefest of these audio blemishes would cause a jarring disruption of the visual flow itself. What to do in this case? One option (which I mostly chose) was simply to leave these alone, and live with some sound blemishes for this particular segment. But I could also have muted those particular moments of audio, while leaving the video in place and flowing smoothly -- as long as I was willing to put up with silence for the durations I was muting.
Muting part (or all) of an audio track
Below is the V1 track for this jet-in-flight video, with a segment delineated (through start and end splits) where I had an 'um' followed by a brief pause:
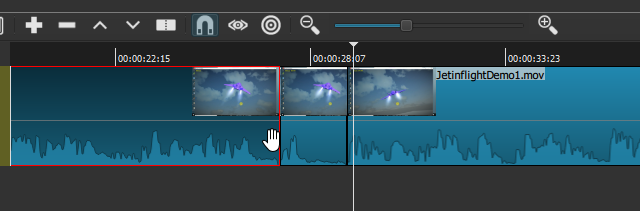
Again, this is not a place where we can simply delete the segment, without causing a very noticeable 'skip' in the video motion. In this case the skip would simply be annoying, but one can imagine this was instead a moment of video where I was actually demonstrating some crucial UI operation, on screen, so that the deletion could cause a real disruption in the visual information being presented to the viewer. However, we should recall here that, having defined a brief segment or 'clip' like this, deletion is not the only thing we can do with it. We can also apply filters to this particular segment, and we can change some of its properties. As it happens, both of these provide an option for muting this particular segment, while leaving the video playing undisrupted. As we saw in the last chapter, we can apply any filter we want to this clip--in this case the clip will not appear in the Playlist, but if we select it on the Timeline itself (it will have the red border once we select it), then open the Filters panel, we can select the Mute filter either from the "Favorites" list or from the more extensive Audio filters list:
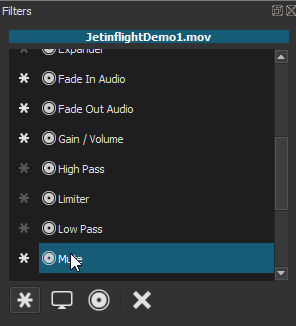
Double-clicking on this filter will apply it to the selected segment; in this case there is no dialog for setting different options, because there are no options with this filter: we've just muted the audio for that segment, full stop. Now when I play the track, the sound simply goes away for the duration of that segment.
As we can see even in this truncated view of the "favorite" ones, audio filters can do a great deal more than simply muting: we could add a fade in and/or fade out to the audio here, we can adjust the volume, we can also adjust the bass and treble, the balance between left and right channels if the audio is stereo; we can add effects such as compressor, expander, reverb and delay. Most of these effects would make little sense applied to such a brief segment of audio, of course, but might make a lot more sense when applied to longer segments or, indeed, to the entire track. Next chapter we will explore fade filters, in particular, on the topic of mixing audio tracks. Meanwhile, though, we should note that there is another and perhaps more straightforward way to mute a single segment (or an entire track, if it is not segmented) by way of its Properties. With that segment of the V1 track still selected, we can summon the Properties panel from the main toolbar, and within it, click on the Audio tab:

This tab displays a number of read-only properties of the Audio for this segment, for example the Codec, the number of channels (2: L and R) and the sample rate. These will be the same for all of the audio in this overall V1 track. But notice that "Track" itself is a drop-down control. If we click it we find it has two options: one is the currently-displayed track name (which, again, will be the same for the entire audio track). The other option is "None". If we select "None", all of those read-only attributes will disappear, and the audio itself--just for this segment--will be muted. The wave-form for that audio will still be visible in that segment of track in the timeline (as it is when we apply a Mute filter as well), which may seem counter-intuitive but is a way of reminding us that this segment of audio has not been lost or destroyed, just muted: as long as this overall Project is open, OR has been saved, we can always go back and un-mute that audio segment should we chose to, by reversing whichever muting option we chose before.
Splitting a pre-recorded audio track from its video track
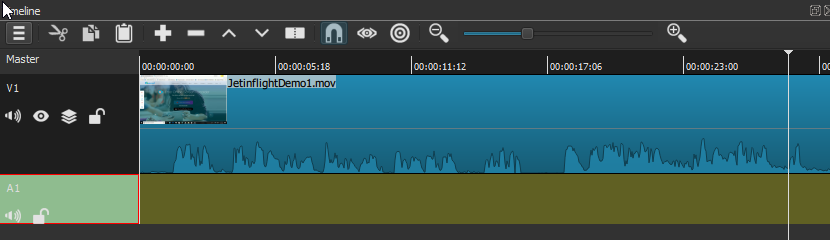
We'll close this chapter with a couple of final points on this general topic of audio 'cleanup'. First, one might be wondering whether it isn't possible to split the audio track off from a video track and edit it separately--thereby, for example, cutting out the unwanted audio blemishes but joining up the remainder, so that there are no resulting silences? The answer is yes, it is certainly possible to do this; and there may be other good reasons for spitting off an audio track to work with separately (or even export as an audio file). This is probably NOT a good way to accomplish post-recording cleanup, though. To understand why, let's take a quick look at this kind of splitting. Below is the jet-in-flight video track with the earlier splits undone (I just hit "Undo" a couple of times), which will make it easier to copy V1 as a whole track. I have also used the Menu dropdown (far left control on the Timeline toolbar) to "Add Audio Track". As we see, there is now an empty audio track, labeled A1, directly beneath the V1 video track. I have also selected this track by clicking on it, which is why it's highlighted here:
With this new track highlighted, what will happen if I now hit the Append control (the big + sign) on the Timeline toolbar? Shotcut will attempt to paste the V1 track, which is the only item in the Playlist, into the A1 track. But of course A1 is an audio track, so it cannot contain video content. The result is that only a copy of the audio from V1 will be pasted in, as we see below:
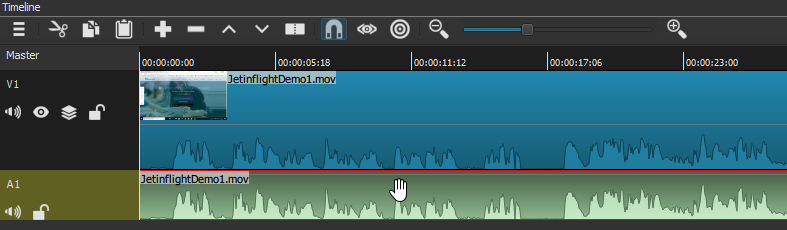
We can now see two exact copies of the audio waveform -- and at this point they are also exactly aligned, because Shotcut will always add (or technically 'Append') content to the zero point of an empty track. If I were to play this project right now, it would sound exactly as the V1 clip sounded by itself: I am actually hearing both audio tracks at once, but I cannot tell this because they are exactly superimposed. If I only wanted to hear the new A1 audio track--as I presumably would if I were doing any editing on it--I could mute the audio of the entire V1 track, either using one of the methods discussed above or, to make it really simple, by clicking the far-left "mute" control on the V1 track (this will only work with entire tracks, which is why I didn't mention it above).
At this point I could, if I wanted, listen to the A1 track, hunt for offending audio blemishes, split them into separate segments the same way we did above with the video track, and then delete them. But you can probably already see what would happen. Doing an ordinary Cut on the first of my offending audio segments would cause the remainder of the audio track (everything to the right of the cut segment) to shift slightly left; and since audio and video are now separate tracks, this shift means they will no longer be aligned. The misalignment will be only very slight after this first deletion -- perhaps a second or less -- and that alone would probably not be a huge practical issue for a screen-video demo (though it would already be annoying if, instead, this were a video of someone speaking, where their mouth movements were no longer fully aligned with their voice). But every subsequent little deletion would add to this lag. By the time we had gotten to, say, ten of them -- an average number of little audio flaws for a 3-minute 'raw' video like this -- the accumulated delay between the audio and the video would become unwatchable, even for a software demonstration. It would be impossibly distracting for an interview, and even worse for something like a video demonstration which involved playing a musical instrument. It's true that we could avoid this problem by doing a "Lift" delete rather than an ordinary ripple-delete -- this would simply leave a small gap in the audio track wherever we'd removed anything -- but then we've accomplished nothing we couldn't have done by simply muting the audio segment in place. To review, then: splitting off the audio track from the video is easily done, and may be appropriate to accomplish some editing goals. But we should beware of any editing operation that leaves the audio track either shorter OR longer than the video track, because the A/V disconnect is something that most viewers will not tolerate.
This brings up a final point about this kind of post-recording audio 'cleanup': it is extremely difficult to pull off, and often impossible, in certain specific video scenarios where the audio and video are very tightly linked, and both central to the informational substance of the presentation. One example would be a video demonstrating how to play a piece of music (or anything else, like a scale or chord progression) on a particular instrument. If I am demonstrating a typical blues chord progression on a guitar, and both showing and narrating exactly what I'm doing, but I also say "um" or "you know" or similar filler words--or the dog starts barking, or my roommate slams the door--while in the midst of this process, I don't have a lot of options: if I mute out the offending words/noises I also mute out the music for those moments, and if I trim the entire video for those moments (our first option above) I lose the music and have a confusingly choppy video. This would also apply, really, to any 'talking head' type presentation, such as an instructor speaking into the camera for a segment of eLearning content. The audience is watching you speak, so even if they can't hear you say "um", or "where was I going with this? Oh yeah..." or "sorry, that was just the dog", they can still see you say it; and if you cut out both the audio and the video for those moments, the result again is going to look distractingly choppy to an audience accustomed to the normal audio/visual signals of oral communication. Of course, film-makers have struggled with this same challenge since the advent of talking pictures. So in these specific kinds of video scenarios, the solution now is really the same as it's been all along: a combination of 1) rehearsal, 2) multiple takes, and happily 3) the ability to splice together usable segments of multiple takes to form a continuous sequence.
With that said, we will turn in the next chapter from the topic of cleaning up existing audio to the topic of adding in new, supplementary audio, and how these might be mixed together to form a coherent whole.