Introduction to Video Editing With ShotCut
Basic of single-track editing: Cutting, pasting, appending, transitions
By the end of the previous chapter we had a single video clip, of the waterfall in Iceland, loaded into a video track in Shotcut's Timeline panel and ready for editing. We will now continue with that same sample project, as we begin to look at some basic editing functions on a single track. Before we begin any actual editing, however, we need to come up with some basic conception of what we are trying to achieve thereby: what is the final, edited video 'product' we want Shotcut to render?
One thing we know already is that the waterfall clip itself, while it's a high-resolution capture of a compelling moving image, is extremely brief: only about 12 seconds total duration. That's not really long enough to ask an audience to watch, in most contexts. We want to end up with a longer final video, at least something in the 1 minute range if not longer. But how to do this? One could Copy that entire waterfall clip, and Paste it end-to-end repeatedly in the V1 track until the latter was a full minute or more in duration; but six iterations of the same short clip would simply look odd (at least for this waterfall; for some captured movements the repetition might be comical or interesting). How about stretching it out, ie slowing down the playing time? We could certainly do that, by going back to the Properties Panel for that clip and changing the Speed, which is set by default to real-time or 1.000x, to something a great deal slower, like 0.1x or 10% of real-time. I've actually tried that: the results in the Timeline track now look like this:
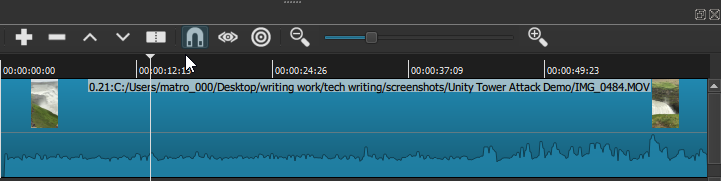
The V1 track is now just over 1 minute in duration (I've zoomed it out, but note the second markers along the top which indicate the greatly expanded duration of the clip itself). When we play it, we see the same waterfall, now flowing for a full minute but at a glacially-slow pace. Again, this could conceivably be interesting if the action captured were some kind of wild athletic move, or perhaps a volcanic eruption, that truly benefited from being seen in super-slow-mo. In this case, though, not so much. We will Undo this action, and reconsider.
The next obvious question is whether we might compile this clip together with other, thematically-related short videos, to achieve a longer-duration end product. Do we have other compelling video clips from the Iceland trip last summer? Indeed we do. We will go back to iCloud and look for more Iceland videos, specifically with water themes. Here is another, extremely tall and pictureque waterfall, but the clip is only 5 seconds long -- will it make a viable contribution? The only way to know, really, is to bring it in and find out through experimentation. Here is a 45-second slow-pan of a volcanic beach-- again, let's bring it into the project and find out if it 'works' in this context. Here is 15 seconds of another tall waterfall; surely that's worth trying. Finally, a very brief clip of a volcanic geyser (it is, in fact, the original Geyser from which all others derive their name). Surely that is worth trying out. I will now open each of these clips in Shotcut and add each, in turn, into my Playlist for this project.
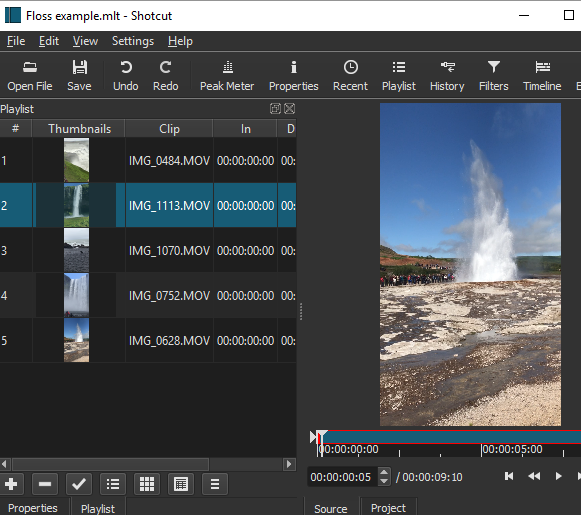
Here we see the four additional clips I have just added to the Playlist, along with the original waterfall clip (by the way, as noted in the Orientation chapter the term 'clip' here is a bit ambiguous since it can refer both to full video files, as here, and also to segments, or subsets, of a full video file as defined in the Source view by manipulating the left and right clip ends. Everything shown in blue in the Source window is part of the clip, which by default will be the full video you've opened. Clipping as such will be explored in a later chaper). In this screenshot the last clip/file added to Playlist, the Geyser, still displays in the Source window as well. Here we might observe that "Playlist" may be a somewhat misleading name for this panel, because it is not meant to imply any kind of sequential ordering of these clips: I can double-click on any one clip to play it in the main window; I can drag the clips in the Playlist to re-order them as I like; but this order isn't especially meaningful as I can't play this sequence of clips, in order, from within the Playlist itself. Sequential or linear ordering is done on the Timeline. The Playlist is really just a library of assets, imported into the project, for potential incorporation into the final video we will define by way of crafting one or more tracks in the Timeline. We could add a dozen, or conceivably a hundred, additional assets into the Timeline -- not just video clips but also still images (for example, from among the hundreds of spectacular jpegs from the Iceland trip), as well as audio files that might be worth considering as as a soundtrack. None of these will become part of the finished video product until and unless we decide to incorporate them into the Timeline, and from there play around until we have something that displays in a way we're satisfied with, and wish to Export as the final product.
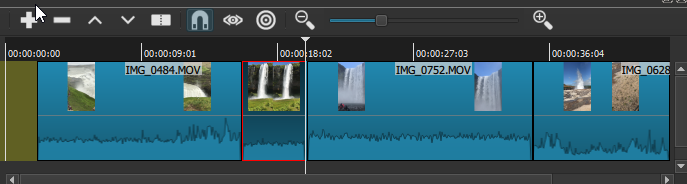
For want of a better starting point, then, I will begin by simply selecting each of the new water-themed clips in Playlist, in order, and Appending them to the existing V1 video track in the timeline, by way of the Append (+) button in the Timeline controls. For now I'll leave out the beach clip, as being both much longer and thematically distinct from the others. This now yields the following Timeline view, of our single video track V1, when suitably zoomed out to see more or less the whole thing:
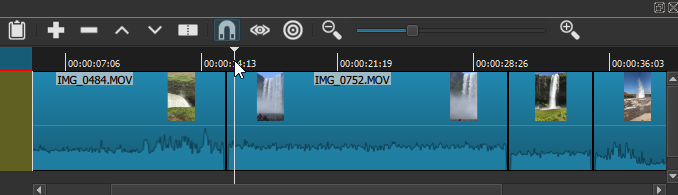
As you can see, each of the new clips has been appended, left to right, after our original waterfall clip. The full clip is now some 45 seconds in duration. If we now play this, we have what might be considered a 'first draft' (or first cut) of a compilation video of "Water Wonders of Iceland."
But it's only a first draft, for numerous reasons. First of all, the order of the clips in the timeline is totally random; I have essentially just followed the order in which I first chose the clips and added them to the Playlist. Playing the resulting track, I might decide this works fine as a sequence, or I might decide to rearrange the clips. Perhaps I want the third clip (its name cannot be seen in the above shot but it is IMG_1113) to appear immediately before, rather than after, the current second clip, which is _0752. There are several ways to do this, but for now the safest would be as follows: 1) I select that 1113 clip on the timeline by clicking on it (this clip or segment will now show a red border, as seen below), then 2) right-clicking to reveal a drop-down Edit menu, and selecting Cut:
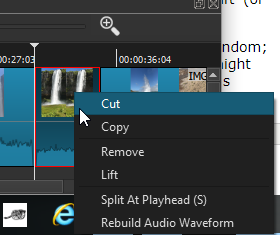
Rather than right-clicking, I could have instead used the Cut button from the Playlist toolbar, for the same result. Why Cut in particular? Because this will copy that segment to the clipboard but also ripple-shift the following segments to the left, thus leaving no gap where that 1113 segment was. I might want a gap there, but I don't in this case. Having done the Cut, I now 3) move my cursor (which also means moving the Playhead) to the point where I want this 1113 clip to appear, which is between the original waterfall clip (0484) and what was the second clip, 0752. Finally 4) I Paste the 1113 clip into its new position, using the Paste button on the Timeline controls. This will shift all remaining segments to the right again, preserving them all in their entirety. Had I instead used the Overwrite button, it would it have pasted the 1113 clip in the same position but not shifted the others right, instead overwriting a portion of the 0752 clip. Again, you may want to do that in some cases, for example to preserve all other segments' position relative to other tracks in your project, but I don't care about that here.
The resulting edited V1 track now looks like this, with 1113 in its new position:
Playing the V1 track now, I am better satisfied with the sequencing of video images. But this track could still be improved. For one thing, we can see here how unequal the video segments/clips are in duration, which a viewer would also percieve and might find annoying. In particular, the 1113 clip we've just repositioned is still much shorter than the others. To some extent we might consider ourselves constrained here by the original durations of the raw videos -- but only to the extent that we need to preserve exactly the same frame-rate for all segments, which is 30/second. Perhaps the 1113 clip, which is fairly spectacular, would actually benefit from being slowed to, say, 1/3 of its original playing speed, which will also have the effect of increasing its duration by 3x? Let's give it a try. I double-click that segment again to select it, open the Properties panel, and change the Speed from 1.000x to 0.333x:
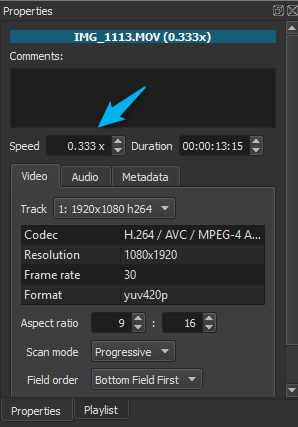
As soon as I click out of the Speed input box in this panel, I will find that the segment in question has actually trippled its total length, and thus its displayed space in the V1 track, and pushed the remaining segments neatly to the left. (I could also have done this same operation 'manually', by dragging the right edge of the segment itself to make it wider; but to do this I would first have to drag any following segments manually to the right, one at a time, to make space for the wider 1113 segment, so I would suggest doing it via Properties).
As it happens, I find after playing the result that .333x speed is actually a bit too slow, but .5x speed is very nice, and results in a second segment more proportional in duration to the first and third. Excellent. This still leaves an issue with the final segment, though, which as you may recall showed the Geyser erupting. The entire clip is 9 seconds long, or near enough in duration to the others. But erupting geysers are fleeting things, and the actual eruption is only the first half (or really third) of the clip, after which point the camera lingers briefly on the steam aftermath and then pans down toward the ground. We don't want or need this last footage. So now we will perform our first Split operation, to get rid of it. First we will need to select that clip in the track, and zoom out the Timeline considerably so we can see and step through it in much greater detail (with the track selected, the Playhead will move to that spot and will always remain at the center of the zoom, so you don't need to hunt for it again). That expanded Geyser segment now looks like this, with the playhead roughly at its center:
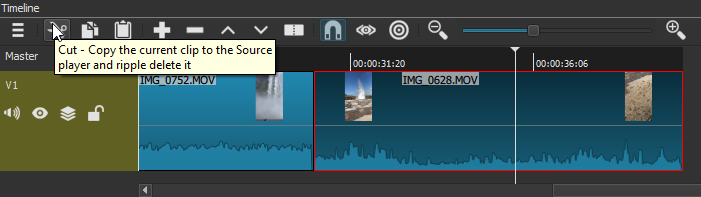
As noted previously, you can move the playhead back and forth either by dragging it at the top, or by 'stepping' with the forward and backward keyboard keys. You will likely find the latter gives the most granular control. I will choose a point a few seconds after the Geyser has performed its show and left the more slow-moving cloud of steam, just slightly left of where the playhead is shown here. Now I will "Split at Playhead" -- this is NOT the "Cut" button that happens to be showing its mouseover label in this screen shot, but rather the icon just to the left of the horse-shoe (mousing over each button in turn will always show you its name and function). That button will create a split in the 0628 (Geyser) clip at the precise spot of the playhead -- after which everything to the right of the playhead becomes a separate segment, and can be Deleted. Better still, the now very-short segment of Geyser clip that remains, to the left of the playhead, can be given the slo-mo treatment as well, which ends up working very well as it did for our 1113 clip. And we're back to four segments of roughly equal duration and visual interest, with a nice rhythmic alternation between real-time and slo-mo speeds.
Is this masterpiece finished, then? Of course not. Leaving aside more advanced questions like labeling, an introductory title, and what to do with the audio (all of which will be addressed in subsequent videos), there is still a basic question of the transitions from one clip to the next. As it stands that transition is entirely abrupt. Shotcut offers a wide range of options for transitioning from one video clip to the next, though most of these are applied through Filters, and will be the subject of a more advanced chapter. However, one of the most useful types of transition, the Dissolve (and an accompanying audio cross-fade), is available directly from the Timeline UI. To create a dissolve transition, all you need to do is grab one clip -- your mouse cursor becomes a hand icon when you are appropriately hovered over a clip to drag it -- and drag it so that it somewhat overlaps an adjacent clip, either to the immediate right or left, then release the clip you're dragging Here, I have dragged the first waterfall clip (our original) slightly to the right, so that it overlaps with the slow-mo second clip:
![]()
The new crossed region shows what was the area of overlap, and has now become a dissolve transition; if I now step through or play the track, my first waterfall image will dissolve into my second. As it happens, this first effort yielded a transition that was too brief, in my view: probably less than a full second in duration. It is possible to resize such a transition one you've created it; but as this can be tricky I would suggest instead Undoing the transition, and trying again with a larger region of overlap in your drag. I was happiest with a transition about twice the size of the first one (without changing the zoom of the Timeline). After that, I created another transition between the second clip and the third, by dragging the second one to the right by a roughly similar amount. I also previewed a third transition from there to the final, Geyser clip, but decided that with that clip already only catching the second half of the eruption (a function of the videographer's reaction time), it was better to leave that transition abrupt. Thus my V1 track now looks like this:
![]()
Here you can see the revised first transition, between the first and seconc clips, and the second transition that is slightly smaller (and we see that there remains no transition between the third and final clips). With any transition between shorter clips, such as these, it's important to keep in mind that you need to preserve some sufficient region of each clip outside the transition area, or the viewer won't have an adequate chance to register the image itself (or any accompanying titles or voice narration) before the next transition begins.
You may also notice that the first clip no longer begins at the zero point of the track, because we dragged it to the right to create the first transition. If we now play the track as is, the resulting gap will show up as a black screen for those first few seconds, before the first clip abruptly plays. We might want to delete this gap by right-clicking on it, which will bring up the single option to "Remove", after which all content will shift left to the zero point. But this opening gap is also a very nice length for an opening title, something we will cover in the next Chapter. For now we will leave this opening gap where it is.
With that, we are well on our way to creating a quite respectable promo video for the Icelandic Chamber of Commerce -- or at least one 30-second segment of such a video. For it to be really useable, this segment would probably need to be assembled together with other segments featuring different geological features, cultural life in Reykjavik, Icelandic ponies, whale-watching or whatever. Of course the overall promo video would probably begin with an intro title, and would probably feature intercut section titles and/or superimposed text captions. Implementing these will be the subject of our next chapter.