Introduction to Video Editing With ShotCut
Getting Oriented: The Shotcut UI and Panels
When you open Shotcut for the first time, you may be surprised at how little you actually see by way of interface or controls. Unlike the Microsoft or Adobe UI model, the Shotcut team has a preference for beginning with a very uncluttered interface, and letting you choose panels from there as you need them. This also means that Shotcut opens very quickly, compared to most editing and authoring tools of any complexity, and it consumes a minimum of system resources until it needs them.
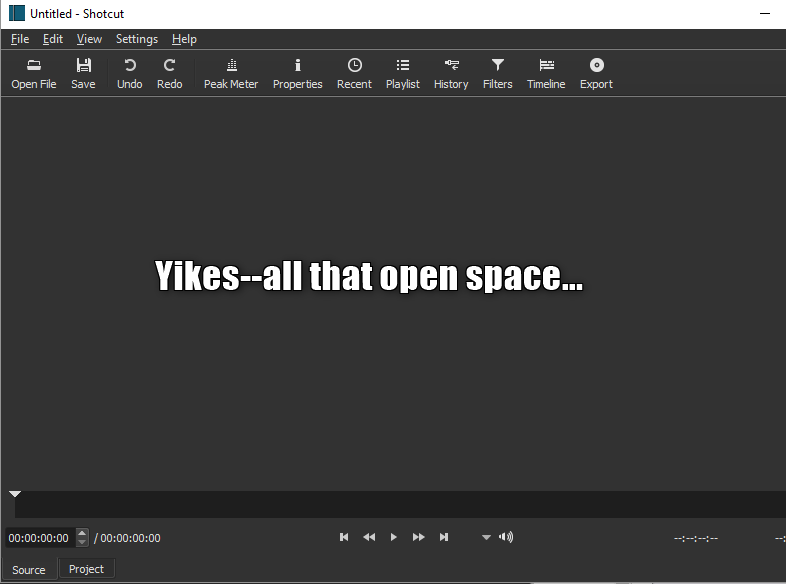
Don't be put off by all the blank space; the Toolbar icons at the top will let you open all of the windows/panels you need, as you need them. Let's take a look at each of these panels in turn, taking them from left to right as their icons appear in the Toolbar above. All of these panels, and how they work together, will be featured again in the 'How to' chapters later in this manual; the following is just for general orientation to the UI and the typical workflow when using Shotcut. (On the other hand, as it does walk you step-by-step through a typical workflow, for some readers the present chapter might be all the orientation you need to get started on your own projects. Read it and see. At a minimum, this orientation should allow you to more easily pick and choose among the 'how-to' chapters that follow for whatever most interests you.)
Open File
This control opens a standard dialogue allowing you to browse to and choose a file to open. What happens next depends on what kind of file you open. As with most media editors, Shotcut will save a Project in progress in its own proprietary Project format, in this case a .mlt file (which will show up in your file explorer with the Shotcut icon, once you've saved your first Shotcut project). When you open a Shotcut Project file of this kind, the Shotcut UI will appear just as you last left it for that project, with all imported media assets and all relevant panels showing -- at a minimum probably the Playlist, the Timeline where you've been manipulating the project elements, and the main Source window.
If you choose instead to open a standard video file, such as .mov or .wmv or mp4, this file will appear and begin playing in the main Source window. Below I've just opened an old, low-resolution .wmv file featuring my cat outside the livingroom window (did I not promise cats?). This file has automatically loaded in the Source window and begun playing:
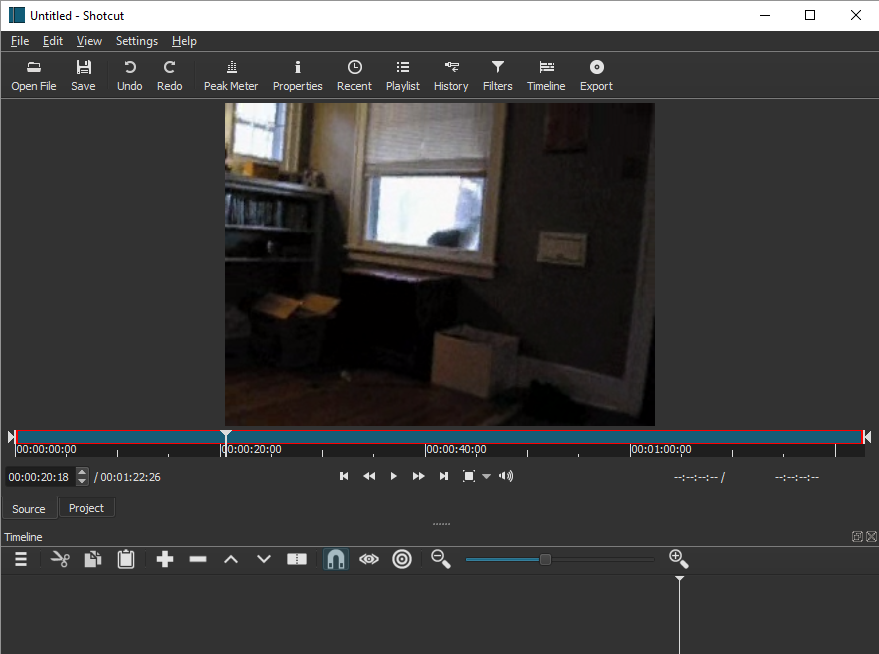
Notice that the Timeline panel at the bottom is now open, too, and displaying its controls (we'll get to them later), but is not yet populated with anything. We are not yet ready to do any editing with this video; at this stage Shotcut is just playing it for us to evaluate as a potential 'source'. To edit it, we would need to add it to the Playlist, and from there add it to the Timeline. More on that workflow below.
A final note here: when you select a video file to open, Shotcut determines whether that file is in a sufficiently optimal format for editing, and if not, it will open a dialogue offering to convert it to a more useable format. My old .wmv cat video above was already sufficiently edit-friendly. Below, I've just chosen to open a fairly lengthy mp4 screen-capture video, and Shotcut opens it in the Source window but also, in front of that, shows a dialog offerering to make this material more edit-friendly:
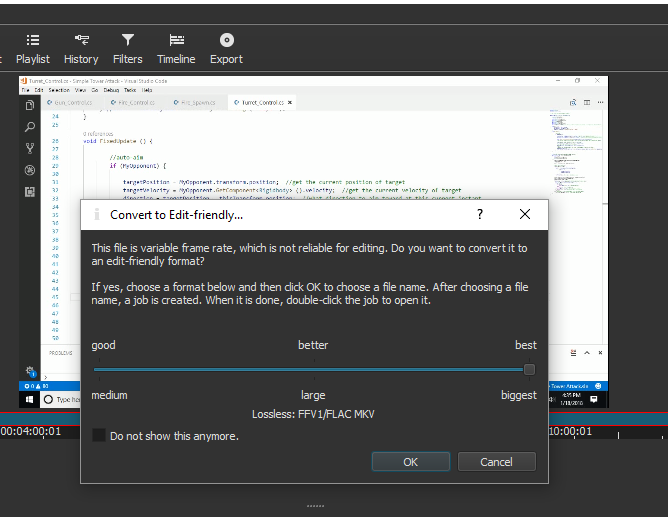
As you will often find in Shotcut, this dialog offers a lot of information that you may understand if you are highly conversant in multimedia formats, but you don't need to understand at this point: by default, the software has chosen a format that will allow high-resolution, detailed editing: a particular kind of .mov file. As it states, hitting ok here will prompt you to give that file a name and saving location, then it will send this conversion to a 'Job', at the same time opening the Jobs panel so you can see the progess of the conversion (which can be seconds or minutes, depending on the length of the original file). Windows Movie Maker actually does the same thing, for file formats its decides are not edit-friendly enough, but offers you no such options as Shotcut does here. When the job has finished, you double click to open it instead in the main Source window. Note that this conversion process will never overwrite your original file, even if you gave it the same name and location, since the format will be different.
Save
As with many editing and authoring tools, to Save in Shotcut is not the same thing as to Export (which will be at the far right of the Toolbar, and the end of this overview below). Saving here means saving your currently-open Shotcut project, in its entirety, with whatever assets are currently included and whatever panels are open. You will be prompted for a location and project name. The resulting .mlt file can only be opened in Shotcut again, not in other software. Any sort of complex editing project is probably not going to be completed in a single session, so this is a very useful feature. But even if you think you are finished with your edited video, we would always recommend saving (or re-saving) the project itself so that you can come back and make further changes if necessary.
Undo
As with most editors, Undo simply undoes the last thing (or things) you have done, other than opening, closing or exporting a file itself. Bear in mind that you can only 'do things' -- make edits, apply filters or alter properties--with files (or "clips", as we'll see later) that have been added to the Playlist, or from there to the Timeline. But within that scope, you can 'undo' a potentially infinite series of changes you've made, within the current session.
Redo
Again, the standard editor control that lets you redo an action you've just undone, either by accident or after some reconsideration. And again, in Shotcut there is a potentially infinite stack of actions you can undo and then redo, within a given session.
Peak Meter
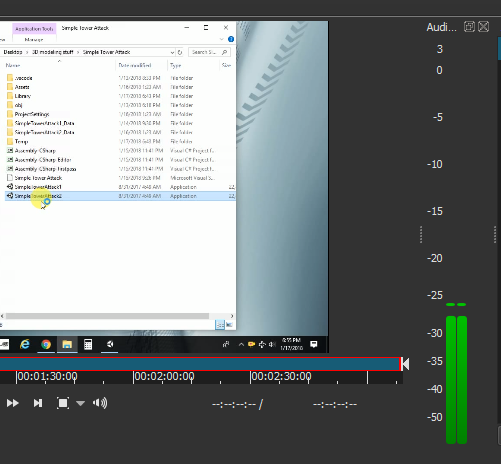
This button opens the Peak Meter (see the vertical green bars and decibel markers on the right side of screenshot below), which indicates the current signal (volume) levels of whatever audio is playing, whether in the main Source panel (as in this screenshot) or the selected track or tracks in the Timeline. This is a separate panel, and like all Shotcut panels it can be closed (with the little X button in the upper right), or dragged to be a free-standing window, or redocked elsewhere in the UI. While Shotcut is not a full-featured audio editor on the level of Audacity, it does allow volume alteration, as well as multiple audio track mixing, fade-in/out, and the application of reverb and some other effects. One can even record a voiceover narration directly through Shotcut, although the method for this is a bit convoluted at present. It is therefore extremely useful to have a peak meter, with L and R stereo channels, to monitor the audio signal intensity of the material you're working on.
Properties
This Toolbar button opens the Properties panel, which allows for the inspection, and in some cases the alteration, of a wide range of properties pertaining to the selected asset. For this panel to be populated, of course, you need to have some asset selected: either as an item in the Playlist, as a track in the Timeline, or, as in the case below, as a file that has been opened in the main Source window but not yet added to the Timeline. Here I am displaying the Properties for an mp4 video tutorial segment called "Bullet_Nav.mp4" which I've just opened and am simply displaying in the Source window. I'm showing a bit of the Source window here as well as the whole Properties panel; you can tell where the panel ends by the Close control and the scrollbar:
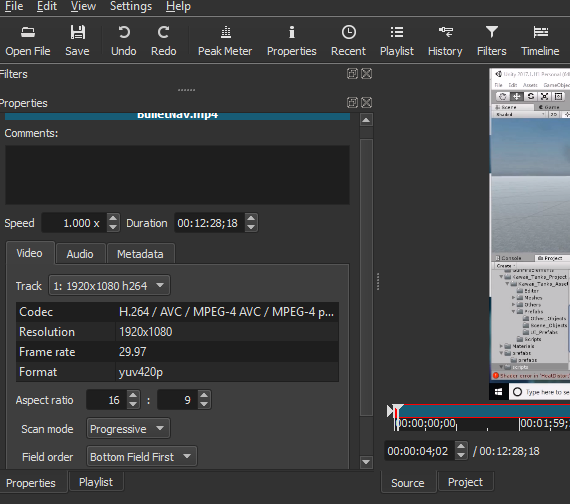
As you can see here, the Properties panel displays both basic and more in-depth information about this video file: the duration, Codec used for encoding, screen resolution, frame rate, aspect ratio and more (including some Track information because I previously edited this file as a track in Shotcut). Note that here I am only displaying the 'Video' tab of the Properties panel; if I switch to the 'Audio' tab I will get information on that file's audio track (if it has one): audio codec, number of channels, sample rate, etc. It's important to stress that, at this point, all of this information is read-only, because I have not yet added this file from the Source to the Playlist, a prerequisite for editing any file or asset in Shotcut. Once I do so, a number of these property fields become editable. Some changes you might want to make here, using this panel's controls, will be explored in the "How to" chapters that follow.
Recent
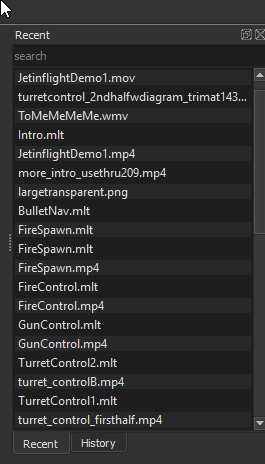
This toolbar button opens the Recent Panel, which is simply a clickable list of all the files (standard format files as well as Shotcut project files) you have recently opened and edited in Shotcut. My current list (below) has 45 items in total---note the scrollbar--and probably represents all files I have manipulated in this version of Shotcut to date. This panel corresponds to the Open > Recent... feature found in many File menus:
Playlist
One of the most important panels in Shotcut, along with the Timeline, Playlist is essentially the clickable list of all assets that have been added to the project for manipulation, with this manipulation happening largely on the Timeline panel though also through changing some Properties (see above) and finally, through adding Filters (see below) directly to Playlist items. Let's consider this annotated screenshot of a Playlist panel:

There are four items in this Playlist, with the first one selected (and thus highlighted in blue). That item is the mp4 file we saw above, now added to the Playlist by way of the "+" button on the lower right, which adds any item displayed in Source to the Playlist. The fourth item in the playlist is an additional, newly-added mp4 file, named "FireSpawn". The two middle items, as annotated, are "Clips" I have taken from the first mp4: they are specific segments of that video, which I defined by dragging the left start-point (visible here, lower right) and the right end-point (you can see both start and end drag-points in the first video I opened above) to indicate exactly when I want a clip to begin and end. If I were to double-click the first of these clips, I would see the following:
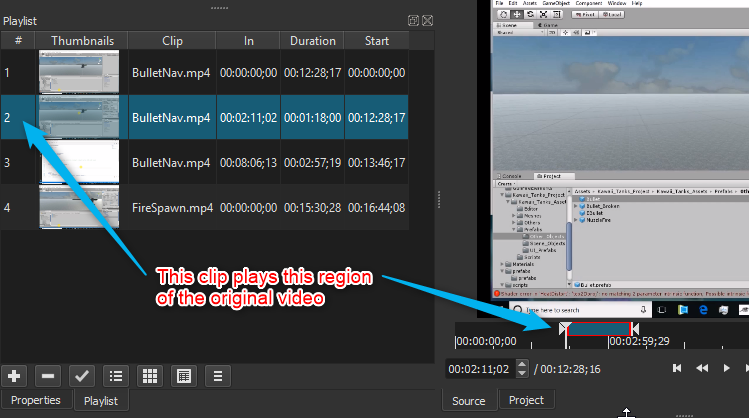
As indicated, this first clip represents only a brief segment or region of the overall BulletNav.mp4 video: the Source now shows me exactly what segment I chose for the clip, and I am able to change the start and end points at this stage as well (or at any later point, as long as that clip has not been deleted from the Playlist).
Here we can see a major reason why video files opened in Shotcut are played in the Source window but not automatically added to the Playlist, as one might expect: the assumption is that many video files opened here will be 'raw' footage, which we will want to review and then decide exactly what, if any, of that footage we actually want to import, maniplate and ultimately save as some new file. We might want to use most of the raw video but not the first and/or final seconds; we might just want to use one or more short segments and discard the rest (though the original 'raw' file will still be preserved, unless you try very hard to overwrite it). Once we move a clip to the Timeline, we can make further, more fine-grained choices about what we want to leave in and edit out in that work-space, but defining one or more Clips from the Source is our first opportunity to do this, and again can save a lot of CPU by not forcing Shotcut to load an entire raw video file into fine-resolution editing memory. Working with Clips will be the subject of a later 'How-To' Chapter.
Note finally in both of the last screenshots that beneath the Playlist panel we can see both 'Properties' and 'Playlist' tabs: these now allow us to toggle back and forth between those two panels in the same UI location. Wherever possible, Shotcut tries to maximize efficient use of screen space in this manner, while still preserving easy access to panels we've opened.
History
We noted above with Undo/Redo that Shotcut allows you to undo (and redo) a potentially endless stack of actions within the current session. The History Panel gives you direct access to that stack. In the current session I have simply added certain items to the Playlist, but any Filters added to a Playlist item, or edits made in a track in timeline, would be listed here as well.
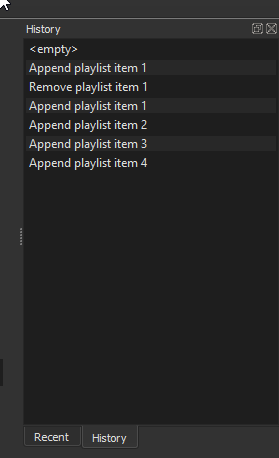
Note, again, that in opening this History panel, Shotcut has preserved the earlier "Recent" panel (which I did not close) in the same location, so again we can toggle back and forth between them with the tabs at the bottom.
Filters
The Filters Panel is another important control area in Shotcut, but one with a complex enough workflow that we will not try to address it comprehensively in this overview. Essentially, Filters represent a very wide collection of effects that we can apply to items we've selected in the Playlist (or that we've selected on the Timeline, as these are automatically part of the Playlist too). Just to give you some sense, here is a list of 'favorite' filters (as defined by the Shotcut user community) that we might apply to the current item selected from the Playlist:
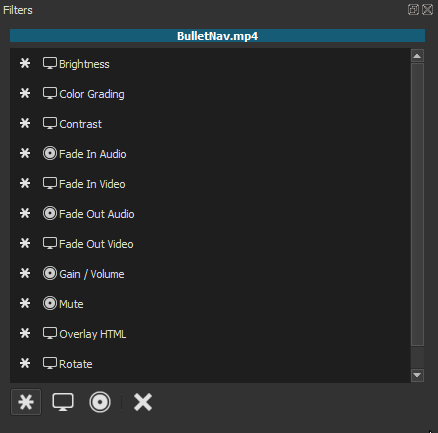
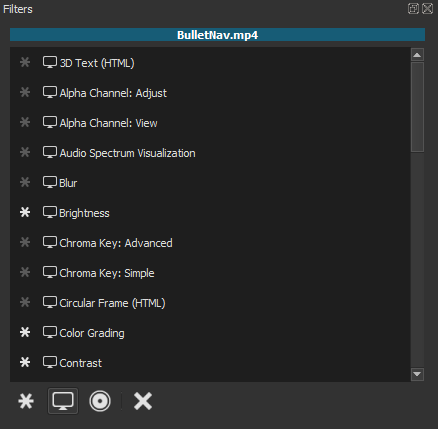
As we can see, this list includes effects relating to enhancement of the video qualities (brightness, contrast, etc), modification of the audio volume, etc, fading in and out of both video and audio segments, along with one example of an extremely useful set of filters: text and html overlays, which you can use to add overlay text captions, static images and even inset videos to your video segment. Among these latter, text overlays are probably the most useful for introductory video-making purposes, and we will cover these in a how-to chapter. The 'favorites' list of filters is opened by default, or by the "*" button at the bottom of the panel here; the next button to its left opens a much longer list of filters for video ( or "screen") effects, and the third one over a list of audio effects. Here are screenshots showing just partial listings of each. First are some visual filters--just through the C's in an alphabetical list:
Now some audio filters:
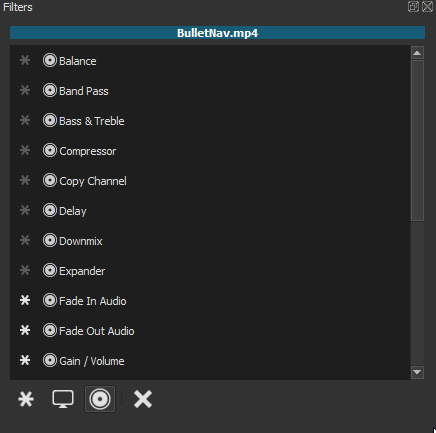
As you can see, the list of available filters is considerable, and Shotcut being open-source software, this list is constantly growing, and greatly expandable though add-ins. Clicking on any of the filters in these lists will (1) apply it to the selected item (indicated in blue at the top of the panel), and (2) open a dialog with controls specific to that type of filter. One can always chose subsequently to edit or delete this filter from the item. The only real constraint imposed by this way of applying effects to video/audio tracks is that the filter must be applied to an entire segment or clip, rather than coming in and out at arbitary points on a continuous track. But as we'll see, the way around this is simply to define separate segments where appropriate, through 'cuts' made in the Timeline video or audio track or through 'Clips', defined from the source file. The general topic of Filters is vast, but hopefully this is at least enough to prompt you to explore the relevant How-To chapters.
Timeline
Arguably the single most important panel in the Shotcut UI, and where you will likely spend the most working time, the Timeline panel is placed near the end of the Toolbar button sequence because that is its logical place in the workflow of editing or crafting a video. As we've seen, a video file must first be opened as a (potential) Source, then added to the Playlist--which might more appropriately be considered the "library" for this project, rather than a 'playlist' in the usual sense, because it is not meant to imply a linear sequencing of its elements. Linear sequencing, as well as synchronization and mixing of different tracks, is instead the job of the Timeline. When opened, the Timeline panel displays its own array of button controls:

Taken from left to right, these button controls represent the following actions:
| Menu -- Displays a menu of additional actions, including adding video and audio tracks and adjusting their visual presentation. In the Shotcut Timeline, video tracks can contain audio as well, and will display the audio wave-form, but audio tracks can only contain audio wave-forms. | |
| |
Cut -- cuts the currently-selected video or audio track (or track segment) and 'ripple-deletes' it, meaning that any additional track segment to the right of the cut segment shifts to the left, leaving no gap in the timeline, while the cut segment itself is copied to the clipboard |
| |
Copy -- copies the currently-selected track or track segment to the clipboard, but without deleting it from its current position (analogous to the difference between Cut and Copy in word processors) |
| |
Paste -- inserts the copied material on the clipboard at the point of the cursor, here also called the "playhead", in the currently-selected track (if there is more than one track present), and shifts any following track segments to the right. Copied audio and video material can be pasted either at another point in the track it was cut/copied from, or into a different track at any location where the second track is empty. |
| |
Append -- Appends the currently-selected Playlist item, or copied track segment, to the end of the current track, if there is already existing content in that track. Also how you insert Playlist items into the Timeline (if no track currently exists, this function will create one and insert the Playlist clip starting at point 0). |
| |
Ripple-delete -- Deletes the currently-selected track or track segment without copying it to the clipboard, and shifts any further segment(s) of this track to the left |
| |
Lift --- cuts (ie, removes and copies to clipboard) the currently-selected track segment without shifting the position of any other segments in this track. Unlike cut or ripple-delete, this operation leaves a gap in the current track, but keeps it synchronized with any other tracks in the project. |
| |
Overwrite -- pastes the copied material at the point of the cursor in the currently-selected track, overwriting any material that is currently in that location and, like Lift, preserving the overall position of the track in relation to other tracks. |
| |
Split at Playhead -- creates a single cut or split at the current point of the cursor (which will also be the Playhead location). The first split divides a track into two segments; additional splits create additional segments. These segments can then be cut, copied, pasted, etc as described above, and as they now have separate properties, can also have filters applied to them. |
| |
Toggle Snapping -- turns 'snapping' on/off. Snapping automatically creates a tight join between two track segments you are manualy sliding together, rather than potentially leaving a small gap in the track, or overlapping the two segments which creates a cross-fade or dissolve in the video or audio content. |
| |
Scrub while dragging -- allows you to drag the play-head across audio & video content in a track and hear/see that content precisely where you are dragging. The playhead will play at normal speed when you hit the play control in the Source view, or hit the spacebar once, but scrubbing allows for more precise selection of points to edit in the video and/or audio. You can also 'step' the playhead forward and backward, in small increments, using the arrow keys on your keyboard. |
| |
Ripple Trim and Drop -- No idea on this one :-) |
| |
Zoom Timeline Out -- horizontally zooms out the Timeline (with all of its tracks), allowing you to see more granular detail, particularly in the audio wave-form or during cross-fades or other visual effects. |
| |
Zoom Timeline In -- horizontally zooms the Timeline in, allowing you to see larger segments (or the entirety) of a long Timeline; this is especially useful if you have a complex edit structure with multiple tracks, segments and filters. The slider between these two button provides analog control for zooming in and out. |
As should already be clear, the range of possibilities for manipulating material in the Timeline is very wide, and cannot be more than suggested in this overview. Below is a partial view of an example Timeline (the first 20 seconds or so) containing two video tracks, with a few operations performed:
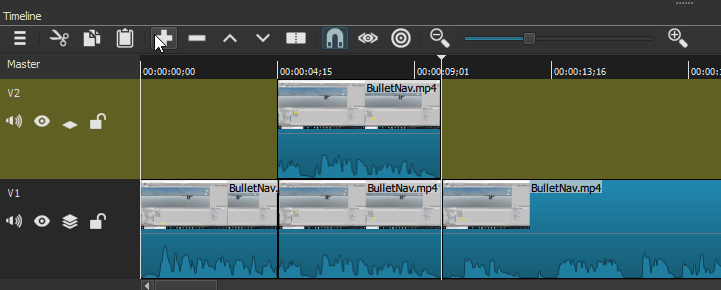
The bottom track labeled "V1" is a video track that was automatically created when I selected my "BulletNav.mp4" item in the Playlist and hit the Append button (+, which might simply be considered "Add to Timeline" for this purpose). The V1 track includes both the video content of the mp4 clip and also the audio, visible here in its wave-form. V2 is a separate video track I created manually via the drop-down menu ("Add Video Track"). I have used Split at Playhead to create two cuts in the first (V1) track, as shown, used my mouse to select the resulting segment between these cuts, Copied that segment, and Pasted it directly above, in the second video track. This track is brighter to indicate that it is the currently-selected track (otherwise I couldn't have pasted into it). Since these two parallel segments are exactly synchronized, if played at this point the resulting audio-video output would be exactly the same as if I were simply playing the original V1 track. This would still be true if I were now to Lift the original segment in V1, leaving a gap there, since Shotcut automatically composites or mixes the two tracks together on playback (as long as both tracks are made visible, with the little eye control button at the left of each track).
As noted previously, an important application of an operation like this would be to apply one or more Filters to the newly-separate V2 track segment, for instance if I wanted to add a text overlay to it, in which case I would probably also want to Fade-In and Fade-Out the upper segment with the text filter applied. But I could alternately have pasted a clip from an entirely different video into the gap in V1, or into the track above it, if I wanted to intercut between those two video contents (in which case I'd probably want to arrange a brief dissolve or cross-fade transition between them, at both transition points). I could even paste in a still-image asset, such as a JPEG file, and stretch it appropriately to the required duration. These and similar operations will be detailed in the How-To chapters that follow.
Export
Export is the final control button on the main Toolbar, and the final logical step in the Shotcut workflow. As we have seen, Save will simply save the entire project, in its current state, in the proprietary Shotcut Project File format. If we want (as we certainly will) to render our edited creation in a general-purpose video format playable on other devices, we will need to Export at this point. The Export button opens a panel that allows us to choose among a very wide variety of video file formats, and then to further specify a range of properties or options within that format. Once we've made these choices--or simply accepted Shotcut's defaults--we can then choose a saving location and file name, and the file will then be rendered (a process which can again take seconds or minutes, depending on the length and complexity of the project, and which will be assigned as a job in the Jobs Panel). Since this procedure can involve a great number of options and possibilities, we will defer any more detailed discussion to the chapter devoted to Exporting a File.