Introduction to Video Editing With ShotCut
Audio and Video (III): Recording a voice-over narration
We've now explored both how to clean up a pre-recorded voice narration, when this has been captured along with your original video, and also how to choose, add and mix in a 'found' audio track intended to establish mood, most typically a music track. Of course, if you were a musician you could record your own musical sound-track (doubtless with more specialized sound-recording equipment and software), in which case it would presumably be tailored more closely than 'found' music to the needs of your own video footage; but the resulting audio file would still need to be imported into Shotcut and probably mixed a bit for compatibility with other audio within the project, before the whole thing was exported as a finished video file. There is, however, one major audio scenario we have yet to explore: using Shotcut to record a voice-over narration for a pre-existing video, which you've either recorded yourself or perhaps even found elsewhere. And because of the kinds of video that this would make sense for, it's entirely conceivable that you might also add a musical background track in this case too--albeit one mixed in judiciously with your voice-over, so the two enhanced rather than interfered with each other.
As we noted a few chapters ago, a voice-over narration added in-after-the fact (ie, not recording with the video) is typically a very different animal from voice narration/commentary/reaction captured during the video recording itself. After-the-fact narration is generally much more polished, considered, rehearsed to a certain extent (at least mentally, if not literally) and sometimes even scripted out in advance. In many cases, we are simply choosing one or the other kinds of narration depending on what we want to achieve or emphasize in the video; and of course in some cases the two (after-the-fact and 'on-camera' or diegetic commentary) can be found mixed together in the same video: perhaps at a political demonstration, performance or other public event where on-camera reactions, interviews and comments are intermixed with the videographer's after-the-fact informational commentary or narration. For cases like that, the present chapter simply supplies the last missing piece for such an audio mix. Indeed, whatever kinds of audio you are mixing together for your video, we still need to look specifically at how you can use Shotcut to shift emphasis back and forth from one audio track to another, depending on the needs of the moment.
It has to be noted, though, that there are certain kinds of video where after-the-fact narration works extremely well--much better, at least for informational purposes, than in-the-moment narration--and other kinds where it is simply not practical at all. In earlier chapters we've looked in some detail at video demonstrations, and seen that there can be quite complex and tedious work involved in 'cleaning up' the captured narration, with all of its pauses, filler-words, back-tracking, side-tracking, random external noises, etc (unless we choose, as many YouTubers do, to simply leave all that in). So why not simply forgo all that (or mute it), and replace it with a nice, fluent, after-the-fact narration? The answer is that this is nearly impossible to pull off. This is probably easiest to grasp in the case of a demonstration involving a musical instrument: how exactly would you mix together the audio of your in-the-moment playing (even if you weren't 'talking though' your fingers' placement and motions at the same time), with the audio of an-after-the fact commentary? This is why, when people absolutely have to correct or enhance the informational flow of their music demos, they do it with floating text captions, not with over-dubbed commentary. But this difficulty actually applies much more broadly to video demos of almost any kind, at least where you (the videographer) are the one performing the action being demonstrated. It is simply much easier to 'talk through,' to narrate, actions that you yourself are performing, in the moment, than it is to come back after the fact and try to narrate those same actions in perfect sync with what the viewer sees on the screen--even if that's just a cursor moving over a computer screen, typing out code or fiddling the controls in a UI. If you are making your own video demos, of anything, you simply have to be as focused and deliberate as you can be, while you talk through what you are trying to demonstrate and/or explain. And/or do what you can to clean up the verbal flow in post-recording editing. Or else simply not worry about it. In any case, if you are exclusively a video demonstrator of this kind, then the present chapter is not for you, any more than the previous chapter on adding mood music.
But there are other kinds of video scenarios where focused, deliberate, flawless in-the-moment narration is itself difficult or impossible, and these are precisely the ones where after-the-fact voiceover narration is most useful. If we are video-recording the actions of other people or things (animals, moving objects, violent weather, etc), unless we are in some way capable of directing those actions, then pretty much by definition we are witnessing something unpredictable, and we can almost never comment on it with the kind of fluency that comes from rehearsal and review of the material before we speak. If you can do this, you are probably a professional sports commentator and are not reading this guide. For the rest of us, there is after-the-fact voiceover narration--which in theory could be recorded using any recording device, simply while watching the video footage in question; but is generally far easier when it can be recorded using your video editor itself.
As it happens, Shotcut's method for recording after-the-fact narration for existing video is not the most intuitive you may encounter. There is no button or control on the main toolbar labeled 'Record'; no Record panel; or even a 'Record...' option named as such in any of the menu dropdowns. You need to follow a series of steps which you would very likely never stumble on by accident. Nevertheless, if you follow these steps, as we'll outline them below, you can produce a high-quality voice recording from your computer's built-in or external mic, as you would wih any other recording software. This audio clip can then be positioned, edited and mixed at will with other elements of the video project.
We'll want to begin with some kind of video clip to comment on, and for this exercise I've chosen a 1:20 long iPhone clip of my girlfriend's cat playing. This video offers good material for the exercise because it's long enough for the cat (a 7-month female kitten named Strummer) to do a range of different activities meriting commentary: she follows her videographer/owner around the room, eats some food, plays with her new bird-mouse toy, and fights briefly with her sister. In the following screenshot we see her playing with the bird-mouse, around a minute into the video:
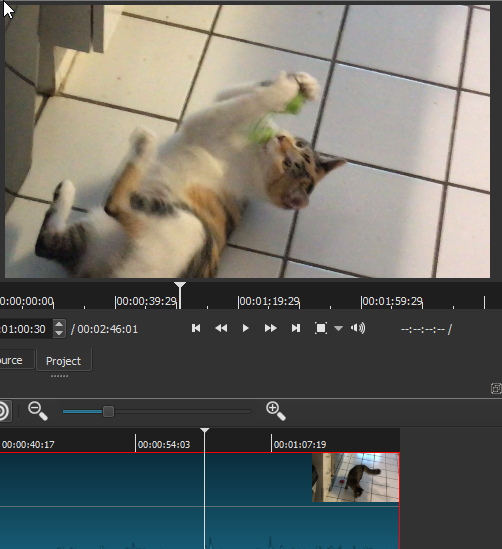
At the very bottom of the video clip, which is already loaded into the Timeline of a new project, we can just see a few audio wave-form spikes: there is very little 'diagetic' audio captured with this video, mostly just some brief vocalizations by Strummer (perhaps her own commentary on her activities). In short, we will have plenty to comment on and little exisiting audio to contend with. The first thing I will do, then, is use my rewind control to move the Playhead back to the start of the track. Now we're ready to begin the audio capture process itself. The first thing we'll do is go the File menu at the top of the UI, and from this dropdown choose "Open Other...":
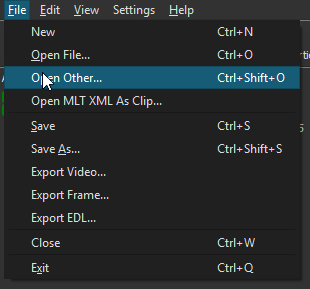
Many of the options in this File dropdown are either familiar already from previous chapters -- Open File, Save, Save As..., Export Video, Close, Exit -- or can probably be guessed: 'Export Frame' will export a single frame of a video as a static image; 'Export EDL' means export a 'Edit Decision List' file, which is a video-editing file something like a Shotcut project file but shared across a number of different editors, including Adobe Premiere, Avid Composer and Apple Final Cut Pro. But what is 'Open Other...'? When we select it, we get a dialog with what seem at first like a number of quite miscellaneous options:
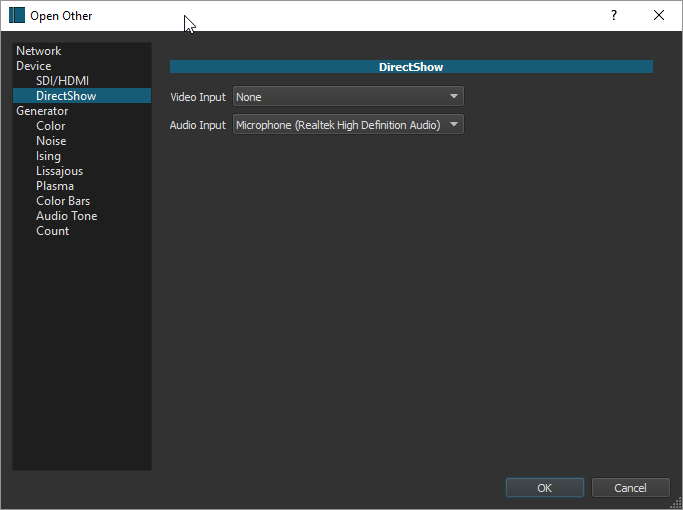
In terms of the left-hand options, 'Network' appears to allow capture of video from a remote URL, though I haven't experimented with it. The list of 'Generators' refers to an array of what seem related to audio or video filters, except that rather than transforming an existing segment of audio or video track, they create new audio or video segments with various properties. These too will be left to the reader to explore. We are interested in the 'Devices' section, and specifically (on a Windows machine like mine) in 'DirectShow', which is the current built-in Windows multimedia framework and API. SDI/HDMI refer to input protocols for external devices. All of these disparate options, then, turn out to be types of Input, or ways of generating new content. By choosing DirectShow, I'm telling Shotcut that I want to use something on my own computer as an input device. In the main region of this dialog there now appear dropdown selectors for both Audio and Video recording input. I am not interested in recording new video here, so I leave that selector with its default of "None"; but I am interested in recording audio, so I change that selector to the only other option available in my case, my built-in RealTek mic and the associated sound card (if I had an external mic installed, that option would presumably show up as well). Having asked Shotcut to accept audio input from my Mic, I can now hit "OK".
When I do so, I am presented with a blank white video screen (since I've chosen no video input), but you can see from the Peak Meter that Shotcut is now monitoring my audio input (I'm speaking aloud here in the shot):
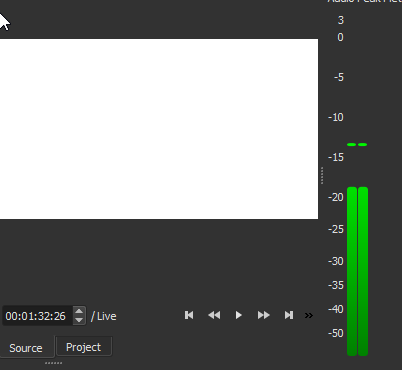
But while Shotcut is now monitoring my input mic, it isn't yet capturing any sound. To do that, I must open the Export panel, which shows the following when I flip from the default Video tab to the Audio tab:
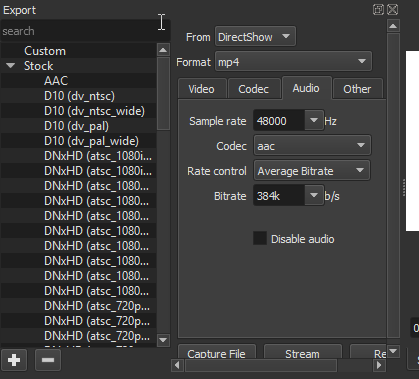
We've seen this Export panel before, but now some particulars are different: most notably, two--in the 'From' dropdown at the top, DirectShow is specified here as the source, rather than a track or playlist item as in a more typical Export; and at the bottom we can (just) see a "Capture File" button rather than the "Export" button we would normally expect. If I now hit this Capture File button, it will open a standard file browser allowing me to name the audio file I'd like to capture and specify a saving location. Before I do this, though, there's one more crucial step: in the 'Format' dropdown, it has defaulted to mp4--because I've been exporting finished video projects as mp4 files--but in this case we want a more suitabe audio file format. From either that dropdown itself (which will give me a very long alphabetized list of formats), or from the search box in the upper right region, I can choose .WAV, which is still probaby the most desirable format for raw audio (although mp3 would work fine as well). Having specified .wav for my format, now I hit "Capture File", and get the expected file-saving dialogue:
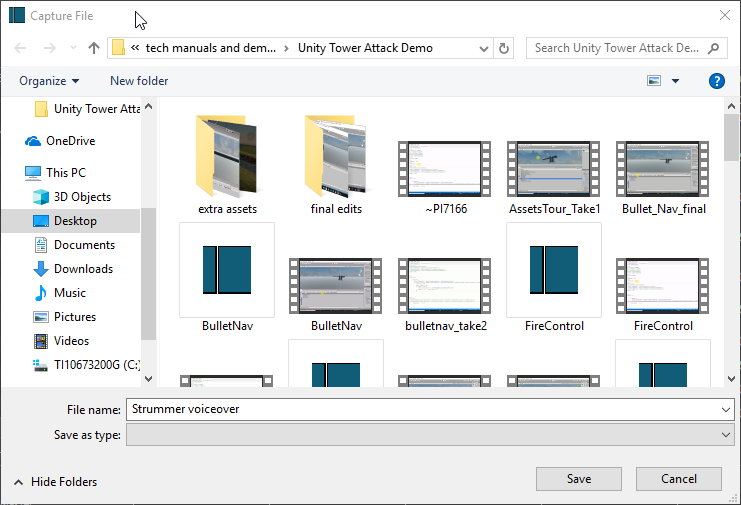
I will call this new audio file "Strummer voiceover"; and while it's unrelated to most other files there, I'll keep the default location which is the folder where I saved my Unity3D demo assets (I have been saving my project files for the present manual in this location too). As usual, it really makes no difference where you save your ouput, as long as you can remember it afterwards! Now, here is a really critical and perhaps non-intuitive point: as soon as I hit "Save" from this dialog screen, I have actually started the capture process for my 'Strummer voiceover' audio file; in other words, from this moment on, that file will be a recording of everything I speak into the Mic, until the point where I hit the button in the Export panel which previously read "Capture File", but will now read "End Capture." So as soon as I've hit Save here, I'll want to flip back to my Project view in Shotcut, start up the Strummer video, and commence my narration of what I'm seeing on the screen. Even with some practice there will doubtless be a few seconds before I'm ready to start narrating, but we can always trim that out of the captured audio afterwards.
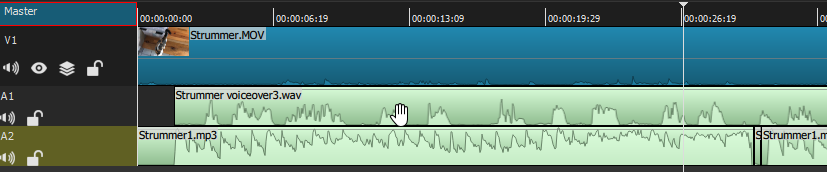
Once we've hit "End Capture", the resulting .wav file will either be queued as a Job, if its long enough, or (as in the present case) will be more or less immediately processed and will then begin playing in the Source window. That window will still show a blank white (this is only an audio file, not a video), but we should be able to hear a playback of the audio track we've just recorded. The audio file will also now exist, physically, at the location and with the name we've specified above. As with any other asset, though, to make any actual use of it within the project, we'll need to add the audio clip to the Playlist and from there to the Timeline--and, just as we did with 'found' audio in the last chapter, again we'll need to first create a new audio track and then Append this audio clip to that track. Here is the resulting Timeline, with my original Strummer .mov video in the V1 track, and my newly-recorded "Strummer voiceover" in the A1 audio track:
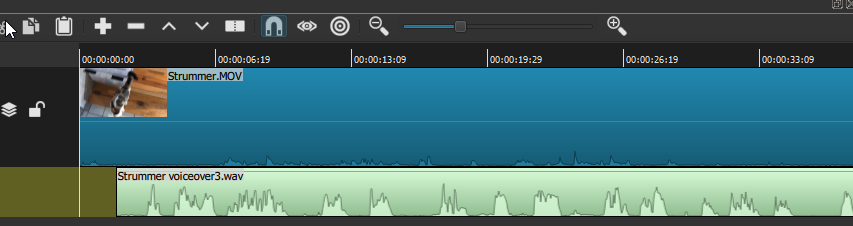
As you can see, the audio file is actually named "Strummer voiceover3.wav" -- even for this exercise it took me three tries to get something satisfactory, each time requiring a new wav file name (I could have simply over-written the same file, but it's generally wise to save separate takes, since you never know if 'voiceover2' will turn out to be better than 'voiceover3' after all). In any case, in the recorded audio track we can see that the wave-form is much more prominent and distinctive than it is in the original video clip: this is a human voice rendering commentary on the video action, recorded at a healthy -20 dB or so, just as the Peak Meter registered above. We can also see that I have already scooted the audio clip a bit to the left of the video's zero point. In fact (as predicted above), the audio actually began some seconds earlier, before I had the video running at all; so after assessing that, I have clipped that first portion out; and while I was at it I clipped a bit more until I had some commentary on the actual action at the start of Strummer's video. As it is now positioned, the audio track is in sync real-time with the actions on the screen, and plays more or less to the end. Strummer's video clip, originally recorded in near-silence, is now enhanced (or we'll pretend its an enhancement, at least) by my faux-BBC nature- documentary-style voiceover commentary on Strummer's actions throughout the short film.
Is this project ready to be re-exported, then, as a finished mp4 video? Here I will set aside questions of length: a proper Strummer documentary would probably want to run a good 10 minutes, and thus would need to contain several such clips, sutured together with transitions (and, in fairness, should probably also be intercut with some footage of Strummer's sister Freyja). But we've already seen how we'd do this, from a technical standpoint. More interesting for the present exercise will be the addition of a supplementary musical soundtrack, which most classic nature documentaries also feature.
To find a good musical track for this video, I went through much the same process we saw in the previous chapter, except that this time I searched for 'jaunty' instrumental music as more fitting for the visual material here. At one music site I found more than a hundred jaunty and/or cheeky orchestrated pieces, and really the challenge was narrowing down to a single one that seemed to best fit. The catch was that this site wanted to charge for a download, even for non-commercial purposes; I politely declined their offer, however, and simply recorded the audition stream using Audacity. This method would not be legal, or recommended, if I intended to put my end-product video to any remotely commercial use, but I don't. So 'strummer1' it is. As we did in the last chapter, I'll Open that audio mp3 file (which will immediately begin playing in my Source), then add it to the Playlist, and from there to the Timeline. Remember that in order to do this, I'll first need to create a new, second audio track, then make sure this A2 track is selected before I use the 'Append' Timeline control to add in the clip:
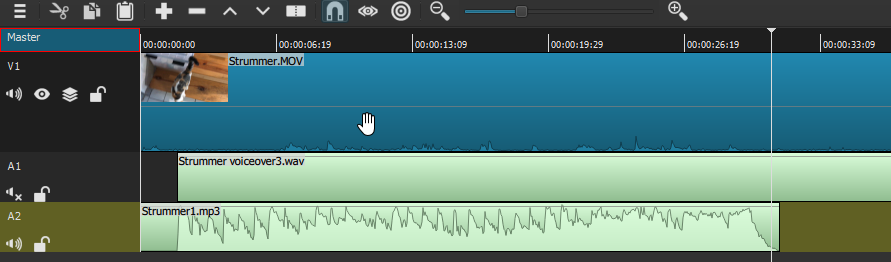
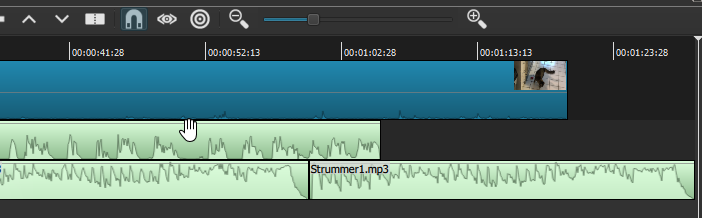
You'll notice two things immediately here: one is that the music clip is quite a bit shorter than the V1 video clip--as a unit, the music theme was only about 30 seconds long. But that is typically not a problem with instrumental music: we can just append one or more additional copies to the end of the first one, to get the required length; the repetition will not typically be noticed. You'll also see that I've muted, for now, my A1 voiceover track, just so I could see/hear the music track by itself with the Strummer movie. It's really a perfect match, except for the length, which I'll correct next. With the A2 audio track still selected, and the Strummer1.mp3 clip selected in the Playlist, I hit "Append" twice more, and this gets me to a music-track length just over the total length of the video (I also trim out the gaps at the beginning of my second and third copies, before the actual wave-form begins again, though I can leave it in for the first iteration). In fact, just as we saw in the last chapter, it happens that in this case too the 3rd iteration of the music track ends about 5 seconds after the end of the video. It could trim that away, OR I could once again leverage that happy chance to add a 5-second end-credit sequence to the end of the video, just as we did before.
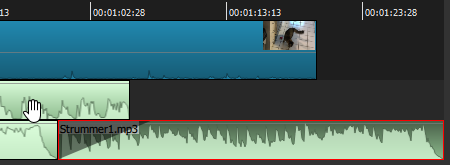
But for now we have a different issue: look what happens when I un-mute my (A1) voice-over commentary track, which once again makes that wave-form visible:
Even before playing the project, we can already see the problem just by looking at the relative size of the wave-forms, which correspond well to the recorded volume of the audio: the music track is much louder than my voiceover, except at a bare few points where they are roughly the same volume. That isn't going to work. In the last chapter, when we mixed together the musical soundtrack with the natural (diegetic) sound of the Iceland waterfalls, it was completely appropriate for the music to be foregrounded. But now it is not; the jaunty orchestral music entirely drowns out my BBC commentary, which is important to the actual informational load of the video. We need a different 'mix' of the two audio tracks.
To start with, we'll simply apply a Volume/gain filter to the A2 musical audio, and try turning down the gain to about half (as we did with the natural waterfall sound in the last chapter--please refer to that for visual details). Actually, you'll note that in the A2 track we're actually dealing now with three separate segments (three copies of the original music clip), so I must apply the same gain filter three times. I could get around this by Exporting the A2 track by itself (the easiest way to do this, without disrupting the overall project, would be simply muting A1, and hiding and muting V1), and then re-importing it as a single whole track; but instead I use the opportunity to experiment with slightly different gain settings for the three segments. A setting of slightly less than half the original volume for A2 seems just about perfect, with the jaunty background music adding nicely to the tone but nowhere overwhelming my plummy faux-BBC voice.
Now, we observed early in this chapter that audio 'mixing' often involves not merely adjusting the gain along entire lengths of your different audio tracks, but also often adjusting the relative gain of different tracks at different moments. If my voiceover narration had been more sporadic than it was, leaving long enough moments of silence between comments, it would probably have made sense to 'swell up' the background music during these moments, using Fade In and Fade Out audio filters. As it stands, there are really no gaps in the flow of my narration long enough to do this--except in a way that would sound nonsensical; but there is an opportunity to show this operation at the end of the whole piece. Let's take a look:
As we can see, the voice narration in the A1 audio track actually ends a good 10 seconds before the video does--with the A2 music track extending for an additional 10 seconds or so, where I would contemplate putting in a closing title/end-credit segment (probably first with a freeze-frame of the final video shot, fading to black before the end text appeared -- all of which we know how to do now). But is there a reason why the music needs to stay so muted, after the voiceover ends? It might be more effective if it swelled up at the end, partly as a way to simply emphasize the ending. How might this be achieved? The final segment of A2 is already separate, so it can (and indeed must) be filtered separately. I will start by raising the gain of this segment back up close to where it was originally recorded. I will then add a Fade-in Audio filter, and set its duration for so long -- 7 seconds -- that the swelling music doesn't step on the end of my narration at all. The result now looks like this:
Again, I will ask you to imagine that an end-credit sequence has been applied to the end of the V1 video track, with its requisite segments and filters (there is no need to go through that exercise again), so that V1 now extends precisely as far as A2. We can see the lengthy audio fade-in applied at the beginning of the final music segment, tapering up so as not to interfere with the end of the A1 voiceover. I could apply a corresponding fade-out filter to the end of this segment, but there is absolutely no need: the music itself ends very organically, just where we wanted to.
It might appear that much in this exercise has relied on random good fortune, such as the chosen musical piece happening to be just the 'right' length. But of course it wasn't the right length: it was much too short to start with, then significantly too long when tripled -- I just happened to find a good use for the extra length, which would probably appear in the finished video as if it were totally designed, particularly as we've adjusted the music. If I really didn't want an end-credit segment in the video, I would probably have used a fade-out audio filter to end my music in a (relatively) graceful way; or else chosen a different musical piece with a different structure that ended slightly sooner. Or if I were really wedded to using the Strummer1 piece, I could adjust the length of the video itself--for example by making the rolling-over-with-toy bit a separate, slow-motion sequence, which would have the effect of lengthening the overall video by however many seconds (cats at play turn out to be almost as good candidates for slo-mo as star athletes do--at least when shot in the kind of high-quality video that iPhones produce these days). The point I'm making here, as I did at the end of the last chapter, is that in video editing of any complexity at all, you will be faced with a galaxy of potential choices, driven in part by a certain overall vision or effect you started out with, but driven as well by choices that open up along the way as you begin to assemble separate pieces, which in some cases you'll have created yourself, in other cases you'll have 'found'. But in either case, you'll never be able to imagine the different ways that your pieces can fit together until you try some actual editing. Save your work -- as project files and as exported video--at different stages, so that you can revisit any version if you want; and in between, just resolve in advance that you'll make as much use of the "Undo" and "Redo" buttons as you need to.