Introduction to Video Editing With ShotCut
Audio and Video (II): Adding and Mixing in Musical Tracks
At the beginning of the last chapter, we discussed some of the general reasons one might want to enhance or 'clean up' an audio track which was recorded along with the raw video, as well as add in and mix together supplementary audio, such as a musical soundtrack to help establish mood, or record an after-the-fact voiceover narration for all or parts of the video. We then looked in some detail at ways of cleaning up minor flaws in an existing voiceover track, which also necessitated an understanding of various options for muting parts (or even all) of the audio in a recorded video track. We finally saw how we could spit off the existing audio track from a video recording, so that it could be enhanced or edited separately (with the caution that one generally wanted to keep a pre-recorded audio track in sync with its corresponding video).
It's now time to start looking in detail at adding in supplementary audio to an existing video track. In the present chapter we will consider the case where we want to add in 'found' audio, for example a stretch of music that we think might make a good accompaniment for the on-screen action in all or part(s) of our video. In the next chapter we'll look at the task of recording our own after-the-fact voiceover narration for on-screen events, which happily can be done directly through Shotcut. Of course, for both of these cases we will need to know how to 'mix' together the various audio tracks we end up with, and the video, so that the right sounds are audible at the right moments on screen.
Adding background music (and some benefits of exporting your work in stages)
Nearly all of our concrete examples in the past several chapters have dealt with one particular video genre: the video demonstration or tutorial. This is one genre where adding background music would generally be a very bad idea, except perhaps for a brief swell of music during the introductory title segment, and/or concluding credits segment. At all points in between, background music would simply distract from your vocal narration, and even from the actions you're performing on the screen, when you want your viewers to be paying very close attention to both. This is true for software demos, as in our specific examples, but no less so for any other type of visual process demonstration (and doubly so for a musical demonstration: consider how confusing it would be to have a background soundtrack playing while you tried to demonstrate chord progressions on a guitar or piano). More generally, with any and all video genres you will need to consider whether adding background music (throughout or at given moments) will enhance the overall viewing experience, by helping to convey a certain mood, or will instead detract from the experience by clashing with other audio that is important to the substance of the video, or in some other way distract the viewer from what you are seeking to convey.
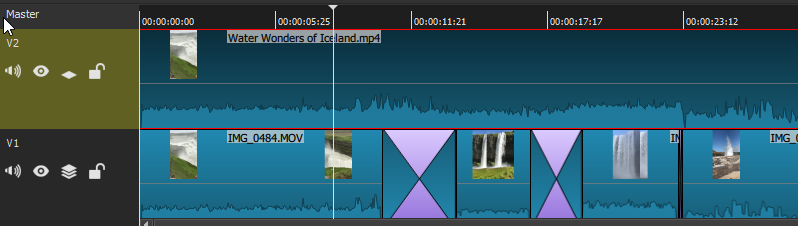
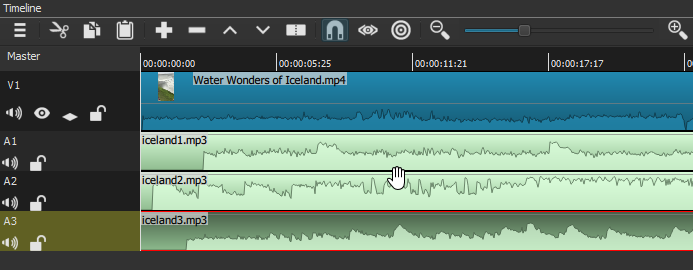
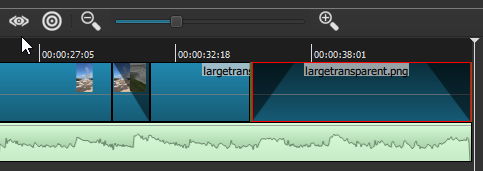
For this reason, some of the best candidates for background music are nature videos, where there is typically no 'diegetic' (that is, in-scene) human speech at all for the music to distract from; and where any recorded natural sounds can be muted entirely or quieted in volume so they mix nicely with the background music. Let's take as an example our own nature-video sequence, the "Water Wonders of Iceland" sequence which we crafted several chapters ago from a number of brief iPhone clips shot on vacation there. Here is the video track as we last left it:
![]()
As we may recall, this video sequence joins together brief clips of three different waterfalls and then a volcanic geyser; the two crossed areas indicate where we created dissolve transitions between the first & second and second & third clips; and we have also slowed the 2nd and 4th clips to half of normal speed, because a) they looked good in slo-mo, and b) this led to more balanced duration among the four clips. Now, as we can see visually from the wave-forms displayed here, each of these clips already has its own captured sound track (technically 'diagetic' or in-scene, and in fact captured at the same time as the video), which for the most part is simply the roaring sound of the water itself. The only exception is the fourth clip, where we can see much more variation in the wave-form: what we have there a combination of the geyser's own sound with the appreciative exclaimations of watching spectators who are not shown in the actual video. But while this last clip contains human vocalizations, we do not hear individual words but simply a collective, emotional response of awe and delight, which very nicely underscores the captured visual image itself. All of this audio has been captured at a pretty healthy volume as well, which we can already see from the height of the wave-forms themselves, but can verify more precisely if we open up the Peak Meter panel, and watch it as we play the video sequence:

Of course, if the raw captured audio happened to be quieter than this--and we wanted it to be more prominent in the final video product--we could always boost the volume (or gain) by adding a volume filter to one or more segments or clips. But as always with sound recording, having a nice healthy volume to start with means that you've captured the audio detail -- the texture, nuance and resolution -- very well; this would likely not be the case if your captured audio had half the volume indicated here, and you simply doubled it with a gain control.
All in all, then, we might conclude that this particular video sequence already 'speaks for itself', and is perfectly effective in conveying its intended impression without the need for any supplemental sound at all (at least musical accompaniment; we will consider a voice-over narration separately below). Nevertheless, with the ease of digital editing in tools like Shotcut, there is no reason not to experiment a bit, and see if maybe this sequence could be further enhanced with the right musical background. We would certainly not want to lose (that is, mute) the captured 'natural' soundtrack entirely, but we can experiment with mixing it in at various volume levels with an imported musical track.
The first thing we'd probably want to do, though, is to save the video segment as is--I had already saved it as a Shotcut project file, but I mean export it as a regular-format video such as mp4 or .mov. This accomplishes several things. First, we would then have the video in its current form, with all the sequence-editing we've done but still just the 'natural', raw sound-track, in case we later decide that any audio augmentation wasn't a good idea. Second and more immediately, exporting this video now will yield a single, un-segmented video, which will make it far easier to mix the audio for this entire track all at once, or define new segments if that is appropriate for applying audio filters. Shortly we will see what I mean by this. Here we will hit the "Export" button at the far right end of the main Toolbar, which invokes the following panel:
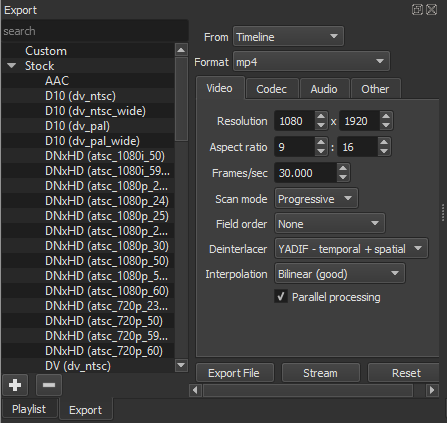
The range of export format options and other choices made available by Shotcut is truly enormous, and really requires its own chapter to explore in any depth. For now, suffice it to note that, were we to click the "Format" dropdown shown here, it would open a list of video file formats, in alphabetical order, so long that it extends well above and below the entire height of my computer screen--and that only covers the format options with names beginning "i" through "p"! It would be surprising if most Shotcut users even knew that most of these formats existed, let alone their various pros and cons. Fortunately, here as everywhere that Shotcut presents you with a wide range of often esoteric options, it also defaults to a vanilla, middle-of-the-road option that is generally safe to simply accept if you are a beginner. In this case Shotcut has suggested an mp4 format for export, with a resolution, aspect ratio, frame-rate and other parameters which are largely inherited from the original raw iPhone clips. if I had instead assembled this sequence out of video clips from disparate sources, with differing format parameters, Shotcut would have to make a best-guess 'average' of these in its default suggestions for exporting, and it could be worth second-guessing some of those choices. But not in the present case. We will simply accept the defaults, and hit the "Export File" option. This will evoke the standard file explorer allowing us to choose a file name (we'll go with "Water Wonders of Iceland.mp4") and a saving location. At that point, when we hit Save, it will queue this export as a Job, opening the Jobs Panel to show us this job and its progress (much as we saw for the 'Edit-friendly' file conversion a few chapters ago). Because this video sequence is so short, and not especially complex in its parts, the export process takes under two minutes to complete, as shown here:
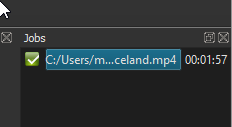
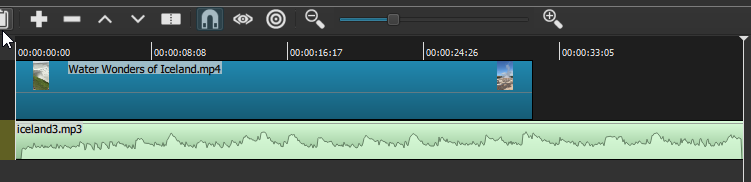
Now, if I double-click on this completed item in the Jobs panel, it will open it in the Source window and immediately begin playing, looking just like it did in the V1 track above because it is the exported rendition of that track. But remember that it's not yet part of the project and available for further editing! To make that happen, as with any other imported asset, we would need to add it to the Playlist and from there to the Timeline. Here, however, we need to decide whether we actually wanted to add this mp4 clip to the existing Iceland project, or instead close that project and open the exported file in a wholly new project. In the first route, our Iceland project would become cluttered and possibly very confusing, because we now would have multiple versions of the same media present: in our Playlist, the newly-created "Water Wonders of Iceland.mp4" would now be the fifth item, along with all of the individual iPhone .mov clips that went into creating it. And as for the Timeline, simply using the Add/Append (+) button in the Timeline toolbar would definitely not be a good idea, because doing this would append the new mp4 clip to the end of the same sequence as it is already layed out, in segments, in the single V1 timeline--so if we then played it, in essence the same movie would play twice. Instead, we would need to create an additional video track (Menu > "Add Video Track") and then, with that new track highlighted, append the mp4 clip into that track at the zero point. The result would look something like this:
Really, the only reason I've pursued this route is to highlight the benefits of our Export exercise itself. The content of these two tracks is identical, as far as the player is concerned, even though they look very different in the Timeline. In case you're wondering, what would actually appear in the play window would be the top track (V2 in this case); Shotcut will always give precedence to the top-most video track, wherever there is content present in it--which is why, two chapters ago, we put our floating-text-caption segment in a video track above the main one. But just as you can mute an entire track, you can also hide it, by clicking the little eyeball icon just to the right of the speaker (mute) icon on that track. If we hid the V2 track here, we would see the original V1 track beneath it play instead--yet there would be no visible or audible difference whatsoever: the content is identical. However, from an editing perspective the difference is considerable: as you can see, the V2 track is a single, seamless whole, with none of the segmentation, transition markers or different clip names that are present in V1 below it. Indeed, had we previously added a floating text caption to the V1 waterfall sequence, as we saw several chapters before, the effect would be preserved after exporting, but all visible signs of that editing work would have similarly vanished in the V2 track. As noted above, having a single, seamless clip as the V2 track means we can now add audio filters to the entire track, or segment it differently than V1 was segmented.
So would we want to work with these two different artifacts--which can really be thought of as different stages in the same project--displayed simultaneously in the same project view? One possible benefit of keeping V1 and V2 here side-by-side (or over-and-under) is that V1 does preserve the visual markers of exactly where one 'shot' begins, transitions and ends; and that could potentially be useful when adding in futher effects (audio effects, for our present purposes). But we would want to make sure we were applying those new effects or additions to V2, not to V1. Indeed, we would need to be very aware that all of the edits we've made in V1 are still 'writable', or changeable -- intentionally but also unintentionally -- as long as that track is open in our project and has not been locked (using the lock button to the right of the mute, hide and composite buttons in the track controls). Perhaps we'd want to keep V1 unlocked because we want to be able to make adjustments to the original editing--move, expand/contract or delete segments or transitions, delete, modify or add filters, etc--but if we did make any such changes, then V2 will no longer be 'current', and we'd need to delete and re-export it anyway. All things considered, keeping V1 open and unlocked concurrently with V2 seems to be a dangerous game. Certainly some of that danger goes away if V1 is locked (and stays locked); but simply displaying it still means that Shotcut is consuming a good deal more memory--all of those edits have to remain loaded separately into memory, whereas in V2 they are simply part of a single encoded file. And the UI is simply more cluttered, as well: there is that much less space to add, for example, multiple new audio tracks, as we will want to below.
With all of this taken into consideration, I will simply delete the V1 track (I can right-click in the control portion of the track, and from there select "Remove Track"); and I will also remove the original .mov iPhone clips from the Playlist, leaving it less cluttered too. At this point, Shotcut will automatically rename the V2 track to V1, as it's the only remaining video track in the project. The effect now is exactly the same as if I had simply started a new project and opened the mp4 file into it. I will go ahead and Save the project, in its new state, with a new name too. My old Iceland project, with the still-segmented V1 track, is still available as a separate Shotcut project file if I ever decided I needed to revisit it.
We are finally ready to look for some suitable background music to add to our video. Unless you are an accomplished musician with good digital equipment, you will likely find your audio rather than create it, and these days you will likely find it online. You can do a google search for 'free background music' or similar terms, perhaps specifying a particular mood as well--for our water-wonders video we want instrumental music, certainly, and something a a bit soft and dreamy. Many sites offer music, sometimes in a wide range of genres, available for free download under a Creative Commons licence, as long as it's not ultimately put to a commercial use. You may also have a particular song or song segment in mind already, in which case you can likely find it on Youtube, Spotify etc--where you can also do a general search for 'dreamy instrumental' or whatever style you want. Sites like these are set up for streaming, and typically do not facilitate downloads as such, but there are any number of free software tools which let you record directly from your computer's audio output (aka sound card), allowing you to capture, as a high-quality .wav or mp3, really any audio that your computer can play. I find that Audacity is an ideal tool for this kind of recording, as it is for general audio editing. Such technical questions aside, if you take this latter route (grabbing an audio stream online) you should be aware of potential copyright issues, although these are easy enough to avoid. YouTube itself, for example, may not allow you to upload your own finished video (if that's even your intent), or may flag it for removal or simply send you a notice, if it detects you've used copyright-protected audio material; but this typically only happens if you're using major-label popular music. So unless you are specifically setting out to create your own 'music video' rendition of your favorite pop song, you are unlikely to encounter this issue (and even then, millions of Youtubers before you have done precisely this and gotten away with it--either because the music is old enough that it's effectively if not legally in the public domain, or because they've very slightly sped up or slowed down the play-speed of the music and thus gotten around the search algorithm). But the present discussion will assume that we're using music as background for our video, not as the foregrounded subject itself.
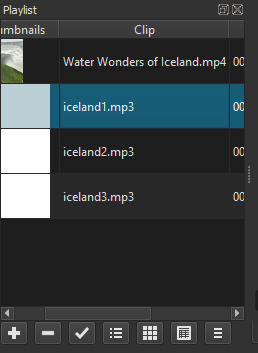
As it happens, I have found three different dreamy, instrumental tracks that I think are worth trying out as potential background music for my Iceland video. The video itself is just over 30 seconds long; each of these audio tracks is a minute long or longer, so among other things I'll want to see how well the various segments (bars, measures) of music in each piece map onto the video. There is no good reason why I can't import all three tracks into my project, and audition each one in turn. To do this I follow essentially the same process I would for importing a video clip: "Open" will simply cause Shotcut to begin playing the audio file in the Source window (we'll hear the audio but of course see no video, just a blank white screen); I'll then need to add this audio track to my Playlist, and from there add it to the Timeline. Here is my Playlist with the three audio tracks added (along with the mp4 Iceland video itself). I have also selected the first audio track, so it's blue-highlighted:
If I were simply to hit the Append (+) control in the Timeline now, with nothing in the Timeline itself except the V1 video track, Shotcut will actually append the "Iceland1" audio segment to the end of the video; that's certainly not what we want. Instead, we need to use the dropdown from the Timeline Menu control to "Add Audio Track", then select this new A1 track, and then hit the Append control. "Iceland1.mp3" is now added in to this new A1 track, starting at the zero position. I want to add the other two audio tracks in the Timeline as well, for easy comparison between them, so I will create two more audio tracks and add "iceland2" and "iceland3" to these. In both cases, I need to first make sure the correct clip in Playlist is selected (double-click on it for good measure), and then make sure that the correct audio track is selected, so I don't end up appending the audio to the end of another audio track (as always, though, it's easy to make such mistakes at first, and if you do, simply hit "Undo" and try again). One all three are correctly added, my Timeline looks like this:
As we can see, the Timeline is getting pretty crowded, between V1 and the three new audio tracks. One way I've eased the crowding a bit was to right-click in the control area of my V1 track and select "Make Track Shorter"--though to be honest the video track only became about 25% shorter when I did this. The audio tracks really cannot be shortened at all, because as it is they are only tall enough for their wave-form to fit at its highest points. To be fair, though, it is rare that you would need to edit with more than four tracks at any one time: once I've chosen the one background-music track I want to use, I can remove the others; this will free up space for, say, a separate video track for captioning purposes, as we've seen previously, or an additional audio track if I wanted to record a voice-over narration (which I won't for this video, but I will for a later example).
Several other things are immediately clear from looking at the Timeline now (or would be if we could see the whole thing). One is that the three audio clips don't all start at the same time: the A2 track begins several seconds before A1 or A3. I might want to trim (delete) a bit of A1 and A3 so they were more comparable --but then it isn't yet clear that I even want to use the first bars or segments of any of these audio tracks. It happens that all three music tracks follow a somewhat similar pattern, of stating a certain 'theme' for the first 20-30 seconds and then re-stating that theme with more instrumentation. Perhaps the fuller instrumentation will work better, particularly blended with the 'natural' or diegetic audio I intend to keep. Since the V1 video itself is only about 30 seconds long, right now all three audio tracks extend out far beyond the end of the video (and the above screenshot). In fact, one thing I could do to compensate for this, just for my initial audition purposes, is to paste in a second copy of the video right after the first in the V1 track (by selecting that clip in my Playlist, then selecting the V1 track, then hitting 'Append'). Now the running length of video is nearly as long as the full audio tracks. We are almost ready to begin our auditions for Best Soundtrack, though one crucial step remains: if I were to play this project as is, we would hear all three of the musical tracks at once, on top of the diegetic audio of V1. That would definitely sound awful! Fortunately there is a Mute button for each audio track as well, so I will mute A2 and A3 for now, and just listen to A1. After a brief listen it also becomes apparent that the natural soundtrack of V1 is simply too loud, as recorded, to hear the music well; so for now I will mute the V1 track too (later we can add a volume filter to try to find an appropriate mix). I should note here that, unlike muting through a filter or by switching off the audio track in Properties, when we use the track's own Mute control the audio wave-form does disappear for that track. The result at this point looks like this, in the Timeline:

Here we can see that only the wave-form of A1 is visible (and that's all we hear upon playing); notice how the Mute icons for the other three tracks are now different too, further indicating that each of these has been muted. We can also see that I've zoomed out the entire Timeline view considerably, so that we can now see both copies of the video, pasted end-to-end, and the end-point of at least the A2 audio track, which is slightly shorter than A1 and A3. Finally, you may notice that I'd made a split at a certain point in the A1 track. This is to mark a point of interest in that audio track: after an initial statement of the musical theme (which I believe is four bars long, but in any case about 20 seconds), there is another 4-bar bridge or transition--you can see the distinctly different wave-form shape--and finally a restatement of the original theme, with more instrumentation, beginning where I've placed that split. I actually really like how this first piece works with the Iceland visuals, and especially the restated theme, which combines the opening piano with some guitar and light percussion. Unfortunately, this whole piece is divided into roughly 20-second segments, while the video itself is 30 seconds--too much of a mismatch in length, at least for now. So I will move on to consider the other music tracks in turn.
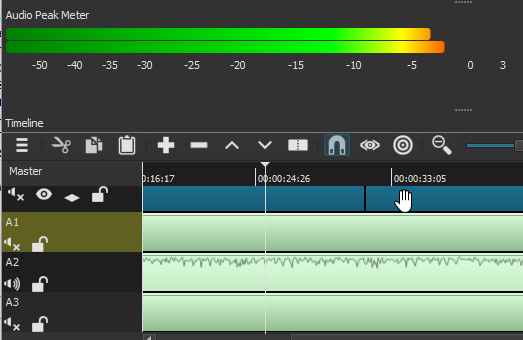
The A2 track presents an interesting case: I really like this music too, especially the keyboard intro; but this time when the larger instrumentation kicks in, it is really heavy, especially at the bass end. The wave-form itself should have clued us into this: you can see below how it's crowded close to the top of the track (compare to the previous screen-shot, of the A1 wave-form), which means that when Audacity recorded it, it was probably already 'clipping' the loudest points so as not to be too distorted. But just to verify this, I've dragged Shotcut's Peak Meter down closer to the Timeline--where it also helpfully assumes a horizontal rather than vertical orientation--and this really tells the tale: whereas our peak-meter reading of the original captured audio in V1 (see the second screenshot in this chapter) showed a near-ideal level of about -17 dB, here the meter goes all the way up past -5, turning a warning yellow and then orange at the very tip. This audio is simply far too loud, and definitely distorted for much of its length:
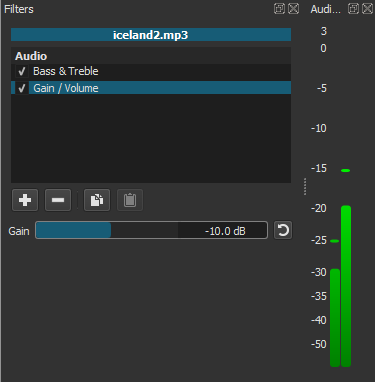
What to do about this? Experimentally, I applied both a Volume/Gain filter and a Bass/Treble filter to this track (by selecting the A2 track, opening the Filters panel, searching among Audio filters for the right ones, and double-clicking on each). Using the controls provided by these two filters, I dialed down the Bass specifically and the overall Gain more generally: as I did the latter, I could see the Peak Meter move downward in real time, to a level that looked much less scary (notice I have once again re-docked the Peak Meter to make it more convenient for this screen-shot):
So now the actual peak levels seem ok. Unfortunately, while the volume of the A2 track is now acceptable, the distortion remains, when I play it: this distortion is an artifact of the recording itself, and can't really be edited out after the fact. Now, if I were really motivated, I could go back to Audacity and try to re-record what I'm calling "Iceland2" from the original stream online (assuming I could even find it). However, I have my doubts that this will be fruitful: after all, I had recorded it at exactly the same input gain as the other two tracks, and yet it ended up far more 'hot' or distorted; this suggests to me that the original track is much louder than the other two, has far more bass, and is probably already too distorted for me to use, even with up-stream editing in Audacity. Probably not worth the effort. So I move on to consider the A3 track instead.
Just as in Goldilocks, it turns out that the third track is just right (believe it or not, I didn't plan this in advance: it just worked out that way). "Iceland3" happens to be structured in segments much closer to the same 30-second length as the video clip; and while the second such segment (or perhaps the third) does eventually become too heavy with rock-style instrumentation, so that like the second track it is simply too 'hot' and heavy to use, the opening 30-second section is just about perfect, in both length and mood. So I will delete the other two tracks from the Timeline, as well as the duplicate length of video clip from V1, since I certainly don't want it in the final product. I will also make a split in the A3 track itself at a point about 4-5 seconds after my video ends, and delete the remainder (since I know I won't use it). My timeline now looks like this:
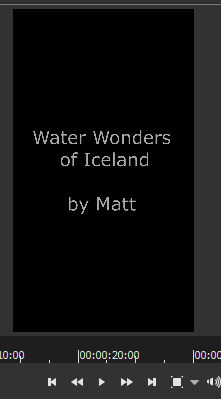
Why don't I cut off the Iceland3 track right at the end of the video itself? Because something about the shape of the music itself, at this point, has given me an idea: particularly with the right audio fade filter applied, the final seconds might be an ideal background for a closing title or credit sequence. It hadn't even occurred to me to add one before, but video and sound editing in general can be driven, to a surprising degree, by such happenstance. Technically speaking, we know from past chapters how we might add a closing credit sequence: We will import our transparent background image into this project, append it the end of the video clip, and add a Text filter to it -- in this case the text will be "Water Wonders of Iceland, by Matt" (we're keeping things very simple, for illustration purposes). After some experimenting I decide that, rather than use a dissolve-transition from the end of the video, I will apply a fade-to-black filter to a short segment of the end of the video (which is already a near-still at the end of the Geyser spout), follow that with a brief blank segment of my transparent-background image (which will read as black); then follow that with a longer segment to which I've applied my text filter, appropriately sized and positioned, and my fade-in and fade-out filters. The result in the Timeline now looks like this, zoomed in a bit so we can see more detail in this ending sequence:
Here we can see a total of three 'fade' filters applied: the first (fade-out) to my brief end-segment of the video, and the second and third applied to the last and longer transparent-image segment, which is the one that carries my text filter. In all three cases I have lengthened the duration of the fade filters, from the default of 1 second to about 1:20 seconds. If I now back up my playhead to the mid-point of the final filter, I can see my end-title/credit text in mid fade-out on the screen itself:
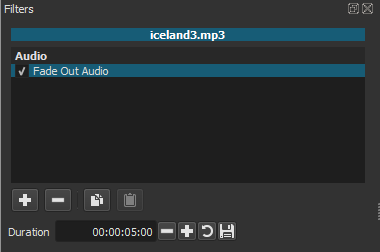
At this point we have a fairly pleasing ending sequence -- except that our audio track just carries the full length of the end-credit sequence and then ends abruptly. We need it to fade out instead. In general, just as with the video track, for audio too a filter must be applied to a defined segment, or else it will apply to the full audio track. But that is not an issue with a Fade-out Audio filter, because even if we apply it to the entire A3 audio track, it will only take effect working backward from the end-point. All we need to adjust is the duration of the fade: by default, as with a video fade-out the duration is 1 second, but this is far too short for our purposes (or probably any, for an audio fade). After some experimentation I bump up the duration to a full five seconds, which amounts to a very slow fade across the whole duration of our end-credit visual. For whatever reason, the Shotcut team has not yet added a visual correlative to this audio filter in the Timeline, so there is nothing additional to show you except for the fade-out filter itself applied in the Filters panel:
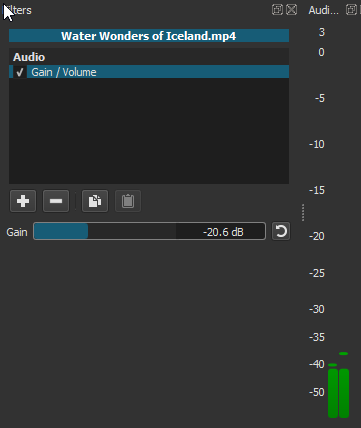
So are we there yet? We could be: the whole point of going through this kind of careful audio selection and editing is to end up with a musical sound-track that 'fits' so well with the on-screen images that the whole effect appears 'natural' and complete. Yet we need to recall here that the video clips I sequenced together had their own, literally 'natural' sound, which we have simply muted entirely during this soundtrack-audition exercise. What we want to do, then, is make sure the mp4 video clip itself is selected (either in the Timeline or in the Playlist), and apply a Gain/Volume audio filter to it--not a Fade, as we just did to the Iceland3 music track, because we want to control the volume along its entire length. As we already saw when we tried this on the Iceland2 sound track, the Gain/Audio filter gives us a slider control which, as we move the blue bar from its default position either left or right, changes the Peak Meter signal in real-time so we can judge the effect of our changes. If you go back for a minute to review the second screenshot of this chapter, you'll recall that the 'natural' sound for these video clips was right around -20 to -17 dB: very nice when heard on its own, but much too loud in conjunction with the musical soundtrack we've chosen. So I want to back it down to less than half of that volume. Exactly how much will be a matter of experimentation, as with just about every other aspect of audio-video editing. Eventually I settle on a volume (or gain) of a bit under -40 dB, as shown here (bearing in mind that for this screenshot I have muted the separate music track, so it doesn't register in the Peak Meter):
When I now unmute the music track, and play the project, I hear both of the sound tracks together in a 'mix' that is really quite nice: the music track is distinctly audible, establishing a serene and gently upbeat mood to the whole piece (and helping to further cement the unity or coherence of the four separate iPhone clips--a not-inconsiderable benefit of a musical soundtrack); while just enough of the natural sound itself is audible as well to give us some sense of the actual force of these natural water wonders.
Of course, as this is a text-and-screenshot document, you're going to have to take my word for the qualities of the actual audio-visual work I have produced; and indeed, even if this were instead a video demonstration so you could see and hear everything for yourself, you might decide at any step of the way -- right back to the original selection and arrangement of clips, let alone the sound selection and mixing -- that you might have made different choices. Which is entirely fine, and more than fine: let a thousand audio-visual flowers bloom! The point is that now, hopefully, you begin to have an idea how to go about it for yourself, using this excellent editing tool.