Learn JavaScript with Phaser
Adding Hazards and Enemies
We need things for our player to avoid to add some challenge to the game. In this chapter will we learn how to create static hazards and moving enemies. Because they are both official hazards that zap our player we will put them both in a group called hazards.
Hands On: Adding a Static Hazard
Let's add a hazard into our game a location and let's make it move. We will add a very simple flickering flame. It consists of two frames of animation. They alternate give the flickering effect. Here is an image of both frames one above the other.
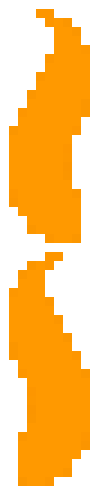
To make our image animated, we will add it as a spritesheet, and specify the width and height the frames, here 11 pixels wide and 27 high. And after that we can also load in a sound to play when we hit a hazard. Put this code in preload:
 game.load.spritesheet('hazard', 'https://s3-us-west-2.amazonaws.com/s.cdpn.io/1171931/fire2.png', 11, 27);
 game.load.audio('hazardwav', 'https://s3-us-west-2.amazonaws.com/s.cdpn.io/1171931/splat.wav');
Then add the hazard to the game. Again as with the coins in the previous chapter, we will create a group called hazards in case we want to add more later. Add the following code to create:
      hazards = game.add.group();
      hazards.enableBody = true;
      hazard1 = hazards.create(100, 250, 'hazard');
      hazard1.animations.add('flicker', [0, 1], 6, true);
      hazard1.animations.play('flicker');

      hazardSound = game.add.audio('hazardwav');
The next stage is to make the player dissapear when they touch this flickering flame hazard. This is done in a similar way to working with the coins but in reverse. Add the following line to update: part of the code.
game.physics.arcade.overlap(player, hazards, this.hitHazard);
We now need a hitHazard function to dissapear our player if they hit a hazard. Take care to follow the same pattern and to add this after the collectCoins function.
    var hitHazard = function(player,hazard) {
      player.kill();
      hazardSound.play();
    },
This does give us win and lose conditions, so hey presto, we have a game. But either of those options mean we are stuck in a form of limbo, either alive with nothing to do, or you disseapear leaving only the game world. You will have to refresh the page to progress. Clearly this is not ideal and we'll deal with that in the next chapter in part two of this book.
Hands On: Adding a moving Enemy
Pick up your code from the end of the last chapter (or remix this project 1)
We are now going to create an enemy to patrol a particular area of our game. To create the movement we will use a process called tweening to do this. Tweening is a process common to many forms of animation which creates inbetween frames to give the illusion of movements. In this case we are going to do motion tweening.
Our aim is to make the enemy appear in one place, and then for it to move back and forth making it difficult to access one of the coins and to move upwards on one of the platforms.

To make this happen we will set a destination point for the motion and ask our enemy to back and forth.
Let's add some code to our project as a way of getting to grips with how tweens work.
Create two new variables at the start or your code.
    var enemy1;
    var tween1;
Let's add the code we need to make a static enemy to the game and add this to the hazards group.
In preload add the line:
game.load.spritesheet('enemy', 'https://s3-us-west-2.amazonaws.com/s.cdpn.io/1171931/mimic.png', 32, 32);
In create add the lines:
      enemy1 = hazards.create(180, 115, 'enemy');
      enemy1.animations.add('fly', [0,1,2,3,4,5,6,7,8,9,10], 6, true);
      enemy1.animations.play('fly');
If we hit Run now to preview our code, we can see here that while this sprite has an animation in the way that our main player, coins and flame hazard does, it does not move around in our game yet.
Now let's start to add some magic by adding a tween. A tween is a flexible way of controlling the properties of our game objects that are displayed on the screen. In this case we will alter the position of the enemy object.
      tween1 = game.add.tween(enemy1);
      tween1.to({x:350, y: 115}, 2000, null, true, 0,-1,true);
The tween code above will move our enemy to the position 350, 115 on the x and y access two seconds after the game starts and when it gets there it will move back and not stop doing it. Perfect.
The use of tweens is a common concept for games and is used for many different things apart from for this kind of movement. This means taht the code gives us many options. Our use is quite simple but for a full look at the different options you have have a look at the section in this chapter on looking at documentation.
Hands On: Restarting our Game
We need something to happen when we hit a hazard / enemy or collect all the coins. To make things simple let's just restart the game.
Restarting our game when we die is easy. We just add the following code to our hitHazard() function
game.state.restart();
This restarts the currently running state which is our one and only state called playState. We haven't talked a lot about game states as those will be looked at in more detail in part two of this book, but in a nutshell this line restarts our game.
We now need to restart the game when we have collected all the coins. This is a little more complicated and involves creating a new function that goes through
To do this add this new function at the end of the PlayState object.
    var checkAlive =  function(group) {
      var count_alive = 0;
      for (i = 0; i < group.children.length; i++) {
        if (group.children[i].alive == true) {
          count_alive++;
        }
      }
      if (count_alive == 0) {
        game.state.restart('play');
      }
    };
And then the following line to update:
checkAlive(coins);
When our player collides with a coin it still exists but This line keep checking to see if there are any coins left alive in the coins group.
Check your Code
You can check your code against this chapters code demo here - https://glitch.com/edit/#!/add-hazards-chapter
End of Level Chat
This is the final chapter of this level of this book. We have tried to talk you through the core elements you need to make a game.
This involved creating a games space, adding a main player, adding hazards and a goal to chase. You can really play around with what you have picked up here to create a really challenging game.
We have also covered the use of phaser to create a core structure to our game using the preload(), create() and update functions and how to add your own functions to deal with key game mechanics like collecting our bonus coins and programming what happens when you
In the next level we will add more structure to our game to allow us to add an opening scene.
So at this point have a really good play around with what you have learned so far. When you are happy with what you have been working with then read on to find out more.
Under the Hood: about tween and using documentation
In our example we have an enemy that patrols a certain area. We managed to program this movement by adding a tween to the game which took our enemy, and then using the tween.to() function to tell the game exactly how to move. We used these commands.
      tween1 = game.add.tween(enemy1);
      tween1.to({x:350, y: 115}, 2000, null, true, 0,-1,true);
We can see that there are quite a few parameters that get passed to this function.
Let's have a look at how this process works by looking at each parameter. When you get to a function like this one which has a lot of parameters, as a programmer you are not really expected to remember them off by heart. Instead you just need to know where to find the right information.
Looking at tween.to() function is a good chance to explore the way to look at documentation and the way they describe things. For phaser, there are several places you can find documenation for Phaser 2 on the web. The two main ones are:
- https://photonstorm.github.io/phaser-ce/
- https://phaser.io/docs
If we visit the second one directs us to the first one for the most updated version. So let's use that. We can go there and filter on a key word "Tween" -
Another potenially faster way is to enter "phaser-ce tween" into our search engine
We should end up on this page. https://photonstorm.github.io/phaser-ce/Phaser.Tween.html
There is a lot of information here and it can be overwhelming but we know we need to find information on the function Tween.to() . In this documentation functions of an object are also called Methods and if we look on the left of the page we can scroll down to see the entry for to and click on it.
Here is the direct link to that section https://photonstorm.github.io/phaser-ce/Phaser.Tween.html#to
We can see that the entry for the function / method to of Tween, lists the parameters that you can pass to this function.
to(properties [, duration] [, ease] [, autoStart] [, delay] [, repeat] [, yoyo])
Underneath a descritpion of what this function does, there is a table of the parameters and if they are optional or not and what kind of information you should pass into the function.
Let's breakdown our code.
tween1.to({x:350, y: 115}, 2000, null, true, 0,-1,true);
The first entry is a properties object. The one we have here has two properties in it. One is the x position property and the y position property of our enemy character sprite. Here is a reminder of how the x and y coordinate system of our game works. Point 0,0, is on the top left.

These properties set the position that the character will go to but we could also include other properties of the enemy as well, many of the properties of a Phaser Sprite.You can have a look at the list of properties you may be able to change here. https://photonstorm.github.io/phaser-ce/Phaser.Sprite.html#toc-4
For example, the alpha property controls how transparent the Sprite is. If we wanted the character to fade in and out we could add alpha:0 to the property object. {x:350, y: 115, alpha:0}
Let's get back to our code.
tween1.to({x:350, y: 115}, 2000, null, true, 0,-1,true);
The next entry duration is 2000 and this controls how long the tween takes to happen. In this case 2000 milisecond, which is 2 seconds.
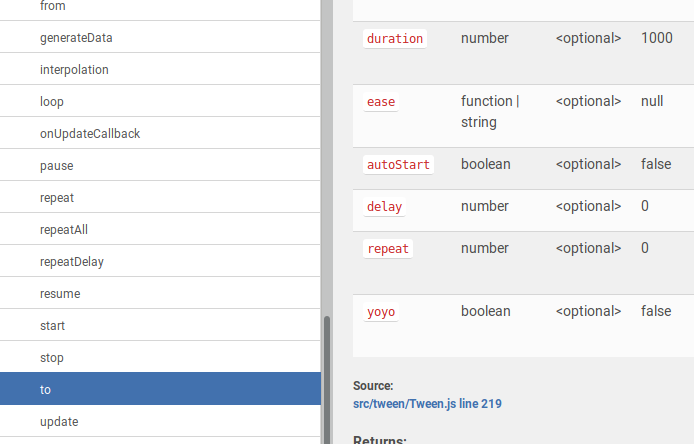
Then we have null, true, 0, -1, true which correspond to the parameter for [, ease] [, autoStart] [, delay] [, repeat] [, yoyo]
Let's look a the entries from the documentation for these parameters.
ease |
function | string | <optional> | null |
Easing function. If not set it will default to Phaser.Easing.Default, which is Phaser.Easing.Linear.None by default but can be over-ridden. |
autoStart |
boolean | <optional> | false |
Set to |
delay |
number | <optional> | 0 |
Delay before this tween will start in milliseconds. Defaults to 0, no delay. |
repeat |
number | <optional> | 0 |
Should the tween automatically restart once complete? If you want it to run forever set as -1. This only effects this individual tween, not any chained tweens. |
yoyo |
boolean | <optional> | false |
A tween that yoyos will reverse itself and play backwards automatically. A yoyo'd tween doesn't fire the Tween.onComplete event, so listen for Tween.onLoop instead. |
This means that for our character:
- there is no easing in of the movement (don't worry about this)
- the movement does start automatically
- there is no delay
- the movement does repeat
- the animation goes back and forth to create the patrolling aspect
This section was designed to give you an introduction to the way that documentation is written for the Phaser game library. This is very similar to the way most documentation is written. Sometimes it will make more sense that at other times. It is best used in combination with examples and a helpful group of people to give you advice when you go wrong as well. This internet forum is a good place if you do get stuck. http://www.html5gamedevs.com/forum/14-phaser-2/
- https://glitch.com/~add-a-reward-chapter ^