ETOYS REFERENCE MANUAL
License: The Etoys Manual will be dual-licensed under GPL (standard for FLOSS Manuals) and MIT (standard for Etoys). By contributing, you agree that your edits can be used under both the GPL and MIT licenses.
3. User Interface
This chapter provides an overview of all the parts of the default Etoys user interface and a short introduction into the main concepts like halo, viewer and projects. There are various ways to make changes to this User Interface, starting with turning off the eToyFriendly Preference, described elsewhere.
In some places in this chapter, keyboard shortcuts for various commands are described. In general, they consist of a modifier key (Command or cmd on MacOS; Control or ctrl or ctl on Linux; and Alt on Windows), and a letter or punctuation key, optionally with a shift. A few keyboard shortcuts follow different patterns. The notation used here is mod-letter, mod-shift-letter, or mod-symbol. For example, mod-shift-w (which we do not write as mod-W) using the appropriate modifier key for the platform in question brings up the World menu, and mod-, the etoys source menu.
Etoys is built on Smalltalk, which was designed to use a three-button mouse. Missing buttons can be simulated using mouse and key combinations. Specifically
- Middle click is equivalent to ctrl-left click on Linux, ?? on Macintosh, and ?? in Windows
- Right click is equivalent to Command-click or Apple-click on Macintosh
Get correct details. Is middle-click on a Mac option-click? Is middle-click on Windows alt-click?
3.1 Overview
This is a summary of the interaction elements.
3.1.1 About flap
In the top left corner of the Etoys window is a small tab marked About. Clicking it opens a flap, containing information about the version of Etoys, with a short description and the URL of the Squeakland Web site. A flap is a rectangular object, frequently with a tab attached, containing useful objects or information. It has two states, open or closed, so that it can be brought into the workspace and dismissed as needed. Flaps are described in more detail below.
3.1.2 Toolbar
The toolbar at the top of the screen includes basic navigation through Etoys. Each of these has a balloon help bubble that pops up if the cursor hovers over any item. Following is a list of each of the toolbar items.
![]()
In Etoys 4.1 the toolbar has changed; the icon for the new project has been removed.
![]()
![]()
When the user clicks here, it opens the Quick Guides, an interactive Etoys book of help topics. In Etoys 4.1, there are other languages than English available. The Quick Guides will be shown in the chosen language, if available, otherwise in English.
![]()
This shows the current name of the current project. The user can change the name directly by writing in the textfield, or can save the project and give it a name during the process.
![]()
This creates a new project within the current project. This can cause problems when it has been clicked while another project then the home project is currently shown. This button has been removed in Etoys 4.1. To create a new project, go to the home project and click the cloud with the text "New Project".
![]()
Click the arrows to go to either the previous or the next project in the list. The left button brings the user back to the project which he or she just left (the previous project). The right button proceeds to the next project, if there is any.
![]()
Here the user can open the painting tool and create sketches. Every time the user clicks on the icon, a new sheet will open where the user can start a new painting. Make sure to quit the painting tool when finishing a drawing, either by discarding the current drawing or by saving it as an object in the World. To redraw an existing painting, use its gray halo icon.
![]()
Clicking this icon opens the Supplies Flap. Here the user can find a great library of objects ready to use.

A user can temporarily customize the objects that are shown in the supplies flap. Almost all objects from Object Catalog can be added to the Supplies flap except for Particles because it consists of several parts (Kedama World, patch, turtle). To do this, drag the desired object to the world, then open the supplies flap and drag the object to the flap. Dragging the object from the Object Catalog directly to the Supplies flap will not work. Note that the changes to the supplies bin will only last until quitting Etoys. It will not be saved with the project.
The user can remove any of the objects in the Supplies Flap easily using the pink icon from the halo of that object. Removing the object from the Supplies Flap doesn't delete the object permanently but just deletes the object's icon.
![]()
Here the user can change the User Interface language. When starting Etoys, the language chosen on the computer will automatically be used. Displaying languages not written in the extended Latin alphabet, such as Russian or Japanese, requires enabling the Pango library for displaying text in Unicode, in addition to switching to the language. It may also require adding fonts for the desired writing system, either through the Etoys language menu or outside Etoys in the host operating system.
There are longstanding bugs in the Etoys use of Pango that result in text being misplaced or badly rendered. For example, SQ-102, Etoys text alignment doesn't work correctly with Pango.
![]()
When the user clicks once, it toggles the full screen view. Holding down the mouse button brings up the option to switch off scaling. The default setting is optimized for the resolution on the XO laptop.
What does scaling do? It seems to have something to do with the WindowingTransformation methods scrollBy: aPoint and translateBy: aPoint, but what is the application here?
![]()
The user can open a saved project from the default Etoys folder when the user clicks on this icon. Holding down the mouse button when clicking allows searching in other folders or open other files.
![]()
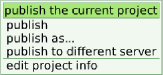
The user can save a project to the default Etoys folder by clicking this icon. Hold down the mouse button to get more options, as shown below. The user can save the project to other places or publish it directly to the showcase.
![]()
Click here to quit Etoys. A dialog box will appear asking for confirmation, since quitting would mean throwing away the current state of the system.
![]()
Click to hide or show the toolbar. This is helpful for projects made in older Etoys versions (before 3.0), so that the toolbar will not hide parts of the project. When the toolbar is hidden, a smaller version of this icon appears at the top right of the window. Clicking it restores the toolbar.
3.1.3 Toolbar (Sugar)
On Sugar, the toolbar looks slightly different.
![]()
![]()

Collaborate with other Etoys users in the network. To share the current Etoys activity the user clicks the Share button and select "My Neighborhood". This makes the activity public and its icon will be visible in everyone's neighborhood view. To join that activity, a buddy would click that icon in the neighborhood.
Alternatively, the user can invite a buddy to an Etoys session. This will not make the shared activity visible to everyone, but just to the invited buddies. To invite someone, zoom out from Etoys to the Sugar neighborhood view. From the menu palette of the buddy's icon select "Invite". They will get a notification and can join the shared activity by clicking it.
In either case, when a buddy joins a shared activity, a new flap labeled "buddies" will be created on the left screen edge. A "badge" representing the buddy will be placed there. Similarly, on the joining buddy's screen a similar flap will be created. The buddy's project will be otherwise empty; the project in the shared session is not transferred to them. When more buddies join, everyone will get badges for everyone else.
Is it possible to share a project? Presumably one could encapsulate a project in an object such as an Event Theatre, and share that.
The badge is the way to communicate with the joined buddies. The user can send an object to a buddy by dragging and dropping it onto the buddy's badge. The object with all its behavior and scripts will be copied to the buddy's computer. As soon as the transfer is finished, a signal tone is played and the object is attached to the buddy's pointer.
If the user clicks the small "C" button on a buddy's badge, a text chat with the buddy is opened. The user can use this to talk to each other. To stop collaborating, click the Share button again and select "Private". Or simply stop Etoys.

Click here to find an entry in the sugar journal and insert pictures etc. Hold the mouse button down to see more options.

Click here to keep a copy of the current project in the sugar journal. It will be stored in a new Journal entry (independent of the entry that is created or updated on stopping). This statement is no longer true for Etoys 4.1. The user will need to hit the "Save" folder to store a new project entry in the Journal. Hold mouse button down to see more storing options, like saving the current project to local storage or to a server.

Click here to exit Etoys. This results to an automatic save of the project in the Journal. The home project is not stored on exit unless the user renames it in the tool bar. This is to prevent useless copies of the home screen in the Journal. If the current project was loaded from the Journal, that Journal entry will be overwritten. Otherwise, a new Journal entry is created.
![]()
In Etoys 4.1, this is the button to exit Etoys. Exiting Etoys no longer automatically saves the project in the Journal on version 4.1. Upon hitting the "X" to exit, the user will be reminded to save the project before exiting.
3.1.4 World
(See further information about the World in the More Objects chapter of this manual.)
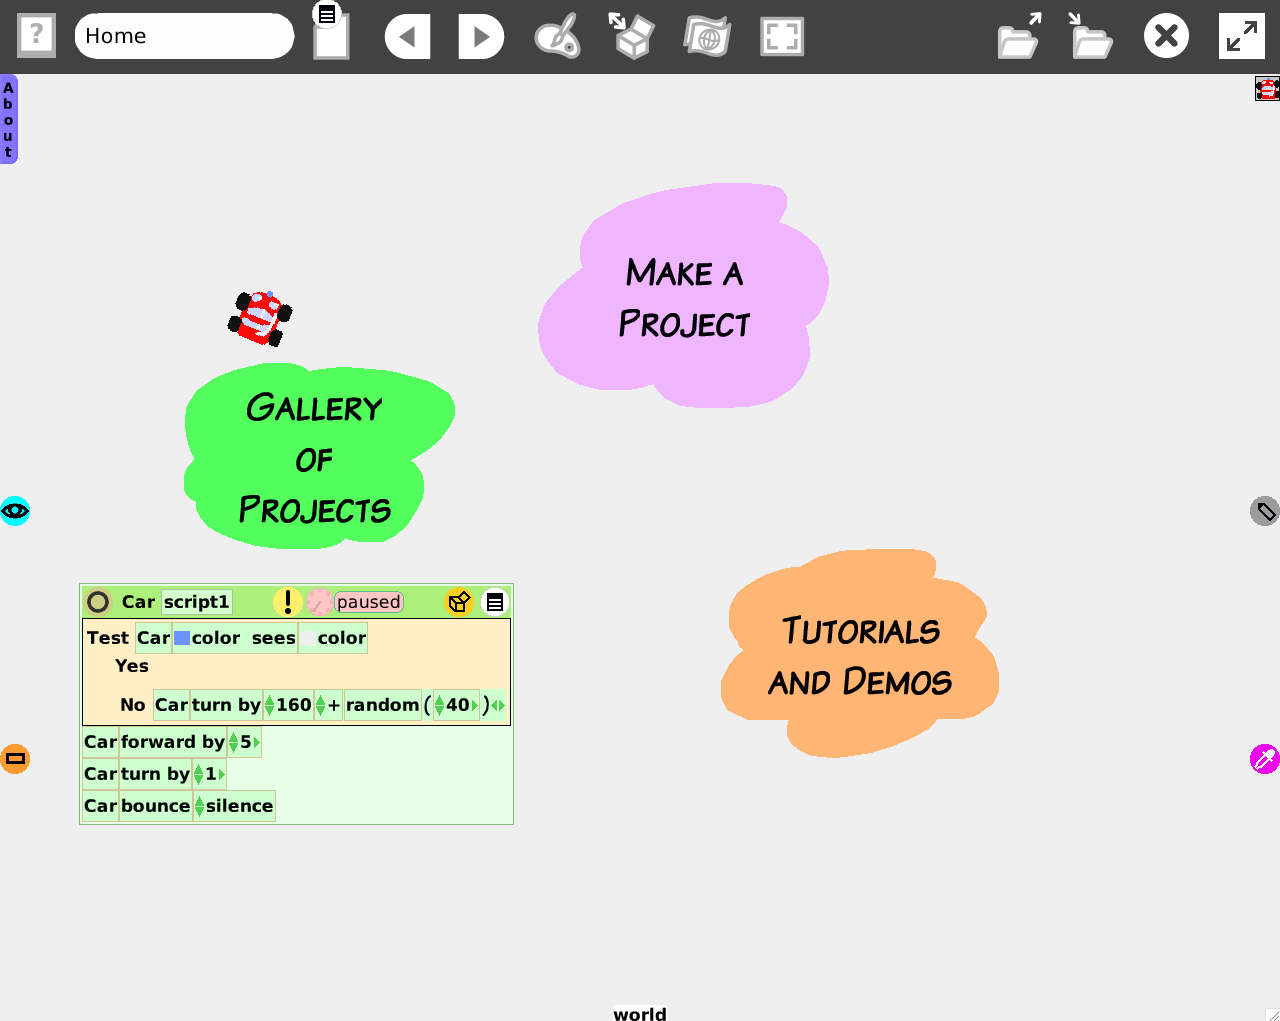
The world is the most inclusive object in any Etoys project. It is basically a full-screen playfield (see playfield in the Basic Objects chapter) that can contain various individual objects within it. The home screen shows a world containing
- an about-flap with the information of the Etoys version,
- an open script, a running car, and a folded viewer for the car,
- three clouds to go to the gallery of projects, tutorials and demos or to create a new project.
The sugar toolbar at the top is not contained within the world.
Tutorials and Demos
This section contains a demo and two tutorials of increasing difficulty, one on using halo tools and one on scripting challenges. We recommend that users new to Etoys start here. Going through the tutorials teaches the rudiments of navigating the Etoys world.
Gallery of Projects
To see examples of what users can do with etoys, look at the various models shown here and explore the objects used with their halos and viewers. For further exploration, go to http://squeakland.org and view the online Showcase for even more projects and project ideas.
When the user clicks on this cloud, an empty world appears. At the top is a toolbar with two call out bubbles in the form of balloon help for the Paint tool and the Supplies box, giving the user two places to start. Hovering over any item brings up balloon help describing what that item does.
To change the background of the world, use the gray halo icon. The painting will be automatically embedded into the world and inert to all user interactions by default. To change this behavior, use the menu icon of the halo.
When Etoys starts up, it displays a car driving around a screen. This is itself a model. The car tests if it is bumping into things, and if it does, it bounces off and drives off in a different direction. The user can explore the script that defines this behavior, and try modifying it by editing values of variables or inserting other tiles from the Car's viewer.
3.1.5 Balloon Help
Hovering over an item in the toolbar will bring up balloon help with a short explanation of what each item does.

Balloon help is Etoys text, so users can edit it. To add a balloon help to a sketch, or edit existing balloon help text, bring up the halo of the object, being careful not to stop with the halo of any enclosing object, and click the menu icon. From the menu entries, choose "extras" and then "balloon help for this object". Type or paste in the desired balloon help text.

The help will be shown when the mouse pointer hovers over the object or when the user clicks the question mark in the Halo.
![]()
Balloon help might be available in various languages. If it is not, and you want to help with the translations, please read in the Appendix how to do this.
3.1.6 Flaps
Flaps are a place to store objects for later use or put in notes. Special flaps can used to share objects between projects. To get a new flap, there are some options:
- Open the etoys source menu (Cmd-, in MacOS; ctrl-, in Linux; alt-, in Windows) and click the option "flaps..."
- Another keyboard shortcut offers the full "dangerous" World menu, dangerous because it gives access to Squeak, and allows saving the image. (Cmd-Shift-W in MacOS; ctrl-shift-W in Linux; alt-shift-W in Windows) This can be a problem for beginners, who will not know how to restore the default image. The commands on the source menu appear on the World menu along with many others.
- Make a copy of the the flap from the home page, edit it as desired, and drag it into the supplies bin. Then it is available to drag it from the supplies bin and put in another project. This avoids exposing the other items from the mod-, menu and shows how to use the supplies bin to copy objects to other projects.
In Etoys 4.1, a flap to add to projects and edit is already in the supplies bin.
3.2 Projects
Projects are the units of work with in Etoys for saving and loading. When clicking the "Make a Project" - cloud, the homescreen disappears and a new empty world appears. Everything put in the world belongs to the project and will be saved with it. It is not possible to add a project inside another project. Only the current project will be saved. To create a hierarchy of nested projects, save each project separately. Then create links to load one from the other, for example with the project navigator.
The user can share projects with other users. Etoys is highly portable, so that projects will run on Windows, MacOS, Linux, and other platforms in the same way, with some exceptions.
- For some projects, it might be necessary to install special font files. The fonts used in a project are not saved with it. Fonts which are installed on the computer will be used. This is most obvious when changing languages to one not written in an extended Latin alphabet.
- Objects than those which come with the Etoys installation will not be available on other computers unless the definitions are saved elsewhere so that others can load them. See the documentation on change files for how to save and load changes to Squeak objects.
- Projects from early versions of Etoys will not load into Etoys version 4.0 and newer. Projects from these versions open with the navigation bar turned off, but a little icon on the top right corner which the user can click to turn the navigation bar on. This is because older projects could be using the space for the project which is now occupied by the nav bar. To make it easier to use the user can drag any object in this area down and save the project again, so that when the user opens it the next time, the nav bar will be shown right from the start.
The paragraph above needs version information.Also, is it saying that old projects will not load at all, or that they will load with this particular difference?
- Projects created in version 4 of Etoys (Late 2009 to March 2012) should load without difficulty into Etoys 5. But some projects created in the new version will not be usable in older versions. If the user tries to load a project created using Etoys 5 into an earlier version of Etoys, a warning message will be presented about possible incompatibilities.
Projects created in older versions (before XO-version 2007) might not work in Etoys 5.
Tto show several projects from within Etoys in a certain order, use the project navigator (see the More Objects chapter).
3.3 The Halo
Every object has a "Halo" to allow the user to modify it in various ways. Access the Halo of any object by right clicking the object. The tip of the arrow is the "hot spot." Clicking a very thin line can be a bit tricky because the tip of the arrow must be exactly on the line.
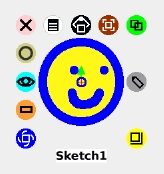
This is the Halo for a sketch. There are other objects with different sets of icons.
![]()
Clicking the pink "X" icon at the top left will move the object to the Trash.
![]()
Clicking the tan "O" icon along the left edge will collapse the object into a tab with a close button marked x, a name, and a button similar to this one to restore the object.
![]()
Clicking the blue eye icon in the middle left will open a viewer for the object.
![]()
Clicking the brown rectangle icon will attach a tile for the object to the cursor.
![]()
Clicking and dragging the blue spiral icon at the bottom left corner will rotate the object.
![]()
Clicking and dragging the yellow square icon in the bottom right will resize the object if the user clicks on it and drags. If the user holds down the shift key while resizing the aspect ratio will be maintained.
Note: If the heading of the object is changed and does NOT equal zero this icon will only let the user change its scale, maintaining its aspect ratio. Even if the heading is returned to zero, this icon will only let the user change the scale.
![]()
Clicking the green double boxes in the top right duplicates the object. Holding down the shift key when clicking creates a sibling object. There is a difference between siblings and duplicates. See more about this in the chapter AppendixMorph.
![]()
Clicking and dragging the red-brown frame icon moves the object. Moving an embedded object leaves it embedded.
![]()
Clicking the black tongs and block icon picks up the object. Click again to place it somewhere else. Picking up an embedded object removes it from the embedding.
![]()
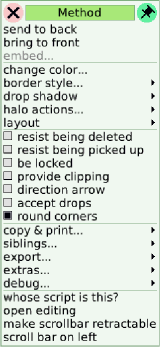
The icon that that is meant to look like a printed menu gives the user a menu of other options, as in this example.

send to back - this puts the object behind other overlapping objects.
bring to front -this puts the object in front of other overlapping objects.
embed - this allows the user to embed the object inside another object, so that the combination acts as a new object. For example the user could embed All Scripts in a playfield, book or in a particular page of a book so it only shows on that page. This option is grayed out unless the object overlaps another object. Selecting this option brings up a list of objects where the user can embed this object.
change color - clicking this option opens up the medicine dropper and paint palette tool. Clicking a color from the color palette changes the color of the background of this object.
fill style - Options to choose color, and for solid color, gradient, bitmap, or default fill.
border style: this option sets the style of the border based on color, width and style.
- border color - brings up the medicine dropper and paint palette tool. Clicking a color from the color palette changes the color of the border of this object.
- border width - brings up a tool that sets the thickness of the border. Drag the tool around and choose the width
- simple
- inset
- raised
- complex alt framed
- complex alt inset
- complex alt raised
- complex framed
- complex inset
- complex raised
These options make no sense. Applying them gives weird graphic results. Report as bug.
drop shadow: this gives the user options to turn a drop shadow on or off, and to set the color of the shadow and the shadow offset.
resist being deleted - when this is set, the "x" button in its halo does not appear. The default value is unset.
resist being picked up - when this is set, the object cannot be picked up by clicking it. The pick-up and move tools on the halo continue to work. The default value is unset.
be locked - when this is set, the user cannot affect certain changes to the object.
Which ones?
provide clipping -whether the parts of objects within this object that are outside its bounds can be masked.
direction arrow - when set, the direction arrow will appear on the center of the halo. The default value is unset.
accept drops - when set, allows objects to be dropped into the all script body. The default value is unset.
- make a sibling instance - makes another morph with a player of the same class as this object. Both siblings will share the same scripts.
- makes multiple siblings - makes multiple instances.
- indicate all siblings - make all siblings visible.
extras: gives the user the following options
- adhere to edge - default is none, which means the object can be placed anywhere in its container. Other options let the user specify if the object sticks to an edge, corner or center of its container.
- draw new path
- follow existing path
- delete existing path
- balloon help for this object - allows the user to change the balloon help for an object. The balloon help will show when the tip of the mouse pointer remains over an object for a period of time.
Many kinds of object have other options on their Halo menus. These are described with each object in chapter 5.
![]()
The center handle has two parts. Shift-clicking and dragging the arrow part changes the heading (the direction of motion) and the forward direction (What is this for?) of the object without changing the orientation of the object's graphic. Shift-clicking and dragging the cross in the circle moves the center of rotation. Sketch objects have this handle on by default. For those that do not, there is a Halo menu option, direction arrow, to turn it on.

The purple eye dropper appears for objects with a fill color. It brings up this Color Picker, documented in the Objects chapter. The red circle is the selector, shown here at the top of the grayscale bar.

Different types of objects will have different halos, possibly with extra handles. For example, a text object will have halo handles to change the font, size, and style.

![]()
On the Halo of a Sketch and some other kinds of object, clicking the gray pencil icon will open a PaintBox to allow the user to redraw the object. (Useful for duplicating the object, then changing the drawing slightly). If the object is a playfield it will allow the user to draw a background image on the playfield.

An optional debug Halo tool, turned on by setting debugHaloHandle on in Preferences (described in the Objects chapter, and analyzed in the Preferences appendix). Click the wrench to get a menu of tools such as the following for examining objects. Shift-click brings up the inspector directly.

These tools, which provide views into the Squeak underlying Etoys, are described in the Programming Tools chapter.
Orientation
An important and confusing set of properties of objects controlled in part by the Halo tools Rotate and center handle has to do with direction. It is necessary to distinguish three properties:
heading The direction in which objects move under the forward by: command.forward direction Not used in Etoys, although it can be set using the Rotate handle in the Halo, and via the Viewer.
orientation The graphic representing an object can be in any rotation independently of the heading and forward direction. This is not an Etoys property. It is not the value of a variable, and cannot be set by any tile command. Since these three properties are not firmly coupled, the rotation of an object's graphic can only be determined visually, not by scripting.
- The rotate tool in the Halo rotates the graphic and changes the heading but not the forward direction.
- The center handle allows the user to change the heading and forward direction without rotating the image.
- Editing the heading in the object's viewer does not change the forward direction, but it does rotate the graphic. Editing the forward direction in the object's viewer changes the heading by the same amount, but does not rotate the image.
Report as bug.
Sketches are created in PaintBox with their heading and forward direction both set to 0 (up).
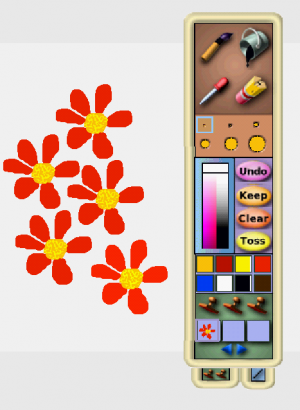
3.4 Painting
Clicking the paint palette in the toolbar brings up the painting tool. It has two components, a translucent rectangle called a SketchEditor where the user can paint an image, and a PaintBox toolbar. The SketchEditor is smaller than the screen. Most of the time, the user wants to draw objects to move them around later using scripts, so drawings for that purpose shouldn't be too big. Everything drawn on one page will be one object. To draw several objects, exit the painting tool by clicking "keep" when one object is done and open it again to get a new sheet to draw on.
To draw the background of the world, click the world's gray pencil halo icon.


The paintbrush uses the brush size selected in the six circles beneath, and the color selected in the color picker.

The bucket pours the selected color in the area that is the same color as under the tip of the pour. If a region is not completely surrounded by any other color the fill will spill through and fill a huge area. The Undo button is useful in such cases.

Clicking with the eyedropper in the ColorPicker or anywhere in the image or the world picks up the color under its tip.

A ColorPicker pops up when the mouse points to the Pick Color area of the palette without clicking.

In the top row the user can pick up no color or transparent to take away all color with the selected tool. Click and hold mouse down to move around.

The Eraser erases the the colors to transparent.

Here the user can choose the size of the brush or eraser. The brush has a round shape and the sizes are in pixels 3, 7, 13, 25, 50, 80. The eraser is square, in the width of the selected paint brush. The paint brush icons indicate which color was most recently selected in the ColorPicker in this or any previous instance of the painting tool in the same session, or blue by default in a new session.

Clicking Undo reverts the last change the user made. It remembers one change. Click again to redo the change.
Click Keep when done editing the drawing to exit the painting editor and leave the drawing as an object.
Clicking Clear erases the whole sketch, leaving a blank sheet.
Clicking Toss brings up a dialog asking whether to throw away the current painting completely. Clicking yes does so, and clicking no leaves the painting open. Throwing away a new painting will erase everything. When editing an existing painting, throwing it away will give back the painting as it was before the painting session.

Color Swatches keeps the 8 most recently used colors for fast access.
![]()
Click the flap below the painting box to open the shape tools. This opens a selection of shapes the user can select.

![]()
Draws a line straight line. Click mouse and hold down, move mouse and release to make line. It uses a square brush with current brush size and selected color. Hold the shift key to step lines angle in 45 degree intervals
![]()
Draws a rectangle in current color and brush width. Hold the shift key to make a square.
![]()
Draws an ellipse in current color and brush width. Hold the shift key to make a circle. Ellipse draws from center.
![]()
Hands the user a polygon in current color and brush width. Move the yellow handles to change polygon. Drop yellow/blue on top of each other to erase a handle. Click and move green triangles to make more handles. Click outside handles to end editing.
![]()
Draws a 5 pointed star in current color and brush width. Draws from center, click and drag to select size.
![]()
Click the left flap below the paint box to open the stamping tool.

The stamp is used for making a copy of a selected part and stamping it back to make patterns or drawings. Click a blank stamp, then select the area of the drawing to copy by clicking and dragging the mouse. A thumbnail of the user's selection will be shown in the blue rectangle below the selected stamp. The user can now stamp that selection. If the picture does not have a background fill color, the stamp tool will make the stamp without a background color.
3.5 Viewers
A viewer holds the tiles that describe the scriptable attributes of an object and the actions it can perform. Use it together with a script editor to compose scripts for objects that define how the objects behave. Bring up the halo for an object and click the blue eye icon in the middle left ![]()
to open a viewer for this object. A viewer always represents the state of the player for the object it belongs to. The user can open several viewers to get access to the tiles of different objects. Tiles from different viewers can go in any script.
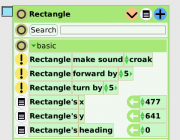
The top row of the viewer displays the name of the object being viewed. To edit the object's name click it and type the new name.
All viewers have a little thumbnail tab, much like a tab on a folder, to identify which viewer is which when they are not open.
The "tiles" section of this manual gives specifics about tiles in the viewer. The tiles are organized in categories. There are generally sixteen or more different categories in a viewer. The number is different for different kinds of object. For example, a "Holder" has some categories that a "Sketch" does not have and vice versa.The categories are separated by green stripes. The title of the category is written inside the stripe. The default categories in a newly-opened viewer for many objects are "Basic" and "Tests". Click one of the green stripes to open a menu of categories.
There are six different types of tile:
- Commands have an exclamation mark on the left. Clicking the exclamation mark runs the command once. They can be placed directly in scripts.

- Variable assignments representing attributes of an object have a small menu icon on the left. Clicking the menu icon brings up a menu offering watchers of several kinds for the values, and an option to change how many decimal places will be shown for numeric values. The user can access either the value of the object, by dragging the tile by its name, or an assignment command, by dragging it by the green assignment arrow. Assignments can be placed directly in scripts.

- Control structures have no icon at all on the left, and a light colored background. They can be placed directly in scripts.

- Tests have no icon at all on the left. They can be placed in slots in control structures in order to determine which commands to execute next.

- Expressions generate values of various object types as parts of scripting commands or assignments to variables. They can be placed in slots in commands and variable assignments.

- Watchers show only the value (simple watcher) or name and value (detailed watcher) of a variable. The value can be modified in a watcher, in some cases using controls such as up and down arrows, or by clicking the value to edit it as text, or with a menu or color picker, or by other means appropriate to the value. Watchers can be placed in the world and in other playfields, but not in scripts.

If the user drags a command, variable assignment, or test tile from the viewer into the world, Etoys opens a script editor to hold it as a script command. Further tiles can be dropped in the script or in slots in other tiles.
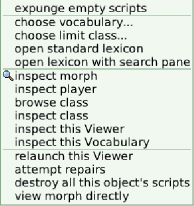
The viewer menu
The user can open the viewer menu by clicking the menu icon in the top row of a viewer. It is in the middle between the variable icon and the category pane icon.
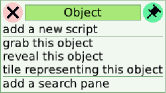
The viewer menu items do the following:
- add a new script: Attaches a new script tile to the mouse that expands to a ScriptEditor when dropped.
- grab this object: Attaches the object to the mouse.
- reveal this object: Make the object flash a few times to make its location obvious on the screen. This command also brings the object back on screen if it has moved beyond its borders somehow. If a script used the command Object hide, 'reveal this object' will flash it, then bring up its halo.
- tile representing this object: Puts a tile representing this object at the mouse cursor for placement anywhere in the world.
- add search pane: Opens a search pane in the viewer.
With the eToyFriendly preference turned off, two more items appear.
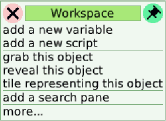
- add a new variable Opens a dialog box to accept the name, class, and value of the new variable
- more... Opens a further menu
or
Why do we get two different versions?
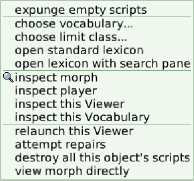
- expunge empty scripts Delete all but one script containing no programming tiles.
- choose vocabulary... Choose a tile set for this viewer. Default is eToy.
Choosing some vocabularies results in the viewer showing no categories and no tiles. After choosing any other, choosing eToy fails to return to the standard tile set. It is necessary to close the viewer and open another on the same object.
Report as bug.
- choose limit class... Open a menu with the title Show only methods implemented at or above... Choices are Unscripted Player, Player, Model, Object, and ProtoObject.
No visible effect. What is this supposed to do?Report as bug.
- open standard lexicon Open Vocabulary viewer, showing the Squeak code for each tile.
Document this vocabulary viewer.
- open lexicon with search pane This fails with an error, Message not understood, in a predebugger.
Report as bug. The method called, openSearchingProtocolBrowser, does not exist.
- inspect morph Open inspector on the costume of the object of this viewer.
- inspect player Open inspector on the player of the object of this viewer.
- browse class Open a window displaying compiled scripts for the object on the class of the player of the object of this viewer.
What is the class of this object? It is not the System Browser, but it has many of the same functions.
- inspect class Open inspector on the class of the player of the object of this viewer.
- inspect this Viewer Open an inspector on this Viewer.
- inspect this Vocabulary Open an inspector on the current vocabulary of this viewer, listing its element categories and a few other properties. It appears that all vocabularies other than eToy have empty category lists.
- relaunch this Viewer
Error: attempt to index a non-existent element in an ordered collection
Report as bug.
- attempt repairs Results in the meaningless message 0 [or more] repair(s) made.
Report as bug.
- destroy all this object's scripts Delete all scripts for this object except the default empty script.
- view morph directly Error: Message not understood.
Report as bug.
Categories
Tiles are divided into categories that access or share topic. The user can add another category pane when the user clicks on the "+" sign in the blue circle right beside the menu icon.
All objects share these categories:
- Variables
- Scripts
- Basic
- Color
- Geometry
- More Geometry
- Pen use
- Test
- Motion
- Fill & Border
- Scripting
- Sound
- Observation
- Drag & Drop
- Miscellaneous
Some objects have specific categories that give access to the object's abilities. For example, "Button" also has a button category that allows the user to change the look and use of the button. "Star" has a star category that allows the user to change the number of points on the star, and objects like "Playfield" and "Holder" have categories specific to them. There is a command, choose category... described above, to add extra vocabularies in their own categories, such as Vector, which can also be turned on in a scripting preference.
Variables
Variables keep information stored within a script. They can contain different types of information set by selecting data types from a menu. Variables should be named to indicate their purpose. The name of the variable helps the user or others read a script later on. The user can add a variable by clicking the "v" sign in the icon left of the menu icon. When creating a variable, the user has the choice of data types. Click the default to get a menu with options like these (depending on the version of Etoys, and the eToyFriendly preference).
Document types for Etoys v5: Boolean, Color, CustomEvents, Graphic, Number, Player, Point, ScriptName, Sound, String
- Boolean
A Type with two possible values: true or false - BorderStyle
A Type with the following possible values: simple, raised, inset, complex framed, complex raised, complex inset, complex alt framed, complex alt raised, and complex alt inset. This variable could be used in a script to create the visual effect of a Button being pushed. - ButtonPhase
A Type with the following possible values: button down, while pressed, button up - Color
A Type that stores a particular color. A Color is made up of multiple attributes as shown in the color category of the viewer. When the user sets a color all those values are updated. A color variable can be used in tests, to change the color objects in the world. See the Common Tiles chapter for a description of the color variables.
Etoys Challenge: Take an existing project and use a set of color variables to change color schemes for the project. - Graphic
A Type used to store a graphic. - ImageResolution
A Type used by the Camera object (found in the Multimedia section of the Object Catalog). This can be used to change the resolution of the image captured. Possible values are: original, 256 colors, 256 grays, 4 grays and black and white. Lower resolutions will reduce the size of the object.
This name is an error. It is the color depth that changed here, not the image resolution in pixels.Report as bug.
- Number
A Type used to store a number. The number defaults to displaying 1 decimal places to the right of the decimal point. The user can specify the number of decimal places that will be displayed. NOTE: When displaying 1 decimal place to the right of the decimal point, if its actual value is 2.45, if will be rounded to 2.5 for display. But a Test for myNum >= 2.5, the test result using the actual value will come out false and the NO branch will be executed.
Pop Quiz: Can you determine under what cases the display of a number will round up?
Pop Quiz 2: Can you determine how many decimal places can be accurately represented in an Etoys Number?
Pop Quiz 3: What is the largest number you can use in Etoys? - Patch
This variable type currently does not work in Etoys 4 and will throw an exception "Message Not Understood". For now do not use this variable type.
What objects have this option? It appears not to be available in v5.Is this reported as a bug?
- Player
This Type is used to store a reference to an Object. In Etoys the terms Player and Object basically mean the same thing. - Point
This Type is used to store an X,Y location. The user must specify it in the form X@Y where both X and Y are three-digit numbers (not variable names) Therefore 100@200 is valid and specifies X=100, Y=200. 010@020 is also valid, specifying X=10, Y=20. Entering only one or two digits for a component of a point will be accepted, but when a script tries to use that value to set an Object's location an Exception message will appear.
Verify.
Report as bug.
ScriptName
- This Type is used to store script names. A list of existing script names plus "empty script" will appear in the list. This can be used to scripting, where one script sets a script name variable, and another script uses that variable to determine which script to run. Script names with Capital letters will show in lower case with a space preceding the capital letter. So the Script "haveFun" will show as "have fun" in the pull down list.
- Sound
A Type used to store a sound object. The list will include all the default sounds, plus any sounds added to the project. - String
A Type used to store a set of characters. - TrailStyle
A Type used to store a pen trail style, valid values are: lines, arrows, arrowheads, and dots.
Search
This search box lets the user search for tiles by name using partial matches. This search is within the tiles in the current viewer, belonging to the current object.
3.6 Script Editor
Is this V4?

New version V5?
Although some object actions can be controlled in the object's viewer, the script editor is where the user can assemble tiles to create more complex actions or scripts. In the script above two of the object sketch's tiles have been dragged from sketch's viewer and dropped into the Script Editor, and then variables have been added as arguments to commands. When the tile is held on the mouse cursor in a place where it can be accepted by the Script Editor, an area in the script opens up and turns green to show where the tile will be placed. When a tile is released and sound is enabled an audible click plays as the tile enters its slot.
The Script Editor allows the user to assemble tiles and test out and debug ideas for creating a simulation in the Etoys world. The user can use the results of these test scripts to simulate and determine the attributes and behaviors of the objects in the world. Getting into the habit of testing ideas or at least thinking about how to test ideas (and whether what other people say is true) is a wonderful "habit of the mind", essential in science, software development, civics, and other parts of life.
Collapse button

The round brown button with the black enclosed circle at the upper left collapses the script back to the viewer. The script can always be viewed in the Script Editor again by dragging it out onto the world from the scripts category in the object's viewer.
Name of the Player being Scripted
The text to the right of the collapse button is the name of the object the script is attached to. The user cannot change the object's name here.
Name of script
The text to the right of the object's name is the script's name. It's a good idea to give a meaningful name to the script. For example, if it's a script to draw a particular shape using pen trails, the script named could describe the shape produced.
Run once

The yellow exclamation point in the center of the Script Editor toolbar runs the script one time. The user can also run the script from the object's viewer.
Step button

This function is new in Version 5. Run the next phrase in the script. The user can thus step through the script, observing changes at each step, or querying the state of the system with watchers, other scripts or Squeak commands. This is an essential debugging tool.
Tickindicator

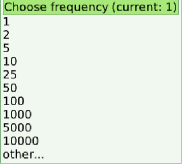
The TickIndicator is the clock face to the right of the yellow exclamation point. The TickIndicator is light green when not in use, pink when script is paused and blue when script is ticking. Hold mouse button down and a menu pops up for setting the rate at which the script should run. The default is 8 ticks a second. Predefined in the menu are choices from one tick to 100 ticks a second. The last menu option is called other... Here the user can type in the number of times per second that the script should run, which can be less than once per second. A tick rate of 0.5 indicates one tick every other second, 0.1 once every 10 seconds, etc.
ScriptStatusControl
This appears to the right of the clock, showing the current state of the script. Click it to get the following menu of options:
- normal - run when called
- paused - ready to run all the time, will change to "ticking" Status when the user presses the "Go" button in the "All Scripts" object.
- ticking - run all the time, will change to "paused" Status when the user presses the "Stop" button in the "All Scripts" object
- mouseDown - run once when mouse goes down the object
- mouseStillDown - run while mouse still down on the object
- mouseUp - run once when mouse comes back up off the object
- mouseEnter - run once when mouse enters the object's bounds with the button up
- mouseLeave - run once when mouse exits the object's bounds with the button up
- mouseEnterDragging - run once when mouse enters the object's bounds while dragging another object
- mouseLeaveDragging - run once when mouse exits the object's bounds while dragging another object
- opening - run once when the object is being opened. This only works for World and Page objects contained in a book
.
Pop Quiz: Can you figure out how to use this to ensure a Book always opens to the first page when a project is opened? Can you figure out how to use this to reset a Page each time it is opened? - closing - run once when the object is being closed. This only applies to World and Pages objects.
More events:
- connectedTo - run once immediately after a connector has connected to the object
- disconnectedFrom - run once immediately before a connector is going to disconnect from the object
- KeyStroke - executed when any key is pressed, this is only available from World and Playfield scripts
- acceptedTextContents - executed when text is accepted, which can be when the user tabs to the next text field or hits return (if accept on CR is checked), this is only available for Enhanced Text objects.
Gold Box

Clicking the gold box or treasure chest icon to the right of the ScriptStatusControl brings up this menu of tiles:
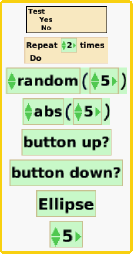
The Gold Box menu gives access to the following special tiles:
-
test tile
This tile has three slots into which the user can place one or more tiles: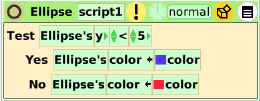
Test: The user can place any tile that contains an attribute of any object. For example, the user could test whether Ellipse's y value is less than 5 as shown. To accomplish this grab the left side of the Ellipse's y tile from Ellipse's viewer. Make sure not to click the assignment arrow and get the red box surrounding Ellipse's y and its value at the right, because that will result in an assignment phrase for the tile, not its attribute. The user can test on almost any attribute (numeric, color, graphic, etc) of any object.
Pop Quiz: How could you define a test to see if a car passed a finish line in a race?
Yes: Tiles placed in the "Yes" holder will be executed when the "Test" is true. If y<5, then Ellipse will turn blue.
No: Tiles placed in the "No" holder will be executed when the "Test" is false. If y>=5, then Ellipse will turn red.
Any attribute tile can be used in the "Test" holder of the "Test Yes No" tile. Some can also be used as watchers, which can be useful when debugging scripts. While the user may think a "Sketch obtrudes" or a "Sketch is under mouse" the Etoys system may think differently. Being able to see this as a script runs can help. - repeat tile

This tile has one holder called "do" into which the user can place the name of a script. The tile repeats the script in the "do" placeholder the number of times set in the number box at the top of the tile.
-
random tile
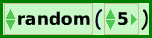
The random number will range from 0 to the number in the number box (in this case 5). It can be dropped into the end of a command that requires a number or function. This is a special case of a function tile.
-
function tile
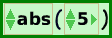
The user can choose a function by clicking the arrows at the left or clicking the function name (in this case "abs") to get a drop down list of functions to choose from. Many commonly-used functions are available in the list. The function can be dropped into the end of a command that requires a number or function.
-
button up?
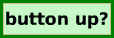 Used in Test and its value is true when the mouse is NOT pressed down.
-
button down?
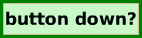
Used in Test and its value is true when the mouse is pressed down anywhere.
-
tile representing the player

In this case the player is Ellipse.
-
number

A number box that can be dropped into the end of a command that requires a number or function.
Script editor menu
![]()
The Script Editor Menu button on the far right with the eToyFriendly preference turned on brings up the following menu.
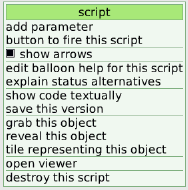
It has the following options.
add parameter
Many tiles in Etoys have a parameter. It is a value that influences the behavior of that tile.
For example, the "forward by" tile has a parameter that specifies how far the object should move. The "make sound" parameter specifies which sound to make. Etc.
The user can also make new tiles. When creating a new script, a tile for it is placed in an object's "scripts" viewer category. That tile can be used in another script.
The "add parameter" menu entry lets the user add a parameter to a tile. When using that new tile in another script, the user can set a specific value for the parameter just as with any other tile.
Inside the script for a tile, that parameter is shown in the title bar. It is called "number" (unless the user changes the parameter type). The user can drag this "number" tile and use it like any variable tile in that script.
For example, this script, contains the "number" tile four times:
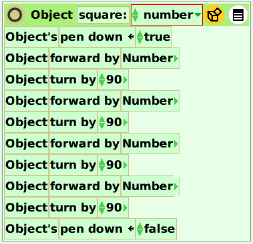
In every use of this new tile, the user can give it another "concrete" value. That's why in the script itself, there is only the "abstract" value called "number". (Computer scientists call the concrete values "arguments" and the abstract values "parameters", but even programmers get confused about the distinction).
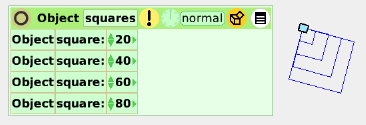
Note that after adding a parameter, the user cannot set the script to "ticking" anymore, because it now needs a parameter. It only gets a concrete value for the parameter from another script where the tile is used. Additionally, the user can set a value in the viewer, and hit the yellow button to run the script with that value:

The following are the data types that can be used as parameters:
- Boolean (true or false)
- BorderStyle
- ButtonPhase
- Color
- Graphic
- ImageResolution
- Number
- Patch
- Point
- ScriptName
- Sound
- String
- TrailStyle
button to fire this script
This will create a button object that can be used to fire the script. The user can change the button's label from the menu in its viewer by selecting change label.
show arrows
When selected the arrows inside scripting tiles will be displayed (ex: the up and down arrows to increase numbers and the left and right arrows to remove and parts of the expression.
edit balloon help for this script
This edits the balloon help that is shown when the user hover over the script name in the scripts category of the Objects Viewer
explain status alternatives
Opens a window with descriptions of the options for "when this script should run" (ex: normal et al)
show code textually
Will provide a text version of the script for editing. This provides an entry into Squeak programming. To save changes type <ctrl><s> (on PC and XO) <cmd><s> (on Macintosh) when done. Note that once changes are made the script cannot be converted back to tile scripting without losing the changes.
save this version
When editing the text version of a script this menu option saves the changes.
grab this object
Will move the object to the position of the mouse for placement anywhere.
reveal this object
Will display the halo for this object to make it easy to find. This can take a second or two.
tile representing this object
Will create a tile representing the script's Object. Tiles representing an object can be used in this or other scripts to replace the Object being acted upon in a script.
open viewer
Will open the viewer for this script's object.
destroy this script
Will destroy this script.
With eToyFriendly turned off, two more options are added to the menu.
- fires per tick... Brings up this menu to allow the user to set the speed of execution of the script.
- detached method pane Brings up a window showing the text version of the script. This method pane updates when the tiles in the script are edited. However, editing the text does not result in tiles being added to the script editor window, and breaks the connection between the two views so that adding tiles to the script editor no longer results in the text being updated. The detached method pane has this halo menu, with commands specific to editing a script.
All but the bottom four items are common to halo menus. The ones specific to scripting are:
- whose script is this? Displays a message box stating, "This holds code for a script named...belonging to an object named...". This is the same information displayed in the toolbar of the script editor.
- open editing Permit editing by drag and drop.
How is that supposed to work? It is implemented in the MorphicModel openToEdits method, but this is a text editor.
- make scrollbar retractable Sets the vertical scrollbar outside the window when the mouse is over it, and hides it when the mouse moves away. Clicking again displays a horizontal scrollbar. There is no way to undo this setting on this menu and make either scrollbar appear all the time.
Report as bug.
- scroll bar on left Toggle display of vertical scrollbar at the left or the right, but do not change the text on the menu to indicate which state it is in.
Report as bug.
3.7 Mouse Buttons
Etoys was designed for a three-button mouse. One version, originally from the Xerox Alto computer on which Smalltalk was developed, is shown below.
The buttons are traditionally identified by color, since there is not one universal button order. For many users, red is left, yellow is middle, and blue is right, although the opposite order is common among left-handed users.
- Red-clicking (usually left-clicking) is the most common mouse action, used among other things to select objects and menu options and to click and drag to move objects.
- Middle-clicking (yellow) brings up alternate menus or a find dialog, depending on context. Control and left/red button together has the same effect in Linux.
- Blue-clicking (usually right) on any object brings up its tool Halo. Using the alt key and the left/red button together in Windows has the same effect.
Get the full set of directions for Mac, Linux, and Windows, and synchronize with the start of this chapter.
Mouse actions can have different effects in original Smalltalk, Squeak, and Etoys. In particular, there are different menus in each.
The more usual Xerox three-button mouse is shown below. A common arrangement today is the wheel mouse, with buttons at left and right, and a wheel that can be turned to scroll the display or pressed as a middle mouse button.

In the rest of this manual, the terms left, middle, and right are used.
What are the Mac combinations? Is it Command-left and Option-left to get right and middle?In Etoys, right-clicking the mouse will open the halo (the menu of colored circles) for the currently selected object. This can be the world, which fills the entire workspace, or any object inside it. Right-clicking again, will select and open the halo for every embedded object in the structure under the cursor.
Left-clicking will invoke a behavior if the user clicks on a button, menu entry or menu icon. Left-clicking many objects picks them up, so that the user can move them around.
For any object, the user can set its behavior regarding mouse-clicks. The menu icon in the object's halo provides the options "resist being picked up" or "be locked". The first one says whether the objects is resistant to a drag done by mousing down. The second option prevents all user interactions.
3.8 Keyboard Shortcuts
Here is a list of keyboard shortcuts which are useful in Etoys. Mostly, these are used with text. There are many more keyboard shortcuts when using the programming tools to access the underlying squeak code. See chapter "programming tools" for more.
| Description
|
Windows
|
Macintosh
|
XO
|
| Cut
|
ctrl-x | cmd-x
|
ctrl-x |
| Copy
|
ctrl-c | cmd-c
|
ctrl-c |
| Paste
|
ctrl-v | cmd-v
|
ctrl-v |
| Select all
|
ctrl-a | cmd-a
|
ctrl-a |
| Find
|
ctrl-f
|
cmd-f
|
ctrl-f
|
| Find again | ctrl-g | cmd-g | ctrl-g |
| Exchange selection with prior selection | ctrl-e | cmd-e | ctrl-e |
| Set selection as search string for find again | ctrl-h | cmd-h | ctrl-h |
| Choose font and size | ctrl-k | cmd-k | ctrl-k |
| Repeat last text-related operation | ctrl-j | cmd-j | ctrl-j |
| Copy window | ctrl-o | cmd-o | ctrl-o |
| Duplicate | ctrl-D | cmd-D
|
ctrl-D |
| Undo | ctrl-z | cmd-z | ctrl-z |
| Choose justification options | ctrl-u | cmd-u | ctrl-u |
| Redraw Screen
|
ctrl-r | cmd-r
|
|
| Display/Hide Shared Tabs (fyi: the Sugar Navigator Flap is a shared tab)s
|
ctrl-F
|
cmd-F
|
|
|
Compare to clipboard |
ctrl-C | cmd-C | ctrl-C |
|
cursor TopHome |
ctrl-H | cmd-H | ctrl-H |
|
Set style |
ctrl-K | cmd-K | ctrl-K |
|
Outdent |
ctrl-L | cmd-L | ctrl-L |
|
Select current type-in |
ctrl-M | cmd-M | ctrl-M |
|
Make project link |
ctrl-P | cmd-P | ctrl-P |
|
Indent |
ctrl-R | cmd-R | ctrl-R |
|
Search |
ctrl-S | cmd-S | ctrl-S |
| Delete preceding word | ctrl-w
|
cmd-w
|
ctrl-w
|
|
Convert linefeeds to carriage returns |
ctrl-U | cmd-U | ctrl-U |
|
To lowercase |
ctrl-X | cmd-X | ctrl-X |
|
To uppercase |
ctrl-Y | cmd-Y | ctrl-Y |
|
Capitalize |
ctrl-Z | cmd-Z | ctrl-Z |
|
Swap characters |
ctrl-y | cmd-y | ctrl- |
|
Swap characters |
ctrl-y | cmd-y | ctrl- |
|
Swap characters |
ctrl-y | cmd-y | ctrl- |
Other special keys (not available on all platforms
| Cmd-1
|
10 point font |
| Cmd-2
|
12 point font |
| Cmd-3
|
18 point font |
| Cmd-4
|
24 point font |
| Cmd-5
|
36 point font |
| Cmd-6
|
color, action-on-click, link to class comment, link to method, url ... Brings up a menu. To remove these properties, select more than the active part and then use command-0. |
| Cmd-7
|
bold |
| Cmd-8
|
italic |
| Cmd-9
|
narrow (same as negative kern) |
| Cmd-0
|
plain text (resets all emphasis) |
| Cmd--
|
underlined (toggles it) |
| Cmd-=
|
struck out (toggles it) |
| Shift-Cmd--
|
(aka _) negative kern (letters 1 pixel closer) |
| Shift-Cmd-+
|
positive kern (letters 1 pixel larger spread) |