ETOYS REFERENCE MANUAL
License: The Etoys Manual will be dual-licensed under GPL (standard for FLOSS Manuals) and MIT (standard for Etoys). By contributing, you agree that your edits can be used under both the GPL and MIT licenses.
4. Common Tiles and Viewer Categories
Tiles are the blocks from which you can build Etoys scripts. You will find most of the tiles you can read about in this chapter in the viewers for Etoys objects. There are a few more in the Gold Box menu on scripting windows toolbars, and on menus provided with many tiles. There is also a function tile in the Object Catalog, which defaults to random. The chapter is sorted by the categories that appear in object Viewers. There are also special categories for special objects, explained in the chapters where the objects are covered. Sometimes you will find fewer tiles in a category or fewer categories than are discussed in this chapter. For example, the category color doesn't exist for all objects. The objects drawn with the painting tool don't have this category, because there can be many colors in a drawing, while the Ellipse has it. The main headings below are the categories and the headings beneath them are the specific tiles in that category. We begin, however, with properties of tiles in general.
These tiles are defined in the Etoys-Scripting Tiles category in Squeak.
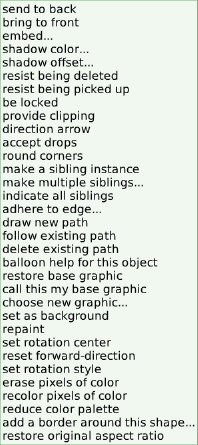
In the StandardViewer for any object, tiles are grouped in categories. This is the menu of categories for an ordinary Morph.

The layout and as object categories appear only with the eToyFriendly preference turned off.
Other categories appear in viewers for other objects in the extended Object Catalog (v. 5.0, eToyFriendly off), and for objects with connectors attached (connections to me).
- book navigation (Book, Storyboard)
- bubble
- button
- calendar
- camera
- collections (graph paper, holder, playfield, x-y plane)
- color & border
- connections to me
- connector
- embeddings (Pin)
- graphics (sketches and other images)
- joystick
- kedama
- kedama turtle
- kedama turtle color
- keyboard (Piano keyboard)
- magnifier (several magnifiers, but not RoundGlass)
- movie controls
- number line
- paintbox (flaps)
- pen trails (graph paper, holder, playfield, x-y plane)
- phonepad
- playfield (graph paper, holder, playfield, x-y plane)
- polygon (arrows, curve, polygon, triangle)
- sampling (graph)
- Scratch Command
- Scratch Configuration
- sector
- slider
- sound recorder
- star
- text (not Scrolling Text)
- time
- trash
- video
4.1 About Tiles
There are six kinds of Etoys scripting tile: commands, variables, watchers, tests, control structures, and expressions.
Commands

A command describes an action that can be carried out by clicking on the ! icon at the left, possibly with a constant, variable, or expression parameter. For any object type there is a predefined set of commands, visible in the object's viewer, and users can add more commands as scripts.
Command tiles are implemented in the CommandTilesMorph class in Squeak.
Variables

A variable holds a value, which can be of several object types.
- Boolean
- Color
- CustomEvents
- Graphic
- Number
- Player
- Point
- ScriptName
- Sound
- String
Within variable tiles and actions used in scripts, wherever a number appears, the number can be modified or edited into an expression.
Some variables are predefined as part of an object. Users can define their own variables for use in their scripts, using an icon on the viewer toolbar. The first step is to enter a variable name, and then to choose a variable type from a menu. This is the menu in Etoys v. 4.0.

And this is the version in v. 5.0.
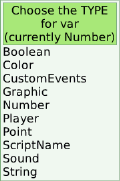
These data types have different sets of values, and are managed and used in different ways. In general, a variable of a particular type can be dropped into a slot in a scripting tile that has a value of that type.
Boolean
Possible values are true (default) and false. Toggle between them by clicking the up or down triangle next to the current value.
Only the down arrow is active in v. 5.0.
BorderStyle
Default value: simple. Click to get a menu with nine options.
ButtonPhase
Default value: button down. Click to get a menu of three values, button down, button up, and while pressed.
Color
A 32-bit RGB-Alpha (Red Green Blue Transparency) color value. Click the color patch that shows the current color to get a color picker. Setting a color variable to display as text permits the color value to be set numerically, with 0-255 being mapped to the range 0.0-1.0.
CustomEvents
Defaults to no event. Clicking it brings up a menu of user-defined events.
To define an event, open a script editor and click on the clock icon to bring up the menu of options for when to run the script. On the submenu for more… is the choice define a new custom event. Clicking it asks for an event name and a description. The new event then appears on that submenu and on the menu for the scripting tile Object's trigger custom event EventName in the scripting category. Selecting a custom event in a script menu and running the trigger custom event tile runs the script.
But what can one do with an event-valued variable? Where can it be used?
Graphic
An image, defaulting to the Paintbox palette graphic. To change the image value, drag the variable out of the viewer to create a script, and drop a tile representing a different image into the variable tile over the current image. Running this script then changes the value.
ImageResolution
This type is misnamed. Resolution is the number of dots per linear unit. This is actually the image's color palette, which can be expressed in terms of the number of colors available, whether they are monochrome or color, and how m
any bits are used to represent them.
Default value: Original, that is, whatever an image is represented in. Click to get a menu with the options original, 256 colors (that would be 8 bits per pixel, but it seems to be 32 bits, with 8 bits each for the three RGB components, plus transparency), 256 grays (8 bits), 4 grays (2 bits), black and white (1 bit).
How can this be used? What tiles have this value type, so that they can accept a variable of this type?
Number
The initial value is a positive integer chosen at random in the range 1-6. By default, 0 decimal places are shown. Click the up or down arrow to increment or decrement the numeric value, or click it to edit it as text. Use the modify function or the decimal places function on the tile menu to set the number of decimal places.
Patch
Creating a patch-valued variable results in a MessageNotification: "An error has occurred; you should probably just hit 'abandon'. Sorry!"
When dragging Particles from the Object Catalog, one gets a KedamaWorld, a patch, and a turtle. The KedamaWorld has a predefined variable that points to the corresponding patch.
Where can this be used?
Player
An object currently active. Default value: dot. To change the value of this variable, put it in a script, drag a tile for another player over the dot, and run the script.
Clicking on a player in a variable tile turns the cursor to a crosshair. What is its purpose and what does it do?
Point
Default value: 0@0. Click to edit.
ScriptName
Default value: empty script. Click to get a menu of the scripts defined for all active objects. Scripting commands accept dropped tiles for ScriptName variables.
Sound
Default value: croak. Click the current sound to get a menu of available sounds.
String
Default value: 'abc'. Click to edit.
TrailStyle
Default value: lines. Clicking brings up a menu with the options lines, arrows, arrowheads, dots. These affect the appearance of the object's pen trails.
To place a variable in a script, it is necessary to click its leftward-pointing arrow and then drag it. Clicking elsewhere and dragging creates a watcher instead, an object that displays the changing values of the variable, and allows the user to edit the value.

Variables are implemented using the AssignmentTileMorph class in Squeak, together with the tiles for the expressions to generate the values to be assigned.
Watchers

Some tiles are very similar to variable watchers, but do not allow assignments of new values. They can be recognized by the lack of the left-pointing assignment arrow and the up and down pointing triangles for selecting or modifying values. Instead they only display values obtained elsewhere. In the viewer, they have a menu at the left for getting simple or detailed watchers.
Values

There are also tiles that represent values, for use in expressions, but do not display them. The menu at the left contains only an option for setting the number of decimal places to use.
Tests

Tests are provided with objects, and shown in the Test category of their viewers. Users can click on parameters, such as the blue color at the right of the block above, to modify them or get a menu of options to choose from.
Controls

Control tiles accept other tiles and determine when to run them. The test yes no tile and the repeat tile are available in the Gold Box menu on the toolbar of any Script, as shown below.

The Test Yes No tile accepts a test and two lists of actions. Choosing one of the action lists to perform depending whether the test evaluates to True or False. This is also known as a program branch.
The Repeat tile carries out the list of actions given it the number of times specified. That number can be a constant or the result of an expression. This is also known as a program loop
Etoys does not provide a scripting tile for the more general While loop, which repeats a list of actions until a test evaluates to False/No.
It is a fundamental theorem of Computer Science that any possible sequential program logic can be expressed using only branches and loops, although it is much preferable to include function calls (as with scripts calling other scripts) or, as in Object-Oriented Programming in Smalltalk, method calls, and to split programs into separate modules. Etoys also supports running tiles in endless loops (ticking), and provides parallel programming, running multiple scripts simultaneously, and allowing scripts to turn other scripts on and off using commands in the Scripting category in object viewers. These are extremely powerful tools, more than powerful enough to allow the user to get into a lot of trouble if used carelessly.
The test yes no tile is defined in the CompoundTileMorph class in Squeak. The repeat tile is defined in the TimesRepeatTile class in Squeak.
Expressions
The Gold Box menu on the toolbar of any Script, shown above, provides several tiles that are meant to be used as components in other tiles, or to accept other tiles as components. These include the math function tiles in the Gold Box menu (above) that default to random, abs (absolute value), and 5; the tests button up? and button down?; and a tile for the current object. Each can be dropped into the appropriate location within a tile containing an appropriate expression. Such component tiles are also available in other locations. Random is available in the Object Catalog. Object tiles are available from the object's viewer and from the tool Halo. Numbers and some functions can be added by editing an expression in a tile directly.
Tiles for components of expressions are defined in classes in the Etoys-Scripting Tiles category in Squeak.
4.2 Category Basic
![]()
The object will make the sound which is specified in the box at the right of the tile. Clicking the box brings up this menu.
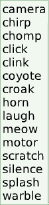
You can choose between camera, chirp, chomp, click, clink, coyote, croak, horn, laugh, meow, motor, scratch, silence, splash, warble and sound tiles you create. You can add your own sound by recording it using the SoundRecorder from the Object Catalog.
![]()
Moves the object forward in the direction of its heading by the amount of pixels, which is given in the right-most portion of the tile. If you put in a negative number, the object will move backwards. If you use a very large number, your object might disappear from the screen. You can get it back by changing the values in the x- and y-tiles of the object or by choosing "grab this object" in the menu at the top of the viewer.
![]()
Changes the heading of the object in degrees by the specified amount. If you use positive numbers, the object will turn clockwise, for negative numbers it turns counter-clockwise. Clicking the up or down triangles before the numeric value increments or decrements the value. Clicking in the numeric field lets you enter a value. Clicking the rightward-pointing triangle extends the number into an expression.
The x coordinate of the object describes the location of the object's rotation center in its holder or the world. The value "0" for the x coordinate defaults to the left side of the object's holder or the world. The default origin of the x-y coordinate system is at the lower left corner of the holder or the world.
You can change an objects rotation center by clicking on it to display its Halo. A small yellow circle with a green arrow will be shown. If you place your mouse on the small yellow circle in the middle of the object, you can hold down the shift key and drag the rotation center to a different part of the object.
Pop Quiz: How can you change the orientation center to make a Baseball bat or Hammer appear to swing?
You can also change the origin point of the World's playfield (or any object with "playfield options..." as a menu item), by selecting "playfield options..." then selecting "origin-at-center". Another way to change a origin point is to click on "set grid spacing..." in "playfield options." The first option allows you to set a new origin point as x@y. These values are relative to the default origin of the lower left corner.
![]()
The y coordinate of the object describes the location of the objects rotation center in its holder or the world. The value "0" for the y coordinate defaults to the bottom side of the object's holder or the world. The origin of the x-y coordinate system is at the lower left corner of the holder or the world.
![]()
The heading is the direction the object is facing in degrees. 0 is straight up, 90 is to the right, 180 is straight down and 270 is to the left.
4.3 Category Color
![]()
The color of the object. You can change the color by clicking on the color box at the right side of the tile. A Color is made up of multiple attributes as shown in the color category of the viewer. When you set a color all those values are updated. A color picker appears and the color changes to the color you click.
![]()
![]()
The green value of the object's color from 0 to 100 as a floating point number. You can change the value at the right of the tile.
![]()
The blue value of the object's color from 0 to 100 as a floating point number. You can change the value at the right of the tile.
![]()
The alpha value of the object's color from 0 to 100 as a floating point number. You can change the value at the right of the tile.
![]()
The hue value of the object's color from -180 to 180 as a floating point number. You can change the value at the right of the tile.
![]()
The brightness value of the object's color from 0 to 100 as a floating point number. You can change the value at the right of the tile.
The saturation value of the object's color from 0 to 100 as a floating point number. You can change the value at the right of the tile.
4.4 Category Geometry
x
The x coordinate (see the basic category for more detail).
y
The y coordinate (see the basic category for more detail).
heading
Heading is the direction the object moves under the forward command (see the basic category for more detail).
![]()
The scale factor is the factor by which the object is magnified. It must be greater than zero, but may be less than 1. The maximum value is 10. It can be changed in the box at the right of the tile.
![]()
Left is the extreme left edge of the object in pixels. It can be changed in the box at the right of the tile.
![]()
Right is the extreme right edge of the object in pixels. It can be changed in the box at the right of the tile.
![]()
Top is the extreme top edge of the object in pixels. It can be changed in the box at the right of the tile.
![]()
Bottom is the extreme bottom edge of the object in pixels. It can be changed in the box at the right of the tile.
![]()
Forward direction is the angle in degrees of the object's forward direction without rotating it. It can be changed in the box at the right of the tile. If the forward direction is changed, the heading is changed by the same amount. If the heading is changed, the forward direction isn't changed.You can also change the forward direction by clicking on an object to see its halo, then hold down the <shift> key and click on the green arrow and drag it in the forward direction you want to set.
Pop Quiz: Why do you think the designers of Etoys added both "forward direction" and "heading"?
Lets say you draw a Sketch of a person with the head at the top. What will happen when you move it "forward 5"? How can you use forward direction to fix this? Will changing heading fix this?
4.5 Category More Geometry
![]()
The location is the position of the object, expressed as x,y coordinates in pixels with the @ between the x and y value. It can be changed in the box at the right of the tile.
![]()
Length is the greatest length of the object along its original y direction in pixels. It can be changed in the box at the right of the tile.
![]()
Width is the greatest width along the original x direction. It can be changed in the box at the right of the tile.
![]()
Theta is the angle between the positive x-axis and the vector connecting the origin to the object's position. It can be changed in the box at the right of the tile.
![]()
Distance is the length of the vector connecting the origin to the object's position. It can be changed in the box at the right of the tile.
![]()
Heading theta is the angle, in degrees, that my heading vector makes with the positive x-axis. It can be changed in the box at the right of the tile.
![]()
Rotation center x is the x coordinate in pixels of rotation center in parent's coordinate system. It can be changed in the box at the right of the tile.
![]()
Rotation center y is the y coordinate in pixels of rotation center in parent's coordinate system. It can be changed in the box at the right of the tile.
4.6 Category Pen Use
![]()
If run, this command clears all pen trails in the object's containing playfield, but not in the object itself. For example, if the object is a playfield in the world, then this command clears pen trails in the world, but not in this specific playfield. Contrast with clear pen trails in the pen trails category of playfields.
![]()
This controls the diameter in pixels of dot to use when trailStyle is dots. It can be changed in the box at the right of the tile.
![]()
This shows the color of ink used by the pen in the box at the right of the tile. You can change the color by clicking on the color box at the right side of the tile. A color picker appears and the color changes to the color you click.
![]()
The pen is down/up if the Boolean choice at the right of the box is true/false. It can be changed in the box at the right of the tile.
![]()
This gives the width of the pen in pixels. It can be changed in the box at the right of the tile.
![]()
This determines whether lines, arrows, arrowheads, or dots are used when I put down a pen trail. The possibilities can be changed in the box at the right of the tile.
4.7 Category Tests
Getting into the habit of testing your ideas is a very powerful concept. While these tiles are not quite that powerful, they can test what is going on in your Etoys world. You can use the results of these tests to determine the attributes and behaviors of the objects in your world. Getting into the habit of testing your ideas or at least thinking about how you could test your ideas (and what other people tell you is true) is a wonderful "habit of the mind".
![]()
Once this tile is placed in a script, it has the three slots shown below into which you can place one or more tiles:
- Test: Any Boolean-valued variable or expression.
- Yes: Tiles placed in the "Yes" holder will be executed when the "Test" is true.
- No: Tiles placed in the "No" holder will be executed when the "Test" is false.
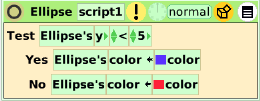
![]()
If the object's color (specified by the color on the left side of the tile) is over the given color (specified by the color on the left side of the tile), then the commands under yes in the test will be executed. If not, the commands under no will be executed. You can change the colors by clicking on the appropriate color. A color picker appears and the color changes to the color you click.
![]()
If any part of the object is over the given color, then the commands under yes in the test will be executed. If not, the commands under no will be executed. You can change the color by clicking on it. A color picker appears and the color changes to the color you click.
![]()
If the object is under the current mouse position, then the commands under yes in the test will be executed. If not, the commands under no will be executed.
![]()
If the object sticks out over its container's edge, then the commands under yes in the test will be executed. If not, the commands under no will be executed.
![]()
If the object overlaps a given object, then the commands under yes in the test will be executed. If not, the commands under no will be executed. The given object can be changed by dropping a tile for the desired object onto dot.
![]()
If the object overlaps a given object or one of its siblings or a similar object, then the commands under yes in the test will be executed. If not, the commands under no will be executed. The given object can be changed by dropping a tile for the desired object onto dot.
4.8 Category Motion
forward by
See the basic category for a description of this tile.
turn by
See the basic category for a description of this tile.
x
See the basic category for a description of this tile.
y
See the basic category for a description of this tile.
heading
See the basic category for a description of this tile.
![]()
If this tile is included in a script, the object will bounce off the edges of its container (ex: world or playfield) and make the sound selected at the right of the tile, when it hits its containers edge.
obtrudes
See the tests category for a description of this tile.
![]()
If this tile is included in a script, the object will turn toward the given object. The given object can be changed by dropping a tile for the desired object onto dot.
![]()
If the object has gone outside the bounds of its container, this tile will zap it over to the opposite edge of the container, providing a 'wrapping' impression.
Note: The fence of the container object, such as a playfield, must be disabled to make it work. If fence is enabled, the object will just bounce on the fence. To enable the fence, use the menu icon of the container and then "playfield options". See chapter.
4.9 Category Fill & Border
color
See the color category for a description of this tile.
![]()
If true is selected at the right of the tile, a gradient fill will be used.
![]()
This is the second color used when gradient fill is in effect.
![]()
If true is selected at the right of the tile, the gradient fill will be radial.
![]()
This determines the width of the border around the object in pixels. It can be changed in the box at the right of the tile.
![]()
This determines the color of the object. You can change the color by clicking on the color box at the right side of the tile. A color picker appears and the color changes to the color you click.
![]()
This determines the border style. You can select from simple, raised, inset, complex framed, complex raised, complex inset, complex alt framed, complex alt raised, and complex alt inset at the right of the tile.
![]()
If true/false, the corners are rounded or not. Select true/false at the right of the tile.
![]()
If true/false, a drop shadow is shown or not. Select true/false at the right of the tile.
![]()
This is the color of the drop shadow. You can change the color by clicking on the color box at the right side of the tile. A color picker appears and the color changes to the color you click.
4.10 Category Scripting
![]()
This starts the given script ticking. You can select from available scripts at the right of the tile.
![]()
This makes the given script be "paused". You can select from available scripts at the right of the tile. Note: If the script specified is the script containing this tile, the script will not pause until it finishes its current processing of the all the tiles in the script. For example, if you have a "Object forward 5" tile after a "Object pause script script1" tile in a script named "script1", the object will move forward 5.
![]()
This makes the given script stop or revert to "normal". You can select from available scripts at the right of the tile.
Note: If the script specified is the script containing this tile, the script will not stop until it finishes its current processing of the all the tiles in the script. For example, if you have a "Object forward 5" tile after a "Object stop script script1" tile in a script named "script1", the object will move forward 5.
![]()
This starts the given script and all of its siblings's scripts ticking in the object. You can select from available scripts at the right of the tile.
![]()
This makes the given script and all of its sibling's scripts be "paused" in the object. You can select from available scripts at the right of the tile.
Note: If the script specified is the script containing this tile, the script will not pause until it finishes its current processing of the all the tiles in the script. For example, if you have a "Object forward 5" tile after a "Object pause all script1" tile in a script named "script1", the object will move forward 5.
![]()
This make the given script and all of its sibling's scripts stop or revert to "normal" in the object. You can select from available scripts at the right of the tile.
Note: If the script specified is the script containing this tile, the script will not pause until it finishes its current processing of the all the tiles in the script. For example, if you have a "Object forward 5" tile after a "Object stop all script1" tile in a script named "script1", the object will move forward 5.![]()
This sends a message to all siblings to run the given script once. The object that executes this will not have its script run, only its siblings will run the script once. You can select from available scripts at the right of the tile.
![]()
This runs the given script once, on the next tick. You can select from available scripts at the right of the tile.
![]()
This runs the given script in the object and in all of its sibling once. You can select from available scripts at the right of the tile.
4.11 Category Sound
make sound
See the basic category for a description of this tile.
![]()
This will play a sound of the frequency entered in the box at the right of the tile.
![]()
This command will stop the sound.
4.12 Category Observation
![]()
This tile goes into a test box to test the heading the object would need to have to face directly toward another object. The given object can be changed by dropping a tile for the desired object onto dot.
![]()
This tile returns the brightness under the center of the object. The brightness appears in a box at the right of the tile.
![]()
This tile returns the color under the center of the object. The color appears in a box at the right of the tile.
![]()
This tile goes into a test box to test a function of the distance to another object. The function can be selected at the left of the tile once it is in the test box. The given object can be changed by dropping a tile for the desired object onto dot.
![]()
This tile returns the luminance under the center of the object. The luminance appears in a box at the right of the tile.
![]()
This tile returns the saturation under the center of the object. The saturation appears in a box at the right of the tile.
4.13 Category Layout

A submorph is typically an object dropped onto another object with the property accept drops set to true. Submorphs can also be added to Morphs under program control. Submorphs can be placed so that they overlap the border of the main morph. This property is supposed to determine whether the portion of the submorph extending outside that border will be displayed (false, the default) or clipped (true).
It is important to understand that the clipping boundary of a Morph is its bounding rectangle, no matter what the visible shape of the Morph. Thus clipped submorphs can stick out well beyond the Morph. It is possible to rearrange the vertices of a Polygon so that a submorph is completely outside its visible boundary while still being completely inside the clipping rectangle.
4.14 Category Drag & Drop
![]()
If true/false, this object will be blind/or not to all input. Select true/false at the right of the tile. This is useful if you have text or other objects you don't want the user to accidentally move or change.
![]()
If true/false, drop is enabled/or not. Select true/false at the right of the tile. When true you can embed other objects in this this object. Once embedded when you move the object all objects embedded inside it will move with it.
Etoys Challenge:
- Use drop enabled to draw a person and ensure "drop enabled" is true.
- Then draw some clothes (some combination of shirts and shorts).
- Place the person and each piece of clothing in a "Maker Button" (this will allow you to make copies instantly just by clicking on the maker button and dragging onto the screen).
- Then see how many possible combinations of different outfits you can create.
- How can you prove you have all the possible combinations?
![]()
If true/false, a simple mouse-drag on this object will allow it to be picked up/or not. Select true/false at the right of the tile.
![]()
If true/false, the object is resistant to easy removal via the pink X halo handle/or not. Select true/false at the right of the tile.
4.15 Category Miscellaneous
![]()
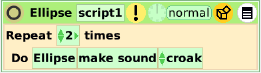
Drag here to tear off a Repeat Times Do tile which you can drop into your script. This tile is also available from the Gold Box menu in the Scripting Editor. This Tile will execute all the tiles inside it the number of times specified as shown below.
![]()
This tile makes a copy of the object. The copy will not be visible, you need to include it in a playfield or holder first. An example would be "playfield include: object's copy". A difference is that for siblings, "copy" creates another sibling.
The menu at the left of the tile allows you to get a piece of data from the object which you can use in scripts. Also you can immediately make a copy of the object.
![]()
This tile allows you to do the menu item selected at the right of the tile. You can either click the yellow exclamation mark at the left of the tile or use the tile in a script. Clicking the up or down pointing triangle cycles through a set of commands. Clicking the command portion of the tile brings up this menu:
What version produces this menu?
Or this menu (Etoys v. 5, eToyFriendly on)
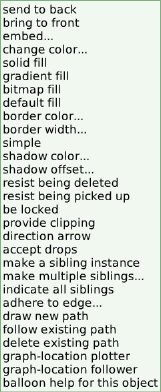
Or this (Etoys v. 5, eToyFriendly off)
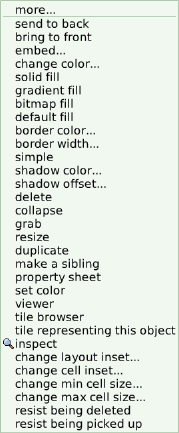
Clicking more brings up this additional menu.

Each of these commands is on the Halo menu or one of its submenus, which are documented in the User Interface chapter of this manual. For each item listed, the menu where it appears is given below.
The following Halo menu commands do not appear here.
- show shadow on the drop shadow submenu.
- Commands on some layout submenus
- Commands on the debug submenu
A number of these commands set Booleans, but do not provide a way to reset them.
send to back Halo menu
bring to front Halo menu
embed… Halo menu. To undo, embed object in Desktop.
change color… fill style submenu
solid fill fill style submenu
gradient fill fill style submenu
bitmap fill fill style submenu
default fill fill style submenu
border color…border style… submenu
border width… border style… submenu
simple border style… submenu
shadow color…drop shadow submenu
shadow offset…drop shadow submenu
delete halo actions… submenu
collapse halo actions… submenu. Can only undo manually.
grab halo actions… submenu
resize halo actions… submenu
duplicate halo actions… submenu
make a sibling halo actions… submenu
property sheet halo actions… submenu
set color halo actions… submenu
viewer halo actions… submenu
tile browser halo actions… submenu
tile representing this object halo actions… submenu
inspect halo actions… submenu
change layout inset… layout submenu
change cell inset…layout submenu, table layout subsubmenu
change min cell size… layout submenu, table layout subsubmenu
change max cell size… layout submenu, table layout subsubmenu
resist being deleted Halo menu
resist being picked up Halo menu. Can set to True, but not to False.
be locked Halo menu. Can set to True, but not to False.
provide clipping Halo menu. Can set to True, but not to False.
direction arrow Halo menu. Can set to True, but not to False.
accept drops Halo menu. Can set to True, but not to False.
copy to paste buffer copy & print… submenu
copy text copy & print… submenu
copy Postscript copy & print… submenu
print Postscript to file… copy & print… submenu
make a sibling instance siblings… submenu
make multiple siblings… siblings… submenu
indicate all siblings siblings… submenu
BMP file export… submenu
GIF file export… submenu
JPEG file export… submenu
PNG file export… submenu
put in a window extras… submenu
adhere to edge… extras… submenu
add mouse up action extras… submenu
remove mouse up action extras… submenu
hand me tiles to fire this button extras… submenu
arrowheads on pen trails… extras… submenu
draw new path extras… submenu
follow existing path extras… submenu
delete existing path extras… submenu
graph-location plotter extras… submenu
graph-location follower extras… submenu
balloon help for this object extras… submenu
![]()
The number at the right is the object's index in its container (holder or world). The index can be changed at the right of the tile.
![]()
This removes this object from the screen. You can either click the yellow exclamation mark at the left of the tile or use the tile in a script.
![]()
This tile triggers any and all of this object's button actions. You can either click the yellow exclamation mark at the left of the tile or use the tile in a script.
![]()
This tile makes the object invisible. You can either click the yellow exclamation mark at the left of the tile or use the tile in a script.
![]()
This tile shows the object's container at the right of the tile. The menu at the left of the tile allows you to get a simple or detailed watcher or piece of data from the object's holder.
![]()
This tile makes the object visible. You can either click the yellow exclamation mark at the left of the tile or use the tile in a script.
![]()
This tile adds the objects image to the pen trails. You can either click the yellow exclamation mark at the left of the tile or use the tile in a script.
![]()
This tile adds the object's image to the pen trails and then goes away. You can either click the yellow exclamation mark at the left of the tile or use the tile in a script.
4.16 Category Graphics
This category appears in the Viewer for a Sketch but not for other Morphs.
This tile shows the picture currently being worn at the right of the tile.
This tile shows the picture originally painted for this object at the right of the tile, but can subsequently be changed via menu or script.
![]()
This tile allows the object to wear the costume of a second object, by default a dot object. The second object can be changed by dropping a tile for the desired object onto dot. You can either click the yellow exclamation mark at the left of the tile or use the tile in a script.
![]()
This command restores the object's costume be the one I remember in my baseGraphic. You can either click the yellow exclamation mark at the left of the tile or use the tile in a script.
![]()
This tile allows the user to select how the graphic should change when the heading is modified. It can be used in a test box to test for the rotation style.
4.17 Category Graphing

This tile is used to give or set the location of an object related to it's coordinate system. The world is the basic system with x and y starting with 0,0 in the lower left corner of the screen.

This tile gives access only to the x-axis of the coordinate system.

This tile gives access only to the y-axis of the coordinate system.
4.18 Category Input
![]()
This tile can be used in a test box to test for last unhandled keystroke.
4.19 Category As Object
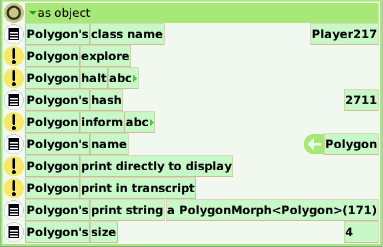


![]()


4.20 Category Speech Bubbles


Renumber the following categories.
4.21 Category Book Navigation (Book, Storyboard)
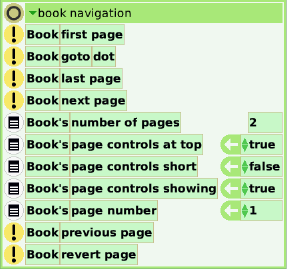

Go to the first page in the book.

Set the specified page as the current page, and display it. Although the default object specified is a dot, this tile has no effect unless the target is a page in a book.

Go to the last page in the book.

Go to the page after this one.

Watcher for the number of pages in the book.

Toggle whether the control bar is at the top or bottom of the page.

Toggle between limited and full sets of controls.

Show or hide controls.

The number of the currently-displayed page.

Go to the page before this one, if any.

Reverts to a saved version of a page, if any.
How does one save pages or books? There is a savePage method in BookMorph, but I don't see how to activate it in Etoys.
4.20 Category bubble


When a bubble is attached to an object, moving the object moves the bubble with it.

When the bubble is attached to an object, this tile references the object. It can be used in scripts as a substitute for a tile derived from the object.

Break the attachment between the bubble and the object. The bubble remains where it is, so there is no visible difference until the object is moved.
4.21 Category button
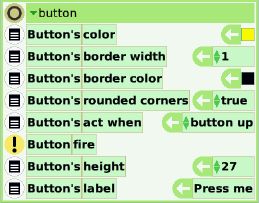

The background color on the button, set with a color picker.

The width of the colored border. Increasing this width expands the border inward, so that it can overlap the button's label. Increase the button's height to remove the overlap.

The color of the button's border, set with a color picker.

Boolean choice of rounded or square corners.

As with any three-phase button, a choice of button down, button up, or while pressed.

Run the action associated with the button. This is programmed via the Halo menu, in Squeak.

The height of the button, including its border.

The text that appears on the button. Use spaces on both ends of the label to adjust the button's width, for which there is no tile.
4.22 Category calendar
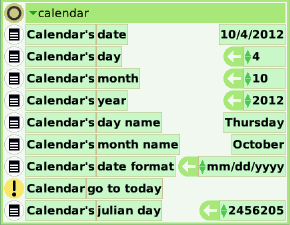

The date selected on the calendar as a text string in the current format.

The numeric day of the month.

The numeric month.

The number of the year, which can be 0 or negative. This does not match any historical calendar.

The name of the day of the week.

The name of the month.

A choice of mm/dd/yyyy (US), dd/mm/yyyy (UK and elsewhere), or yyyy/mm/dd (Japan; simplest to sort correctly).
Perhaps someone knowledgeable about date locales could add more information on this usage.

Set all variables to correspond to today's date.

The Julian day gives a uniform sequential value for days independent of any historical calendar. It is not related to the historical Julian calendar. Julian day 1 is nominally November 25, -4713, a date far outside the range of any European calendar and of most other historical calendars. This value can be 0 or negative.
4.23 Category camera
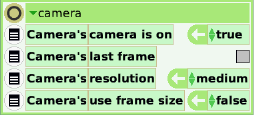

When camera is on, it shows the scene continuously. When camera is off, it shows the last image from when it was last on.

A source of tiles for various properties of the image taken by the camera. Select tiles to get… from the menu at the left. Choose a data type, then a variable of that type to get a tile.
I tried this with a graphic from the camera. I dropped the camera's last frame graphic tile into a sketch variable tile, and tried to run it to set the sketch's costume to the camera image. An error resulted.

Requesting tiles of some types can crash Etoys with a cascade of error messages.

Does anybody know how to use this? In particular, is there a way to ask the camera to take a picture and make it available in the workspace?

Choice of low (160 x 120), medium (320 x 240), or high (640 x 480).

When true, set the view size in proportion to the camera's resolution and resist manual resizing.
4.24 Category collections (graph paper, holder, playfield, x-y plane)


Number of items in this collection.

The index of the currently-selected item, according to some non-obvious internal calculation, or as set in this tile.

The first item in the internal list of collection contents. Placing an object with the mouse puts it at the head of the list, so a thumbnail of the object placed appears in this tile.

The image of the currently-selected item.
How is this used?
What distinction can one make in Etoys between a player and its graphic? This looks identical to page's graphic at cursor. Presumably they have different effects when dropped into some other tiles, but which and what?

Add an object to the collection, and move it to the nearest location within the container.

Add an object to the collection, but do not show it.
The object is placed at the nearest point within the container, even though it is supposed to appear at the cursor location. Verified in Squeak definition which calls goHome. To be reported as bug.

goHome
	| box |
	(owner isInMemory and: [owner notNil])
		ifTrue:
			[self visible
				ifTrue:
					[box := owner.
					self left < box left ifTrue: [self position: box left @ self position y].
					self right > box right
						ifTrue: [self position: (box right - self width) @ self position y].
					self top < box top ifTrue: [self position: self position x @ box top].
					self bottom > box bottom
						ifTrue: [self position: self position x @ (box bottom - self height)]]]

I have no idea what this is. There are no visible use cases; the help is most unhelpful. I can see the Squeak selector for setting this value, but I don't see where it can be used. There is no Squeak code that calls this method, only two instances.

How is this used?
What distinction can one make in Etoys between a player and its graphic? This looks identical to page's graphic at cursor. Presumably they have different effects when dropped into some other tiles, but which and what?

Delete all of the objects in this container. They do not go into the Trash.

Randomly change the order of objects in the container, and renumber them

The page title, if any.

A script for controlling all objects in a container.
4.25 Category color & border

This is actually neither border nor color. The only variable in this group is for the width of the connector, including the line and any arrowheads. It can be set to 0, making the connector invisible when connected to objects at both ends.
4.26 Connections to Me

This category appears only for objects that have connectors attached to them.

The number of connector destinations attached to this object.

The number of connector sources attached to this object.

Apply the given script to objects at sources of connectors coming in to this object.
What kinds of script work? I tried this and got nothing.

Apply the given script to objects at destinations of connectors coming in to this object.
What kinds of script work? I tried this and got nothing.

Apply the given script to objects at sources of chains of connectors and objects coming in to this object.
What kinds of script work? I tried this and got nothing.

Apply the given script to objects at destinations of connectors and objects coming from this object.
What kinds of script work? I tried this and got nothing.
4.27 Category connector
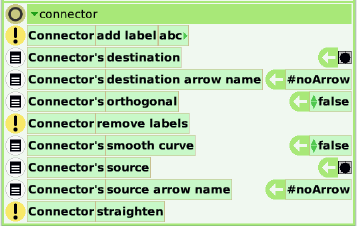

Put a label on the middle of the connector with the given text.

The object at the destination end of the connector, or dot if there is none.

The name of the arrowhead applied to the destination end of the connector. Clicking the current name brings up this menu.
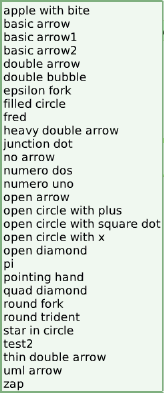
We should give examples of these arrowheads somewhere.

If true, the connector consists of horizontal and vertical segments. If false, the connector can contain segments at any angle.

Delete any label applied to this connector.

If true and the connector's orthogonal property is also true, segments are joined with smooth curves. If false, segments meet at sharp corners. If orthogonal is false,

The object at the source end of the connector, or a dot if there is none.

The name of an arrowhead to be applied to the connector, from the same menu as for destination arrow names.

If the connector has been modified into multiple straight line segments or curves,
4.28 Category embeddings (Pin)
The embeddings category appears in the viewers for pins, and for objects containing embedded pins, like the ellipse below, but not for objects containing other embedded objects. This category mixes functions for the embedded pins, for the objects containing them, and for any other embedded objects.
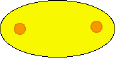
Objects with embedded pins also have variables referring to them.
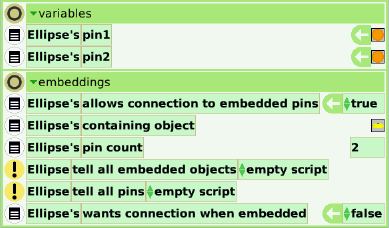
The ellipse above has two pins embedded in it, as reflected in Ellipse's pin count.

Objects containing embedded pins by default allow connections to them, while pins having no pins inside them naturally do not. Embedded pins want connections when embedded, while objects containing pins but not embedded in other objects do not.

Make embedded pins available for connections or forbid connections to them.

If the object is embedded in another object, points to that other object. If not, points to this object.

The number of pins embedded in this object.

Fire a script on each embedded object.
What kinds of script? I tried this and got nothing. How do I define a script that multiple objects can follow?

Fire a script on each embedded pin.
What kinds of script? I tried this and got nothing. How do I define a script that multiple objects can follow?

If this object is embedded in some other object, allow or forbid using it as a connection point.
4.29 Category joystick
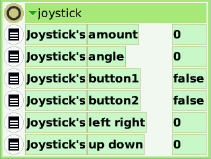
There are functions provided on the Joystick's Halo menu but not in scripting tiles, such as changing x and y range, or setting the Joystick to auto-center.

Range: 0-28.28, independent of joystick x and y axis ranges set in the Halo menu.

With the positive x-axis direction as 0, the angle of the line from the center of the joystick body to the handle. Mathematically,

What button? Is this activated by track real joystick on the Halo menu?
Although the Joystick object in Etoys does not have buttons, the JoystickMorph in Squeak has methods for firing buttons, so it is possible to write a script to set this.

What button?

Joystick horizontal position (x-axis) on a scale from -5 to 5 by default. The range can be set using the Halo menu.

Joystick vertical position (y-axis) on a scale from -5 to 5 by default. The range can be set using the Halo menu.
4.30 Category kedama
There are two kedama categories, one for KedamaWorld, and one for KedamaPatch.
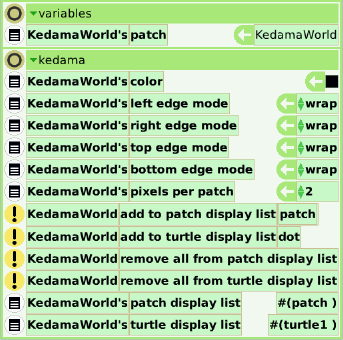

The color of the KedamaWorld object. Set with a color picker.


Set the mode for objects reaching any of the four edges of a KedamaWorld. A menu offers the selections
- wrap Continue from the opposite edge.
- stick Stop at the edge
- bouncing Change direction like a bouncing ball
![]()
Change the size of the KedamaWorld in proportion to this value.

Attempting to use this tile results in an error.

What is the display list? How do I access it?

What is the display list? How do I access it?

What is the display list? How do I access it?

What is the display list? How do I access it?

What is the display list? How do I access it?
4.31 Category kedama turtle
Part of the kedama Particles system. Kedama Turtle has only two categories in its viewer, namely kedama turtle and kedama turtle color.
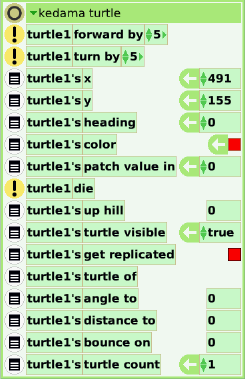

The same as the forward by tile in the basic category of other objects.

Should be the same as the turn by tile in the basic category of other objects. However, nothing happens.

The same as the x tile in the geometry category of other objects.

The same as the y tile in the geometry category of other objects.

The same as the heading tile in the geometry category of other objects.

The same as the color tile in the color category of other objects.

What is this? What can I do with it? The user cannot set this variable.

Delete this turtle.

What is this? What can I do with it?

Has no effect.

What is this? What can I do with it?

What is this? What can I do with it?
One should be able to use the menu at the left to get tiles for internal variables of Kedama Turtle, but attempting to access any of them results in an error.

Angle to what?

Distance to what?

The turtle bounces if it reaches the boundary of the World. But I see no use for this tile.

No effect.
4.32 Category kedama turtle color
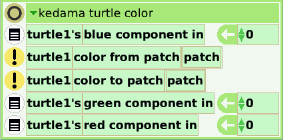

Cannot edit this color component, and cannot see any effect.

No visible effect.

No visible effect.

Cannot edit this color component, and cannot see any effect.

Cannot edit this color component, and cannot see any effect.
4.33 Category keyboard (PianoKeyboard)
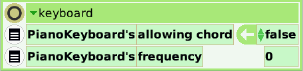

When allowing chord is false, clicking a key on the PianoKeyboard creates a single note for as long as the mouse button is pressed. When it is set to true, clicking a key turns on a note and leaves it on. This allows the user to construct chords. To terminate a chord, set this value to false again.

The frequency of the last note played, whether alone or as a component of a chord.
4.34 Category magnifier (several magnifiers, but not RoundGlass)
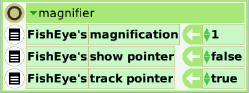

The magnification of the image around the cursor in the magnifier display.

Whether to place a dot at the center of the magnifier

Whether to show a magnified image of what is around the cursor.
4.35 Category movie controls
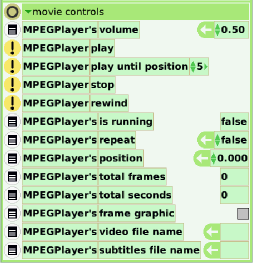

Audio playback volume on a scale of 0.00-1.00.

Start playing the selected video.

Play from the current position in the video up to a specified position.
What is the scale used?

Stop playing, but remain at the same position in the file.

Go back to the beginning.

Whether or not Movie Player is playing a video.

Whether to start over at the end of the video, in an endless loop.

A number representing the current position in the video.
What is the scale used?

Length of current video in frames.

Length of current video in seconds.

A graphic image of the current frame.

The name of a file containing subtitles for the current video.
How is this set?

The name of the file containing the current video.
4.36 Category number line


The value at the beginning (left or bottom end) of a number line or the left or top of a slider.

The value at the end (right or top end) of the number line or the right or bottom of a slider.
![]()
The number of screen pixels in each unit.

The number of numeric units per tick mark.

The number of marks between numeric labels or legends.

Show an arrowhead at the beginning of the number line as well as the end.

Show or hide the zero. This can be used to display crossed horizontal and vertical number lines without the zeroes overlapping them.
4.37 Category paintbox (flaps)


Make a drawing in the specified object, which should be a playfield, according to the help text.
What playfield? What is this for? I tried it in the parts bin of a flap. Nothing. The tools palette appeared, but there was no place I could draw. I tried it in a Holder, and was able to draw, but when I clicked Keep, there was an error.
4.38 Pen Trails (graph paper, holder, playfield, x-y plane)
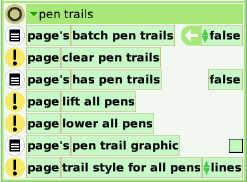

Should pen trails be laid down in all possible detail, or only showing movement from one tick to the next.
Can somebody give us an illustration of the difference?
![]()
Erase all pen trails currently visible in the playfield. Contrast with clear all pen trails in the pen use category.

Are there currently any pen trails in this playfield?

Stop recording pen trails when objects move.

Start recording pen trails when objects move.

A representation of a complete pen trail. There is a menu item for putting it in hand.

A choice of lines, arrows, arrowheads, or dots.
4.39 Category phonepad


Dials a telephone number.
4.40 Category playfield (page, graph paper, holder, playfield, x-y plane)


What is this, and what can be done with it?

Horizon

Vertical position of the mouse, with the lower left corner of the playfield as 0@0.

Bring all parts that have moved outside the playfield back in.

Make any hidden objects visible. The hide tile is in the miscellaneous category.
4.41 Category polygon (arrows, curve, polygon, triangle)
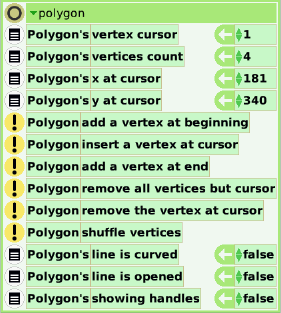

The currently selected vertex for a number of purposes, as in other tiles below. It is highlighted in blue when handles are visible. There is no connection with the mouse cursor. For example, clicking a vertex handle does not set the cursor to that vertex.

The number of vertices and hence the number of sides of the polygon. Editing this value in the viewer or changing it in a script causes vertices to appear in front of the cursor, or to disappear starting at the cursor. The cursor is set to the next vertex after the ones deleted.

The x coordinate of the cursor.

The y coordinate of the cursor.

A new vertex is added at the same location as vertex number 1, with an edge of length 0.

A new vertex is added at the same location as the currently selected vertex, lying in front of it, with an edge of length 0.

A new vertex is added at the same location as the last vertex in sequence, with an edge of length 0.

In fact, two vertices remain, joined by a side of length 0. It is possible to remove one more vertex, leaving a polygon with 1 vertex and 0 sides.

The current vertex is removed, and the remaining vertices renumbered. The polygon is redrawn.

The vertices remain in the same places, but their order is randomized, and the polygon is redrawn using the new order.

If false, the polygon is a straight-sided polygon. If true, the polygon is actually a Bezier curve. In either case, dragging the middle of a side creates a new vertex and splits that side into two.

If false, the polygon is closed, with the last and first points joined by a side. If true, they are not joined.

If true, vertices are marked with yellow circles, except that the location of the cursor is marked with a blue circle. The midpoints of sides are marked with green triangles.
Category sampling (graph)


Play waveform as sound.
![]()
Remove all values from graph.

The x coordinate on the graph

What is this, and what can one do with it?

Load and graph data for the trigonometric sine function from 0 to , scaled with x from 0 to 4000, and y from -100 to 100.

Load and graph data for any sound on the menu.

Reverse the order of the values graphed, and the image of the graph.

The y value on the graph for the current x value. Editing this value graphs the value, and increments the cursor location by 0.01.
4.43 Category Scratch Command
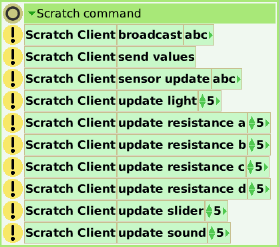

What does this do?

What does this do?

What does this do?

What does this do?


What does these do?

What does this do?

What does this do?
4.44 Category Scratch Configuration
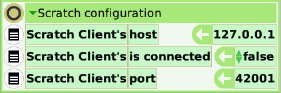

What does this do?

What does this do?

What does this do?
4.45 Category sector


Display or hide the single handle for setting the sector's angle.

The central angle of the sector, in degrees.

The radius of the circle from which the sector is cut.
4.46 Category slider
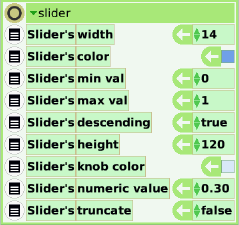

Width of the rectangular body of the slider.

Color of the background area in the slider.

The value of the slider at the lowest position.

The value of the slider at the highest position.

Reverse the slider so that it goes from max to min value.

Height of the rectangular body of the slider.

Color of the knob within the slider.

Value corresponding to the current position of the knob.

Whether to return integer values (true) or decimal fractions (false).
4.47 Category sound recorder


Play back the most recent recording. There is no tile to save a recording, even though there is a button to do so. There is no way, either with tiles or in the UI, to load a saved recording.
If no recording has been made in this session, an error dialog appears saying, "please record a sound first".

Start recording. This assumes that the software has connected to a microphone on the computer, which does not seem to take place.

Halts either recording or playback.
4.48 Category star


The number of points plus the vertices between the points. So the default five-pointed star has ten vertices.

The ratio of length and width of points. The default value is 42. Setting it to 81 makes a fve-pointed star into a pentagon. Setting it to 0 makes it five lines emanating from a point.
4.49 Category text (various text objects, but not Scrolling Text)
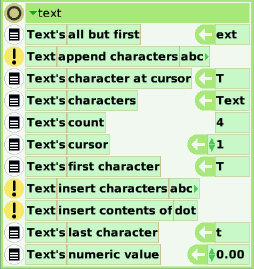

The text data held in this object without its first character.

Add the specified text to the end of the value of the object.

The character at the location specified by the cursor value.

The entire text value of this object.

The number of characters in the text value.
What happens if we put in Unicode text? Does this count Unicode characters correctly, or is it still a byte count? Well, it turns out that I cannot paste Unicode characters outside Latin-1 into a Text object and get a useful result.

An index into Text.

If the text is not empty, this is the initial character from its value. If it is empty, the value is '.'. Treatment of this value is inconsistent.

Insert the given characters at the cursor location. The text in this tile can be edited manually, or replaced by any other text value

Insert text from a specified object at the cursor location.

If the text is not empty, this is the final character from its value. If it is empty, the value is apparently '.'.

If a segment of Text can be interpreted as a number, a value for the first such segment. If a representation of a decimal number is embedded in a text, only the integer part is taken as the value.
4.50 Category time (Digital Clock)
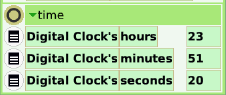

A watcher for the hours portion of the current time.

A watcher for the minutes portion of the current time.

A watcher for the seconds portion of the current time.
4.51 Category trash
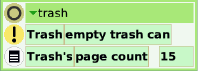
![]()
Delete permanently any objects deleted from the World and placed in the Trash Can.

The number of pages in the Trash Can holding deleted objects, with a help text on page 1, and a deleted object on each page after that.
4.52 Category vector
This category is an option that can be turned on with the useVectorVocabulary preference in the scripting category of Preferences, or using the choose vocabulary option on the more... submenu of the viewer menu. (None of the other vocabularies listed work.)
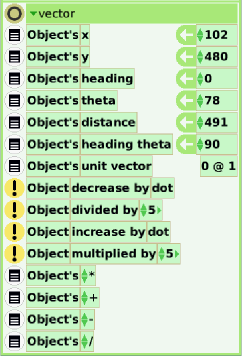
Object's x Distance of object from left edge of world.
Object's y Distance of object from lower edge of world.
Object's heading
Object's theta The angle between the positive x-axis and the line connecting the origin and the object's position. In polar coordinates, θ.
Object's distance Distance of object from the origin of the world, at the lower left. In polar coordinates, r.
Object's heading theta
Object's unit vector
Object decrease by dot
Object divided by 5
Object increase by dot
Object multiplied by 5
Object's *
Object's +
Object's -
Object's /
4.53 Category video
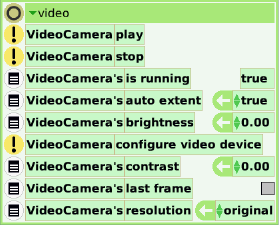

Play the last video, if any.
There is no way with these tiles to record or load a video. What can it play?

Stop playing.

Whether the movie is being played

Determines whether the video window can be resized.

Set Video brightness on a scale of 0-1.
I can't play a video, so I can't see what this does.

Set extent (width and height), test pattern, and whether to display time.

Set Video contrast on a scale of 0-1.
I can't play a video, so I can't see what this does.

The last recorded frame.
I think. I see no way to view it, and in any case there is no way to play a video.

This is misnamed. It is color depth, not resolution.
The options are
- original, from the video itself
- 256 colors (8 bits per pixel)
Probably actually 8 bits per color (RGB) and 8 bits of Alpha (transparency) for a total of 32 bits per pixel.
- 256 grays (8 bits per pixel)
- 4 grays (2 bits per pixel)
- black and white (1 bit per pixel)