ETOYS REFERENCE MANUAL
License: The Etoys Manual will be dual-licensed under GPL (standard for FLOSS Manuals) and MIT (standard for Etoys). By contributing, you agree that your edits can be used under both the GPL and MIT licenses.
5. Basic Objects
In this chapter you will find descriptions for a range of objects available for you to use in Etoys by way of the categories in the Object Catalog. The one exception is Tetris, which should be in the Games category but is not. You can find some of these objects in the Supplies Flap.

One of the objects available is the Object Catalog, the first item in the Supplies Flap at the top left. The following image shows categories selected at the top of the Object Catalog, and then the Basic category selected.

The Object Catalog is organized in large part in categories. Some objects can be found in more than one category. Every object listed can be found by clicking "find" in the object catalog, and then typing the name of the object. To explore objects in the catalog when you don't know their names, you can browse through an alphabetical listing, which includes some objects not in any category. These objects are described in the More Objects chapter.
There is an option in the Preferences object called eToyFriendly. Turning it off makes more objects available in the Object Catalog. These objects are also described in the More Objects chapter.
The objects in this chapter are listed in alphabetical order. Each listing includes
- the object's name in the Object Catalog
- its name in its Halo if different
- one or more images showing any significantly different states
- a detailed description of its functions and of the controls it offers
- special items on its Halo menu
- special categories and scripting tiles available in its viewer
- for compound objects, an analysis into separable Etoys components
All Scripts (Scripting category)
![]()
The All Scripts object has stop, step and go buttons for controlling all the scripts at once.
![]() When you click on the round left icon, the All Scripts object will be closed.
When you click on the round left icon, the All Scripts object will be closed.
![]() When clicking on the right icon with the down arrow, the tool will be "opened up" so users can control each script in the project individually.
When clicking on the right icon with the down arrow, the tool will be "opened up" so users can control each script in the project individually.

This pauses all running scripts.
This button runs every paused script exactly once. To run the scripts continuously using this button, keep it depressed with the mouse. The scripts will continue running until you release it with the mouse button.
When this button is pressed once all the scripts will run continuously.
tickers only- The user can choose whether to just show scripts that are paused or ticking by setting this option or show all scripts by unsetting it. The default value for this option is"set".
all instances- If set, then entries for all instances will be shown. If deselected, only one representative or a group of similar objects will be shown. This option is "set" by default.
For any object in the project that has a script being tracked, it shows the name of the object, the name of the script, the status of the script
Clicking the object name button brings up a menu of this form, with the option for the following submenu.
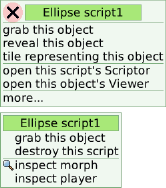
reveal this object brings the object to the front
tile representing this object creates a scripting tile for the object, just like the tile tool in the object's Halo.
Open this script's Scriptor places the Script Editor at the cursor to be placed.
Open this object's Viewer opens the StandardViewer for the object, just like the viewer tool in the object's Halo.
destroy this script Delete this script from the project.
inspect morph Open a Squeak object inspector on this Morph.
inspect player Open a Squeak object inspector on the player for this Morph.
Arrow (Graphics category)

An Arrow can be either a Polygon with two vertices and an arrowhead, or a connector very similar to ConnectorArrow. The first kind, described in this section, is provided in the Object Catalog, and the second kind, described in the More Objects chapter, is provided by the Connector Button.
Even though the Arrow of this kind is not a connector, it can be used as a tool to draw arrows for illustrations where the arrow points at something and does not connect to it. Shift-click to get handles for moving the ends. Add points in the viewer, in the polygon category.
Arrow handles mark the beginning and end points of the Arrow object. Do not overlap the beginning point (little blue circle handle - also signifies the cursor) and its end point (little yellow circle handle) to alter its state from a line to a point. This will create an unrecoverable error. Users would essentially have to "start over" and drag and drop another Arrow object.
Arrow is implemented as a special case of Polygon.
Unique Tiles
Aside from the common tiles found in other objects, the Arrow object has unique tiles under the Polygon and Input Category.
vertex cursor- A vertex is defined as a point of intersection between two lines. as mentioned above, the vertex cursor is indicated by the small blue circle handle. The default location of this cursor is in location "1" for a simple arrow (also the beginning point). To move this cursor to a different vertex point, click the arrows or input the vertex number.
vertices count- Vertices is the plural noun for a vertex. This tile indicates the number of vertices of the polygon.
x at cursor- this tile indicates the x coordinate of the cursor.
y at cursor- this tile indicates the y coordinate of the cursor.
add a vertex at the beginning- click this once or use in a script to add vertices in the beginning of the vertices list (vertex location 1). Click and drag the small yellow circle in location one to reveal the added vertex (or vertices).
insert a vertex at cursor- click this once or use in a script to add vertices in the cursor location (refer to the vertex cursor tile). Click and drag the small blue circle handle to reveal the added vertex (or vertices).add a vertex at end- click this once or use in a script to add vertices at the end (refer to the vertices count to reveal the last vertex number). Click and drag the small yellow circle in location the end location to reveal the added vertex (or vertices).remove all vertices but cursor- this deletes all of the vertices but the cursor.
remove the vertex at cursor- this deletes the vertex at the cursor location.
shuffle vertices- randomly switch vertices positions.
line is curved- this will not curve a standalone arrow but it will curve the lines when the arrow is used to create a polygon.
line is opened- A user can create a closed polygon by not only closing the points or vertices but also by simply changing this value to "false".
showing handles- the default value is "false" where the handles/vertices are not shown.
Unique Menu Options
show handles- same functionality as the tile "show handles". The default value is unset. To show handle, click and set this button value.closed- this closes the loop of the polygon.
curved- this curves the sides of the polygon.
specify dashed line- this creates different dash styles for the lines of the arrow or polygon sides.
You can specify the location of the arrowhead by selecting the different options in the menu: none (no arrowheads), arrowhead at the beginning, arrowhead at end vertex, arrowheads on both the begining and end vertices.
customize arrow-You can chose to use the standard arrowhead or customize the look of the arrowhead by clicking this option. This option is only useful if you already have an existing arrowhead. It will launch a tool that you can move around to change the look of the arrowhead.
Arrow Editor (Connectors category)
![]()
The Arrow Editor creates double-headed curved arrows using any ISO-8859-1 character as the arrowhead.
Why?
The user interface includes a grid of characters in the selected font; two display panes, for characters and arrows; and a toolbar. Click a character in the grid to display it in an enlarged glyph in a pane on the right. Clicking in the glyph pane leaves a mark at the point of clicking.
What are the marks for?
- Choose font brings up a menu of fonts
Komika TextKaps
BitstreamVeraSansMono
BitstreamVeraSans (the default font)
KomikaText
BitstreamVeraSerif
KomikaTextLight
- Rotate Rotates the selected character by 90 degrees clockwise.
- Toggle dots Turns colored dot display on or off in the glyph pane. What for?
- Make morph Creates a graphic object of the selected character, a Curve object, in the selected font and orientation.
- Install Function unknown
- Write code Create a selector for this arrow. Where?
- Clear clicks removes marks in the Glyph pane.
- Arrow scales Adjust the length and direction of the arrow. Is that right?
- Sample Display arrow in a pane in the editor, on the lower right.
The Arrow Editor is constructed out of an Alignment that functions as a toolbar, and a Glyph Editor. The toolbar contains nine Buttons and an UpdatingString.
Attachment Adjuster (Connectors category)
Drop a Morph within the Attachment Point Adjuster to see its connection points as little red circles, add connection points to it, or edit existing connection points. To be effective, the connection points must be within the boundaries of the Morph.The topmost toolbar contains a close button, a menu, a fullscreen button, and a collapse button.
The buttons on the toolbar are
Turn grid on/off Displays or hides a rectangular grid.
Add Array Create connection points by specifying how many down and how many across.
Add The next click places a connection point.
None Remove all connection points in the Morph.
Make movable/non-movable No effect. What is this supposed to do?
A joystick for fine positioning of the Morph in relation to the connection grid.
The items on the menu are
change title… Open an edit window to change the name of the object.
send to back No effect What is this supposed to do?
make next-to-topmost No effect What is this supposed to do?
make unclosable Remove close button from toolbar.
make undraggable It becomes impossible to drag the window by the toolbar. The Pick up tool no longer picks up the window, but does allow it to be dragged. The Move tool is unaffected.
full screen Expands the Attachment Point Adjuster to nearly fill the Etoys window. This is not reversable with this menu option.
window color… Changes the border color of the Attachment Point Adjuster using a color picker. This color picker has a toolbar at the top with the following tools.
- Close button
- Drag button
- Translucency picker
- Property sheet button
- Restore button for going back to the previously set color.
- An area that displays the currently selected color.
The main part of the color picker is a two-dimensional color array of colors to choose from by clicking with a dropper tool (which sets the color in the Attachment Adjuster and in a display area on the toolbal) or by clicking and dragging (which sets the colors dragged over as the dropper moves). To the right of this area is a gray-scale picker.
Right-clicking shows the color picker to be a Sketch, with no further Etoys structure. Its functions appear to be implemented entirely in Squeak.
The property sheet allows the user to set the color in the Attachment Adjuster as a solid color or gradient, and to turn on a drop shadow.
Badge

A tool for collaborating with other Squeak users. In the Sugar version of Etoys, a badge is automatically set up when an Etoys session is shared with other users (buddies).
On all other systems, you need a badge if you want to connect your Etoys directly with another Etoys running on another computer. Besides the badge, you also need Nebraska and fridge. You can find informaiton about these on the respective places in this chapter.
The components of a Badge are
String for the name of the person to connect to
Image of ?, which functions as a button for inquiring whether the other person is available
String for e-mail address
String for IP address
Blue Elllipse, to show working status
Green Ellipse, to show sending status
C Button, to open a text chat with the other person
T Button, to start Telemorphic (What's that?) with the other person
! Button, to tell the other person about the current Etoys project
? Button, to see whether the other person is available
S Button, to see the other person's world, if permitted.
Book (Multimedia Category)

The book is a multi-paged structure. It is an authoring object that can be used for both static and dynamic illustrations and presentations. To use thebookdrag it from the supplies bin into your playfield. Text and other objects can be dragged into the pages of thebook. Aside from the common tiles the book has special tiles for navigating pages and getting the last keystroke entered.
The book can also be described as a multi-paged playfield. Users who have the experience in using theplayfieldobject would find that each of the book's pages are in themselves objects and are structurally the same as a playfield. Each page of the book has the same options and tiles that can be found in theplayfieldobject.
The book has its basic controls and short menu options on top of a single page by default. The page controls come in two formats basic (short) and advanced (long) Although the default controls include a couple of navigation arrows it won't be useful unless you access the more advanced controls and add pages.
Basic Controls (Short)
![]()
The basic controls is the default format. It comes with two navigation arrows. One to move forward one page and one to move backwards one page, a menu, page indicator with total pages value and a button to switch to more advanced controls.
Menu Options (Short)
find- click this option to search for words within the pages. The words are not case sensitive and don't have to be complete. This option also lets you find parts of the words.
go to page- type in the ordinal number of the page you would like to navigate to. If the page number that you typed in exceeds the total number of pages, Etoys will not give you an error but you will be remain on the page where you initiated the request.
show more controls- aside from the button on the left most of the controls panel, this option allows you to get expanded format (advanced option).
revert this page- to use this option, you must first switch to the advanced format of the controls panel and click the "save the page for later revert" option. This allows you to go back to the original state of your page.
revert entire book- As with the revert this page option, one can also save the entire book for a later revert.
Advanced Controls (Long)
In addition to the basic controls you got two icons with double arrows to navigate directly to the first resp. the final page. The + allows you to quickly add one page after the current page, the - will delete the current page. The advanced controls also have additional menu items.

find- same functionality as described in the basic controls format.
find again- this gives you the option to search the next instance of the text that you are trying to find.
duplicate this page- this makes a copy of the current page and inserts that copy as the next page.
revert this page- same functionality as described in the basic controls format.
revert entire book- same functionality as described in the basic controls format.
keep all pages the same size- when this option is set [black] all the pages follow the same dimensions of the current page where this option was selected. The default of this option is clear.
page controls at top- this button is set by default. When deselected, the control panel moves to the bottom of the page. This will be true for all the pages of the book.
page control short- within the advance control menu this button is deselected. Select this button to get the basic controls format.
page controls visible- this button is set by default. Deselecting this button will cause the controls panel to disappear. To retrieve the controls panel, bring up the book's halo by right-clicking the book. Select the Menu icon and scroll down and click the "book.." option. This will take you to the the advance controls menu where thepage controls visibleoption is available again.
scripting area- when selected if you have any "stop, step, go" buttons in the book will only control the scripts of objects inside the book. Also when selected, if you open the viewer of an object in the book, the viewer will open inside the book.
view pages full screen- If set, all the book's pages occupies the entire screen. The toolbar is hidden from view and the book's control panel minimizes and moves to the top left of the screen. To exit the full screen mode and make the toolbar visible, click on the book's menu and select this button again.
wrap after last page- This options is set by default. If deselected, the book will not cycle to the first page after the last page is reached.
sort pages- when selected, it opens up a small window/tool where one can arrange the pages of the book.
hand me a bookmark for this page- this creates a bookmark button for the page. Drag the created bookmark button outside of the page and change the label to make it distinctive to the page (follow instructions onButtonobject on how to do this). The button takes you back to the bookmarked page.
hand me a thumbnail for this page- this creates a small icon to represent the page.
visual and sound effects:
set sound effects for this page- clicking this option opens up 18 choices for sound effects for the page. The sound plays as one navigates to the page. The user can also his/her own sounds. See the sound recorder object for more information.
set visual effects for this page- clicking this option gives the user 11 different visual effects (including "none") for the page. The visual effects are visible upon turning the page. Only one visual effect is active per page and each page can have a unique visual effect.
set sound effects for all pages- clicking this option opens up 18 choices for sound effects for all of the pages of the books. The sound plays as one navigates to each page of the book. The user can also his/her own sounds. See the sound recorder object for more information.
set visual effects for all pages- clicking this option gives the user 11 (including the default "none") different visual effects for all the pages of the book. The visual effect chosen will be visible upon turning each page.
mark this page to be revertible-this saves a snapshot of the page once at its current state. Users can then go back to this state by going back to the menu and selecting "revert this page" option (see the section on this option above for more information). Selecting this again will take another snapshot that will overwrite the last one.
mark entire book to be revertible-this saves a snapshot of the entire book once at its current state. Users can then go back to this state by going to the menu and selecting "revert entire book" option (see the section on this option above for more information). Selecting this option again will take another snapshot that will overwrite the last one.
advanced:
make all pages the same size as this page- clicking this option makes all the pages of the book to be the same sizes as the current one.
set background color for all pages- selecting this option launches the medicine dropper tool which allows a user to chose the color of the page from the color palette. Selecting a color sets the background color for all of the pages of the book.
uncache page sorter- When you have clicked "sort pages" before in your book options, you will get a list of all your pages with thumbnail pictures for easier sorting. This option will delete the thumbnail pictures.
make a thread of projects in this book- this option takes all projects you have put in the book, puts them in a thread and adds a project navigator to the project. This allows you to navigate easily through all these projects. But this option has a bug in Etoys 4.0. You will only get the navigator for the projects from your book, and the book project itself is not included. You will not be able to return to your book project using the navigator or the arrows in the toolbar. The only way back is to click ALT-SHIFT-W, choose "Jump to project" and then choose your book project.
make this a template for new pages- choosing this option allows newly created pages to have the same properties as the current one. This option behaves exactly [something missing]
show full screen- If selected, all the book's pages occupies the entire screen. The toolbar is hidden from view and the book's control panel minimizes and moves to the top left of the screen. To exit the full screen mode and make the toolbar visible, click on the book's menu thenadvancedoption then select "exit full screen" option.
Unique Tiles
Special Viewer category: book navigation

first page- This tile takes the user to page 1 of the book.
goto -go to the given page. This tile does not accept numbers but accepts the tile representation for the page. To get the tile from the page, bring up the page's halo and click the orange button.
![]() Drag this tile to replace the default value "dot".
Drag this tile to replace the default value "dot".
last page- This tile takes the user to the last page of the book.
next page -- Unlike the goto tile where one can jump from one page to any pages in the book, the next page tile only takes the user one page forward.
number of pages- Indicates the total number of pages that the book contains.
page controls short- Whether page controls are shown in short form or in long form.page controls at top- If "true", page controls are shown at the top of the book, if "false", they will be shown at the bottom.
page number- The ordinal number of the current page.page controls showing- The page controls are by default on top of the book. Using this option, you can choose if you want to show or to hide them. A "true" value on the page controls showing tile says "yes I want the controls to show". A "false" value will hide them.revert page- revert to the original version of this page. page controls showing Display or hide page controls.previous page Like the next page tile where one can jump one page forward, the previous page tile takes the user one page backwards.
revert all pages- revert the entire book to its original contents.
Bouncing Atoms (Just for Fun category)
An object with dots (atoms) that bounce off each other and off the walls of the box. From the bouncing atom's menu, you can start infection, set atom count and show infection history. Starting an infection turns one atom red. When a blue atom and a red atom collide, the blue atom is infected and turns red. You can watch the infection grow in the window, and you can view the progress of the infection in a graph by selecting show infection history from the menu. The atoms pause after you set the atom count and they restart if you pick up Bouncing Atoms with the mouse and put it down again, or right-click the bouncing atoms object.
Broom (Graphics category)
The broom allows you to align objects vertically or horizontally (depending on the direction first used to drag the broom). To align objects simply click on the broom and drag to align the objects. Once you start dragging the broom will change into a line. The broom's size can be extended by dragging along the line shown when you first start dragging the broom. Dragging the broom horizontally creates a vertical line, while dragging it vertically creates a horizontal line.
Broom is implemented in the BroomMorph class, a subclass of Morph, and in other classes in the BroomMorphsBase category in Squeak.
Button (Scripting category)
![]()
Buttons are controls that users click to make something happen via a tile script. The default Button displays text inside a rounded rectangle. Its script will be a function of its containing playfield.
To use the Button object, drag it out of the Supplies bin and into a playfield, which could be the world. In its default state, the script for the button is empty. To add scripts to this button, bring up its halo by right-clicking it. Click on the green button with a rectangle on it in the bottom of the buttons halo to bring up a script window. A script for its containing playfield will be created.
If you have a script defined for a button, you cannot move the button to another playfield, which will not accept it. Delete the script and then drop the button into the new playfield, or choose change target from the Halo menu, and enter the name of the playfield where you want it to act. Then you can drop it into the new playfield and create a script for it there.
You can also create a button by first creating a script then clicking on the menu in the Scriptor and selecting the button to fire this script option from the script window.
To create text that responds to user mouse-clicks, set the border width of the Button to zero, and the Button color property to the same color as the Button's holder or container (for example, the page it is on). The border width property, the color property, and the label property are located on the Button pane of the Button Viewer.
To change the font of a Button, click the Menu button in the Button's halo. Select "Unlock String". Right-click on the Button's label twice. The first right-click will display the Button's halo, the second right-click will display a halo for the String object that contains the Button's label. Click the Menu button in the String's halo, and select "change font".
To create a picture button, create a Sketch using the Paint tool, and add a script to the Sketch object that fires on a Mouse Down event.
Unique tiles
The Viewer for a Button contains a button category.

border width Get or set the width of the button's border.
border color Get or set the color of the button's border.
rounded corners Toggle rounded or square corners of the button.
act when Choose whether the script should fire when the button is pressed, up, or down.
fire Trigger any and all of this object's button actions.
height Get or set the height of the button.
height Get or set the height of the button.
label Get or set the wording on the button.
ButtonBar (Connectors category)
This is a holder for buttons in a horizontal or vertical line, adjusted according to the size of the ButtonBar. Colors, sizes, and style of Buttons and ButtonBar are editable.
ButtonDown? (Scripting category)

This is a scripting tile for querying whether the left mouse button is down. It is held in a Scripting Tile Holder. Place it as the test in a test yes no scripting tile.
Button Flap (Connectors category)
The Button Flap object is a flap tab that adheres to the left edge of the world by default, with the Text label My Flap. Initially the flap is closed, as here.

Clicking the flap tab opens a second Object, a parts bin, with the flap tab on its right edge, as shown in part here.
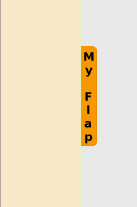
Clicking the flap tab again dismisses the parts bin, leaving only the flap tab visible.
The user can put any kind of object in the Button Flap, but it is most effective using Maker Buttons that have been activated by putting object tiles in them, as described elsewhere in this chapter. In fact, putting other kinds of object in the Button Flap and trying to use them can cause unrecoverable errors. Putting a fresh maker Button in the Button Flap without activating it also causes unrecoverable errors. However, you cannot drag objects from the Object Catalog to this flap. You have to put objects down in the world or within some other object before you can pick them up and drop them in this flap.
Thus, the procedure should be
- Create a Maker button
- Drop a tile on the Maker button to activate it.
- Move the Maker button to the Button Flap parts bin.
If the user moves a Maker Button over a closed Button Flap tab, the parts bin will open dynamically to accept the Maker Button, closing again if the Maker Button is moved away without being dropped. Buttons dropped into a Button Flap are placed in a vertical , starting at the top of the parts bin. The user can rearrange the Maker Buttons by dragging and dropping or picking up and placing them with Halo tools.
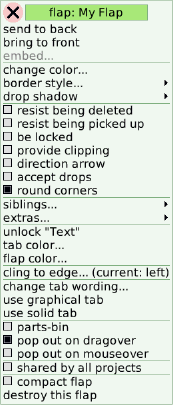
Button Flap settings are controlled via the object menu on the flap tab's halo.
The parts bin has a different Halo menu, shown in its description elsewhere in this chapter.
Button Flap settings (changed via the Button Flap menu) include:
tab color
The color of the Button Flap's tab
flap color
The fill color of the flap's parts bin.
cling to edge…
Sets the location of the flap (top, left, bottom or right)
change tab wording…
Changes the text that displays on the tab
use graphical tab
Displays the tab as a graphic instead of the default text. Once this option is selected, a new choose new graphic… option appears on the menu.
use solid tab
Displays a solid colored tab with no text.
parts-bin
When parts bin is checked, by taking objects out of the flap, you create duplicates.
When it is not checked, by taking objects out of the flap, you create siblings.
pop out on dragover
When selected, the Flap will expand when you drag an object over the the flap handle.pop out on mouseover
When selected the "Flap" will expand when the mouse touches the flap handle. When not selected you need to click the flap handle.
shared by all projects
When selected the flap will be displayed in all projects until you exit Etoys.
BUG: - if you set to shared by all projects and then switch to another project and back using Previous Project/Next Project (or project icons), a second instance of the flap is created.
compact flap
When selected the length of the flap will match that of the side to which it is attached. When unselected the flap size, will minimize to the smallest possible size that can contain its contents.
destroy this flap
Another way to delete the flap.
Special tile in paintbox category:
start painting in
Here you can define your own paint area. You need to drag a playfield out of the supplies flap and drag the "start painting in"-tile on a script. Then you need to replace "dot" with a tile referring to the playfield (you can get it using the orange halo icon of the playfield). When you execute the script, the painting tool will open and you can paint within the playfield.
Take care: You should only execute the script once! If you just click on the clock, it will change it's state into paused, but will keep giving you a new painting tool until you change the script's state to "normal".
ButtonUp? (Scripting category)
This is a scripting tile for querying whether the left mouse button is up. It is held in a Scripting Tile Holder. Place in the test in a test yes no tile.
Calendar (Just for Fun category, v 5.0)
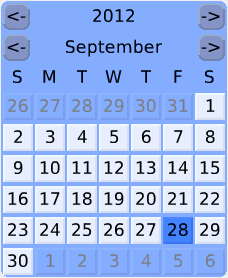
A simple, scriptable calendar that displays one month at a time, with button controls for previous year, next year, previous month, and next month. Click a day to select it. Clicking the gray days in the previous or next month changes to the month selected. The viewer for Calendar has the extra category calendar.
date The selected date as a text string
day The day of the month for the selected date, as an integer
month The month for the selected date, as an integer
year The year for the selected date, as an integer
day name The name of the day of the selected date in the current language, as a text string
month name The name of the month of the selected date in the current language, as a text string
date format A selection among dd/mm/yyyy (European), yyyy/mm/dd (most easily sorted by computers), and mm/dd/yyyy (US).
go to today Command to return to and select the current year, month, and day in the calendar display
julian day Number of days since day 1 of the Julian epoch, January 1, 4713 BCE. Use of julian days simplifies date arithmetic and conversions between calendars.
Components used in Calendar are Alignments, Buttons, Strings, and Texts.
Calendar is implemented in the CalendarMorph class, a subclass of Morph, in the Etoys-Calendar category in Squeak.
Camera (Multimedia Category)
A player for video devices like cameras, video capturers, etc. Camera works automatically with the built-in camera on the XO computer.
From camera's menu, you can configure the video device (see below) or start showing statistics (in transcript). Once you show statistics, you can reset them from the menu. (Can someone add more about showing statistics?) Camera has a special tile in the graphics category.
- camera's graphic is the picture currently being worn.
and 9 tiles in the special viewer category video.
- camera play is a command to start the camera.
- camera stop is a command to stop the camera.
- camera's is running is a tile that returns true/false if the camera is/is not running.
- camera's auto extent sets the height of the slider. This can also be set using the yellow change size button on the slider's halo.
- camera's brightness allows changing of the camera's brightness.
- camera configure video device allows the user to set the frame width and height, test pattern (lenna or color bars) and choose to show the time or not in the camera window.
- camera's contrast allows changing of the camera's contrast.
- camera's last frame is a morph with the last frame.
(can someone describe this more completely?)
- camera's resolution is a tile that allows you to pick among original, 256 colors, 256 grays, 4 grays and black and white.
Chess (Games category)
This is a chess game which you can play against the computer. The visual form of Chess consists of an array of chess squares, numbered from a1 to h8, and ChessPieces, all arranged in a Bordered Morph, with a toolbar implemented as an Alignment of Buttons. The tools are
- New Start a new game
- Help Have the computer suggest a move
- Play Have the computer make the next move
- Auto Have the computer play the entire game
- Undo Take back the last move
- Redo Repeat a move previously taken back
- Quit Close Chess
Chinese Checkers (Games category)
This is a Chinese checkers game which you can play against the computer or other people by clicking and dragging pieces, or by clicking pieces to pick them up and clicking to put them down. Legal moves consist of jumping a piece of either color with one of the player's pieces, once or in an unbroken sequence of moves. The object of the game is to move one's pieces to the location where the opposing pieces start. This is a standard six-pointed board, and the game supports up to six players.

Set the total number of players, and the number of human players, using the reset… command on the Halo menu. There is a ChineseCheckers piece off the board to indicate by its color whose turn it is.
Clicking in a spot which is a legal move results in an animation of the piece moving along a path from the starting point to the finishing point. This animation can be turned off in the Halo menu.
Cipher (Games category)
The Cipher Panel displays an encrypted plaintext message in a simple substitution cipher, with one letter in the cipher alphabet corresponding to each letter in the plaintext alphabet. There are some tools to support decryption. When the user types a letter, all matching letters are filled in.
From the About the Cipher Panel:
You can solve the cipher by clicking above any letter in the message, and typing the letter you think it should be. The Cipher Panel automatically makes the same substitution anywhere else that letter occurs in the encoded message. If you are having trouble, you can use the command menu to 'show cipher hints'. That will display how many of each letter occurs, which is often a help in solving ciphers.
The tool bar at the bottom is an Alignment of Buttons.
- show help Display the About the Cipher Panel
- show hints Display some suggestions, plus the count for each letter in the cipher
- clear typing Revert to the original cipher, with no guesses filled in
- enter a new cipher The user can type in a cipher text for Cipher to use
- quote from Squeak Select and encrypt a short text from the Squeak documentation in the Etoys image, and present it as a cipher to solve.
Circle (Graphics category)

A circular Morph. This shape can also be created using the Ellipse object, for example by editing its length and width in the more geometry Viewer category. However, these remain distinct object types, because an Ellipse can be stretched or shrunk in either direction, while resizing a Circle does not change its shape.
Clock (Just for Fun category)

A ticking clock with hour, minute, and second hands. The time on the clock is the time on the computer. The Clock's Halo menu includes these options:
unlock all contents Contents are the 12 strings for the hour numerals. They cannot be locked again.
Can the numerals be edited?
unlock… Presents a menu of strings to unlock, all initially called string. What does unlocking do?
roman numerals A check box to toggle display between Hindu-Arabic numerals and Roman numerals.
anti-aliasing A check box to toggle display between aliased and anti-aliased font.
change font… Bring up a menu of the fonts in the system to choose from.
change hands color… Bring up a color picker to choose from.
change center color… Bring up a color picker to choose from.
Note that the color of the body of the clock can be changed in its viewer as usual.
The numbers on the dial are Strings. The Clock's dial can be stretched into an ellipse.
Clock is implemented in the ClockMorph class, a subclass of StringMorph, in the Morphic-Demo category in Squeak.
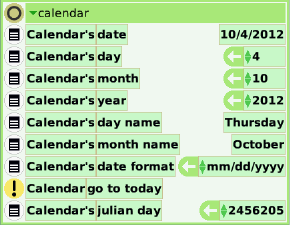
Connector (Connectors category)

Connectors are lines (straight or curved, with or without arrowheads) that can be used to show relationships of many kinds between objects. They initially appear with red connection points that can be clicked and dragged to drop on connection points of other objects, including other connectors. One connection point is designated as the source (initially on the left) and the other the destination (initially on the right). There are options for setting the appearance and behavior of connectors, including setting arrowheads to appear at either end or at both.
Connectors stay connected to the objects when the objects are moved around, maintaining the relationships among linked objects, but shifting the connection point attached to to minimize the length of the connector. This also means that the connector will not overlap the object it connects to.
Connectors have a connector category in their viewers.
These tiles have the following functions
add label Command to attach an optional Label holding the given text. Unfortunately, the label defaults to black text (Label's color) on a black background (Label's background color). However, the colors can be edited in the Label's viewer.
destination Variable showing an object connected to at the destination end.
destination arrow name Variable holding a name for this arrow, set when a destination arrowhead is chosen.
orthogonal Variable to toggle whether line segments in connectors go only horizontally or vertically.
remove labels Command to delete attached label.
smooth curve Variable to toggle between straight and curved lines in Connector. This has no effect if the connector is not connected at both ends. When it is connected, the user can drag and drop any point on the connector's Line to adjust it.
source Variable showing an object connected to at the source end.
source arrow name Variable holding a name for this arrow, set when a source arrowhead is chosen. The same selection as for destination arrow name.
straighten Command to convert a curved connector to straight lines.
In addition to the usual fill & border category in the viewer, Connectors have a category called color & border containing one tile, line width, that can be set to any integer, starting at 0 (invisible).

Connectors have a "hidden" power. Once an object is "connected" to either the source or destination of a connecter, a new viewer category appears for the connected object called "connections to me", This allows you to run scripts (using the tell all… tiles) on items connected to an object. For example, with a single connector attached to a circle at its destination end:

Predecessors and successors are evaluated by taking connections to or from the given object, then connections to or from those objects, until no more are found.
The following are the different types of connectors that are in the object catalog:
- Connector a basic connector with no arrows at its ends
- ConnectorArrow a basic connector with and a basic arrow at its destination point
- Curvy Connector a basic connector with its "smooth curve" attribute set to true
- Curvy ConnectorArrow a basic connector with its "smooth curve" attribute set to true and and a basic arrow at its destination point
- Schematic Connector a connector that adjusts the connection points it connects to to make itself as short as possible
- Random Connectors a button that will create random arrows each time you drag one from it.
There is also a Connector Button that provides a tool for dragging to create connectors.
Options in Halo Menu for Connectors:
- show handles Supposedly to toggle showing or hiding handles, but actually toggling their color between red and blue.
- be orthogonal Toggle whether Connector's line segments will be constrained to be horizontal and vertical
- --- No arrowheads
- --> Arrowhead at destination end
- <-- Arrowhead at source end
- <-> Arrowhead at both ends
- arrow sizes - changes arrow heads length and width by dragging
- add label - will add a text label that will move with the arrow. You can change the position of the label relative to the connector by dragging the label to a different position.
Connector Arrow (Connectors category)

The same as a basic Connector, except that it starts with no arrow at its source point, and a basic arrow at its destination point.
Connector Broom (Connectors category)
The broom (which applies to all objects, not just Connectors) allows you to align objects vertically or horizontally (depending on the direction first used to drag the broom). To align objects simply click on the broom and drag until one edge of each of the objects is aligned, as shown here.
Once you start dragging the broom will change into a line indicating the direction of movement, and the width of the region to be swept. The broom's size can be extended by dragging in the direction of the line. The Connector Broom cannot be moved by clicking and dragging in the ordinary way, but one can use the Halo tools to move it, or shift-click and drag.
Connector Button (Connectors category)

A maker button with an Arrow loaded into it, which is very similar to a ConnectorArrow. Each time you click on the button you create a new Arrow. The Arrow is attached to the cursor. Clicking in the world or in an Object sets the source point of the Arrow. Clicking again sets the destination point.
Connectors Flap (Connectors category)
The Connectors Flap appears in closed position attached to the bottom edge of the world by default, as shown here.

Clicking this flap tab opens the parts bin of the flap, offering a variety of connector objects, labels, buttons, and tools, somewhat different from the selection in the Connectors category of the Object Catalog, as shown here.


The objects provided are
- Label
- Smart Label
- Connector
- ConnectorArrow
- Curvy Connector
- Curvy ConnectorArrow
- Title
- Text Rectangle
- ButtonBar
- Maker Button
- Basic Shape
- New Button Flap
- Attachment Point Adjuster
NEEDS TESTING: There are some bugs here (was not able to consistently reproduce and I am tired, but definitely this needs more testing. I got some "Abandon" booms a few times.
Crostic (Games category)
The Crostic Panel presents an acrostic puzzle for solution. As you type in answers for the clues, the letters also get entered in the text of the hidden quote. Conversely, as you guess words in the quote, those letters will fill in missing places in your answers. In addition, the first letters of all the answers together form the author's name and title of the work from which the quote is taken.
show help Open an About the Crostic Panel help window
show errors Highlight incorrect letters until the user clicks somewhere
show hints Offer to show the five longest clues
clear Start over
open... Bring up a file dialog that does not say where to look for the sample crostic file, which the help text identifies only as sampleFile.
Crostic is implemented in the CrosticPanel and CrosticQuotePanel classes in Squeak, in the Morphic-Game category.
Curve (Basic category, Graphics category)

A smooth curve made of smoothly joined Bezier curve segments, except for a possible angle at the origin point. This is implemented as a Polygon with the line is curved property set to true. Curve has the polygon category in its viewer. Curve has the same color category as Rectangle. Shift-click to show these handles.

Click and drag the blue origin Ellipse or any of the yellow Ellipses to adjust the shape of the Curve. Click a green triangle Polygon to get another yellow dot. Place a yellow dot over a neighboring yellow dot to delete one of them.
By clicking the menu button on the Halo, curve's handles can be shown, curve can be made "open" rather than closed, curve can be converted into a polygon by unchecking curve, and the perimeter of curve can be changed from solid to a variety of dashed lines. Clicking specify dashed line on the Halo menu opens this dialog.

Curvy Arrow (Graphics category)
Although Curvy Arrow looks like a type of connector, it is actually an open Polygon with the line is curved property set to true. It can be edited in the same way as other Polygons, by shift-clicking to get handles to click and drag. Placing the end point over the start point deletes the end point, so Curvy Arrow cannot be made into a loop in this way. However, setting the line is opened property to False adds another segment to close the curve, and fills it with a solid color, editable using a standard color picker.

Curvy Connector (Connectors category)
A basic connector with its "smooth curve" attribute set to true. Initially, when not connected to other objects, it looks just like a Connector.
When the ends are attached to connection points of objects, the vertices of this object can be manipulated using the same techniques as for the Polygon object, although the appearance of the handles is different. Shift-click to show handles.

Drag a handle to move it, or click and drag between handles to create a new handle. As with the Connector object, putting two vertices together deletes one of them.
Curvy Connector is composed of a Line with connector end objects when it is not connected, and Curve Handles when it is connected.
Curvy ConnectorArrow (Connectors category)
Essentially a ConnectorArrow with its "smooth curve" attribute set to true. When the ends are attached to connection points of objects, the vertices of this object can be manipulated using the same techniques as for the Polygon object, although the appearance of the handles is different. Shift-click to show handles.

Drag a handle to move it, or click and drag between handles to create a new handle. As with the ConnectorArrow object, putting two vertices together deletes one of them.
Curvy Connector is implemented as a Line with an arrowhead and with connector end objects when it is not connected, and Curve Handles when it is connected.
Digital Clock (Just for Fun category)

A digital clock that displays the time on the computer. From the clock's menu, you can choose to change font, hide or show seconds, and display a 12-hour, am-pm clock (in which time runs illogically from 12:00 am-11:59 pm, because the Medieval Catholic Church did not allow 0 as a value), or a 24-hour clock (in which time runs logically from 00:00-23:59. The digital clock has the special viewer category time, with 3 tiles.
- Digital Clock's hours returns the Digital Clock's numeric hour.
- Digital Clock's minutes returns the Digital Clocks numeric minute.
- Digital Clock's seconds returns the Digital Clock´s numeric second.
Watcher Tiles [move to Tiles chapter]
There are also tiles that cannot be used directly in scripts, but that can be used to create watchers for values of variables. For example, in the Digital Clock object, the time category...
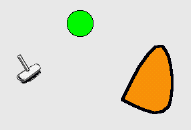
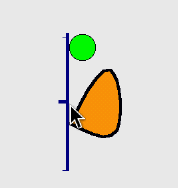
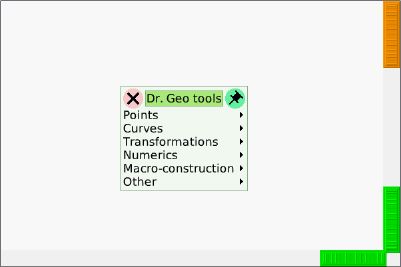
Dr. Geo (Tools category)
Ellipse (Basic category, Graphics category)
![]()
A Morph with an elliptical or circular shape. To make it a circle, set the length and width the same in the more geometry category of its viewer. Ellipse has the same color category as rectangle.
Enhanced Text (Connectors category)
An editable text on a transparent background. Clicking an Enhanced Text turns on a border and displays a cursor as shown here.

The "Enhanced Text" object differs from "Text" object in that it has an extra attribute in the Viewer's "text" category called "focused". "focused" is set to true when the user clicks Enhanced Text, and the editing cursor is inside the text object. The focused attribute can be used to prompt the user for input.
Enhanced Text also has two additional menu items that "Text" does not:
- accept on CR: this attribute will cause the focus to be shifted to the next object when the user hits the <Enter> or <Return> key. The next object will be the next text object (as determined by the "element number" attribute in the Viewer's "miscellaneous" category.
- accept on focus loss: which (HELP couldn't figure out what this does)
Enhanced Text does not have the menu items translatable or use pango, both of which are found in Text.
Event Theatre (Multimedia category)
A framework for creating tutorial snippets. The Event Theatre provides a framework for authoring "event-movies". It uses custom variants of the Navigator, the Supplies flap, the painting system, property sheets, Viewer flaps, etc., all of which reside within the controlled confines of the Theatre. To author an event-movie, get a new Event Theatre from the Objects catalog.
- Resize the Theatre, using the halo, to the delivery size desired for playback.
- Use the menu in the controls panel to add or delete Supplies and Navigator flaps as desired.
- Edit the "caption" by clicking on the text that says "Untitled" and typing your desired caption. This caption is affixed to playback buttons, and, generally, provides a way to identify the event-movie.
- Set up the "initial conditions" for the event-movie you're about to record (e.g., paint a background, provide some explanatory text, add objects you want to be present at the start of the movie.) When the recording is first opened by the user for playback, and whenever the recording has been rewound, this is exactly what it will look like.
- When ready to start the recording, press the "Record" button. A red border will be seen around the recorder, to indicate that recording is in progress. Recording will continue until you hit the ESC key.
- Note that if you want to include sound in your recording, you can add it directly during playback, or you can produce voiceover externally and add it in later using the Event Roll.
- Now proceed to "do", with the mouse and keyboard, whatever you wish to record. For best results, all mouse gestures should be made within the interior of the Theatre.
- Hit ESC when done recording.
- To review what you've recorded, press "Play". If unhappy with the result, repeat steps 1-8.
- If you're happy with the result, and now wish to add a sound, open the sound panel, then click Play to replay the recording, and whenever you wish to add a snippet of voiceover, click on the "Start Recording Voiceover" button, and start talking, and when done with that snippet click the "Stop Recording Voiceover" button. Once the playback finishes, the added voiceover(s) will become part of the event tape, and will be seen in the event roll.
- When you're happy with the result, hit the "Publish" button, to get a playback button. There are currently two choices:
- a. Iconic Button - Initially provides a picture of the initial scene of the movie, scaled 0.3x, and overlaid with the word HINT. When the user clicks on such a button, the event-movie is played back in an ephemeral "playback theatre", and after the playback is done, the playback theatre shrinks down to a 0.5x scale-downed picture of thefinalscene of the movie. Subsequent hitting of the button will again invoke a playback.
- b. Textual Button - a simple labeled button which, when pressed, triggers playback of the event tape.
- The playback button you obtain when you "Publish" can be placed anywhere, such as on the page of a book. You can control, via a playback-button's halo menu, whether or not it should be "auto-start", and whether or not "auto-dismiss". When the user presses the button, a "Playback" space will open, which resembles an Event Theatre, but has only playback-relevant controls. A playback set up for both auto-start and auto-dismiss comes without any controls.
- To edit the "event tape" of a recording you have made in an Event Theatre, and for a generally good time, click on the interlocking-circles icon to obtain a tool that allows you to visualize and to edit a "score" or "piano roll" of the event tape.
Event Theatre
The main tool for creating an Event Tape.Event Roll
An auxiliary tool showing the full "score" of an Event Tape.Event Tape
The results of an event-theatre session; an interaction sequence that can be played back.Event Recording
A term interchangeable with "Event Tape."Event Movie
What you see when you play back an Event Tape. Dragging out an event player produces a mini world where you can record all your actions for later play back. The text above is from the excellent help guide that can be accessed through the question mark at the lower left of the object.
File Dialog (Scripting category)
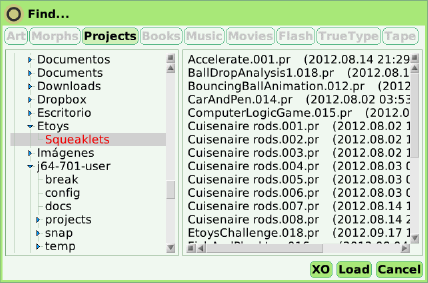
The File Dialog box lists all the directories and files within a user's system. The tool can find files in directories and group them by type: Art (.gif, .png) , Morphs (.morph), and Projects (.pr). There are buttons to load the project, to make an XO bundle and to cancel the search operation.
Flasher (Just for Fun category)

A red dot that "flashes" on and off.
Flasher is implemented in the Flasher class, a subclass of EllipseMorph, in the Morphic-Demo category in Squeak.
Frame Rate (Just for Fun category)

A readout that allows you to monitor the frame rate of your system. From the frame rate's menu, you can choose to change font and its emphasis and you can select pango, a text rendering library.
FreeCell (Games category)

The objective of the FreeCell game is to move all of the cards to the four "home cells" in the upper right corner. Each home cell will hold one suit and must be filled sequentially starting with the Ace. There are four "free cells" in the upper left corner that can each hold one card. The top card in a stack can be moved to a free cell or to another stack. When moving a card to another stack, it must have a value that is one less than the exposed card and of a different color. When a pile is emptied, any card can be placed in the open space, to be built on in the normal manner. A large part of the strategy of FreeCell is to move cards so as to gain access to other cards, while maintaining enough free space to continue moving, or even to increase the amount of free space by emptying piles.
The game supports short cut moves. If there is enough space to move several cards in a sequence one at a time, they can be moved as a group by clicking on the highest-value card in the group. Cards that can be played to the home cell piles without any possibility of blocking progress will be moved automatically. When all piles are unblocked (no higher value card on top of a lower value card) all cards are played to the end of the game.
Grab Patch (Graphics category)
Use Grab patch to get a partial screen shot. Clicking Grab Patch in the Object Catalog turns the cursor into a cross. Click and drag to select a rectangular area in the Etoys world. The result is a Sketch attached to the cursor ready to be placed in the world, where it can be edited with the PaintBox tool in the Halo (gray pencil icon).
GStreamerPlayer (Multimedia category)
A media player.
What kind of file does it play?
Controls are
Menu, with the following options
- Open file (o)
- rewind (r)
- play (p)
- stop (s)
- previous frame (<-)
- next frame (->)
- zoom (full screen, 50%, 100%, 200%)
- advanced (turn repeat on or off)
Open
Rewind
Play
Stop
Quit
Volume slider
Time slider
GStreamerPlayer contains a toolbar made of Buttons, and two Sliders. Its file dialog is a Bordered object containing a button bar of PluggableButtons, a file tree in the form of a SimpleHierarchicalList, and a directory display in the form of a PluggableList.
Bug: This object is supposed to have a Viewer category called movie controls, but selecting it causes a system error (MessageNotUnderstood: UndefinedObject>>totalFrames), and does not display the tiles in the category, although the Viewer does display the category name.
GStreamerPlayer is implemented in the GStreamerPlayer class, a subclass of Object, in the GStreamer-UI category in Squeak, and in other classes in GSTreamer-* categories.
H Number Line (Graphing category, v5)

A line of positive and negative integers, such as one might use for the X axis in a graph.
H Number Line is implemented in the HorizontalNumberLineMorph class, a subclass of NumberLineMorph, in the MorphicExtras-Charts category in Squeak.
Joystick (Basic category)

The joystick can be used to control another object.
Drag a joystick into the playfield. Draw an object. Script the object with Forward and Turn.
Open the viewer of the joystick and select "joystick's left right" and "joystick's up down" from the joystick category and put them in place of the numbers besides forward and turn.
You'll have a script that allows the joystick to control the object.
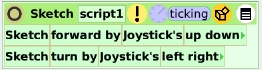
You set the maximum X and Y pixels of "joystick's left right" and "joystick's up down" by using "set X range" and "set Y range" in joystick's menu. This controls the maximum movement of Sketch in the above script. You can also turn "auto-center" off and on and track a real joystick in joysticks menu. Joystick's viewer has the categories joystick and graphics. The graphics category is described in the sketch object section. The joystick category has 6 tiles.
- joystick's amount reads the displacement in pixels of the red dot from the center within the joystick box, which is different from the amount Sketch moves in the script above.
- joystick's angle reads the angle in degrees from the positive x direction formed by a line joining the center of the box to the red dot.
- joystick's button1 provides an option to configure for an external joystick button
- joystick's button2 provides an option for configure for an external joystick button
- joystick's left right can be used as an input value as shown in the script above. The reading in a watcher displays the value determined by "set X range"
- joystick's up down can be used as an input value as shown in the script above. The reading in a watcher displays the value determined by "set Y range"
Key press (Just for Fun category, v 5)
An object that, when selected with the mouse, displays the message Press new key in a SpeechBubble. Although right-clicking the bubble brings up its halo, releasing the mouse button dismisses the SpeechBubble and its Halo instantly. When activated Key press shows an indication of the next key pressed, as understood by the operating system for alphabetic and numeric keys, punctuation keys, and some function keys and key combinations. It does not show capital letters, but does show some key combinations involving the shift key, such as <c. On keyboards with dead keys for creating accented letters and other compounds, pressing the first key has no effect on Key press, but it usually displays the result after the second key. An example is ^, entered as ^ key followed by space.
Special keys recognized include
- <tab>
- <shift-tab>
- <esc>
- <cr> (return or enter key)
- <up>, <down>, <left>, or <right> for arrow keys
- <pageup>
- <pagedown>
- <home>
- <end>
- <delete>
- <backspace>
but not the numbered function keys F1-F12 or the modifiers shift, control, alt, fn by themselves. Some control key combinations are recognized as such, and others as cmd (command) combinations. For example, the alt-a combination using the left alt key in Ubuntu Linux is recognized as <ctrl-a>, while ctrl-a is recognized as <cmd-a>. Right-alt-a displays as a non-character box, although the viewer for the string on the button shows it as à.
Lasso (Graphics category)Use lasso to grab part of the screen of any connected shape as an editable Sketch.
Note: you get a picture of the part of screen you grab. A grab of a script or a tool will be an image, not an object copy. To make a real copy use the green halo handle
Lasso cannot be placed as an object, so it cannot be right-clicked to get its halo, and thus its viewer.
Line (Graphics category)
The line is a Polygon with two vertices by default, but it has options so that can be made to act as a multi-segment Polygon or a smooth Bezier curve, and can have arrowheads at either end or at both. It occurs as a component of various Connector objects. Its viewer includes the polygon category.
Magnifier (Just for Fun category)
A rectangle that displays a magnified image of the world around the location of the cursor. Dragging the Magnifier makes it seem like a magnifying glass, magnifying whatever is under it. From the magnifier's menu, you can choose to change change the magnification, track pointer (which turns off and on the second magnifying option described above), show pointer (the center of the magnifier), or change the magnifier to a RoundGlass, with different options. This conversion cannot be reversed.
Magnifier - magnifier
magnification The factor by which the tool magnifies whatever it is looking attrack pointerWhether or not the pointer should track the cursor locationshow pointerWhether or not the pointer should show the cursor location
show pointer Turn a dot in the center of the magnify window on or off.
track pointer Turn magnification of the area around the cursor on or off. With this option turned off, dragging the magnifier still magnifies what is under it.
Maker Button (Connectors category)
This object allow you to make multiple copies of an object and all its scripts and attributes. Simply drag an object onto the Maker Button to load that object into the button. Then each time you click the button you make a new copy of that object.Mines (Games category)
Mines is a very simple game to play. The rules are just this: there are 99 mines laid down on the board. Find them without ""finding"" them. Your first tile is free - click anywhere. The tiles will tell you how many mines are right next to it, including the diagonals. If you uncover the number '2', you know that there are two mines hidden in the adjacent tiles. If you think you have found a mine, you can flag it by either 'shift' clicking, or click with the 'yellow' mouse button. Once you have flagged all of the mines adjacent to a numbered tile, you can click on the tile again to uncover the rest.
Moving Eye (Just for Fun category)
A small black eye with a white pupil. The pupil follows wherever the computer's mouse goes.
MPEGPlayer (Multimedia category)
A player for MPEG and JPEG movies. It has menu, open, rewind, play, stop, and quit buttons along the top. The menu has the options previous frame, next frame, zoom, subtitles (open subtitles file) and advanced (turn on repeat, set frame rate, create JPEG movie from MPEG, JPEG movie from SqueakMovie, JPEG movie from folder of frames) in addition to rewind, play and stop.
MPEGPlayer Basic Buttons:playStart playing the movie/sound.stopStop playing the movie/sound.rewindRewind the movie/sound.The object also has soft/loud and start/end sliders below the buttons. It has 13 tiles in the special viewer category movie controls.
- MPEGPlayer's volumereturns and allows adjustment of the movie/sound volume.
- MPEGPlayerplayis a command to start playing the movie/sound.
- MPEGPlayer play until positionis a command to play the movie/sound until the position indicated in the numeric input.
- MPEGPlayer stopis a command to stop playing the movie/sound.
- MPEGPlayer rewindis a command to rewind the movie/sound.
- MPEGPlayer's is runningreturns true/false if the movie/sound is/is not running.
- MPEGPlayer's repeatsets true/false for movie/sound repeating or not. You can also access the state of the movie/sound repeating or not in a watcher.
- MPEGPlayer's positionis a number representing the current position of the movie/sound.
- MPEGPlayer's total framesis the length of this movie in number of frames.
- MPEGPlayer's total secondsis the length of this movie in seconds.
- MPEGPlayer's frame graphicis a graphic for the current frame.
- MPEGPlayer's video file nameis the name for the video file.
- MPEGPlayer's subtitles file nameis the name for the subtitles file.
Next Page (Multimedia category)
A button which, when clicked, takes the reader to the next page of a book. It can be used as an additional page turner in a book. The button can be made opaque or not from its menu. (I saw no difference between opaque and not - can someone describe the function here?)
The NextPage method is implemented in the BookMorph class, a subclass of BooklikeMorph, in the Morphic-Books category in Squeak.
New Button Flap (not in Object Catalog)
New Button Flap is provided on the Connectors Flap. This object is almost identical with Button Flap. In fact, it is a Button Flap when closed, but a New Button Flap attached to a parts bin when open. Its functions are explained under Button Flap.
Object Catalog (no category)
Called Objects in the Object Catalog, this is a kind of parts bin that gives access to objects whose class definitions register themselves to appear in it. You will find the Object Catalog in the Supplies bin, and also in itself, under the name Objects. The ctrl-o/cmd-o keyboard shortcut executed in world brings up the Object Catalog, and it also appears on the world menu as objects (o).
- alphabetic- gives you separate buttons for a, b, c, etc. Click any button, and you will see icons of all the objects whose names begin with that letter.
- find- gives you a type-in pane for a search. Type any letters there, and icons of all the objects whose names match what you have typed will appear in the lower pane.
- categories- provides buttons representing categories of related items. Click on any button to see the icons of all the objects in the category.
Note: Not every object belongs to a category, therefore you can find more objects by clicking alphabetic or find at the top of the Object Catalog. Also, not all objects are in the Object Catalog at all. Finding them requires exploring the structure of other objects.
The Object Catalog is implemented with a Button Pane for the top toolbar, Tab Panes for the alphabet and category buttons, a Search Pane for the find view, and IconicButtonWithLabel objects for the Objects in the catalog.
Particles (Basic category)

A Kedama World with pre-made components, a black square containing a red dot, a smaller solid black square, and a still smaller red square. The larger black square is KedamaWorld and the smaller is patch. The red square is turtle1. They have special sets of categories and tiles.(perhaps Yoshiki could describe the tiles or should we refer to the PDF on Kedama?)
KedamaWorld
patch
turtle1 has a set of turtle graphic commands.
PDA (no category)
A Personal Digital Assistant with an address and phone list, a calendar and schedule, and notes. The PDA help text, accessed from an entry in the To Do list, reads:
A lot about the PDA should be obvious just by opening one up and playing with the sample data. The PDA holds a complete database of people, events, to-do items and notes. The date and keyword selected determine which records are visible at any given time.
All records
All records in the database have a number of pre-allocated fields, and these are displayed in the obvious manner in the current item pane at the bottom, when the record is selected. Care must be taken to enter only valid data as the contents of any field. This is usually simple but, for instance, matching string quotes can be a problem (embedded string quotes must be doubled).
Any item may be augmented by any number of fields, provided that the field names do not conflict with existing ones, and that the contents are valid Squeak objects.
The description field may often carry a long body of text so, for this reason, a special feature is provided for viewing only the description of the current item. This makes it a lot easier to read long notes (like this one), and it saves the user from worrying about matching quotes and other punctuation. Sorry it''s a mode -- use the menu of the bottom pane to switch modes.
People
Since the name field is not split into first, middle, last as in some databases, you are encouraged to adopt the following format:
Lastname, First I., Jr. (Nickname) (&Spousename) which allows for useful processing for invitations and the like.
ToDoItems
ToDo items are designed not to be removed, but only to be marked done. This allows the database to be browsed retroactively, with the to-do items appearing and disappearing on the dates the tasks were introduced and completed respectively. Note that toDo items have a deadline field whose obvious associated semantics (see alarms) have not yet been implemented.
Schedule
Scedule [sic] items are relatively simple. It is intended that if duration is specified, and that if time+duration overlaps ensuing events, that the ensuing events will be show in red or someting like that. Alarms have not yet been implemented, but they will accept an integer field equal to the number of minutes prior to event time that the alarm should appear. Presumably an alarm will apppear as a new object on the screen that announces the event, sounds a continuing audible sound, and allows easy dismissal by clicking or keystroke.
A number of short forms are allowed for the time field, such as ''4p'' asTime. An event with time = nil will appear with dashes at the beginning of the day.
RecurringEvents
Recurring events are treated specially. Each master event is consulted to generate derivative events in the schedule for any given day. You can edit the derivative events, at which point they will become permanent events just like any other. An unedited recurring event is a virtual object -- if you edit the master, its derivative copies may disappear from one time and reappear at another. For this reason it is recommended that you never alter the date of a recurring event. Instead, declare its last date, causing an end to that series, and create another recurring event for the new schedule if desired. In this manner all the past schedule will continue to appear as it did when it was current.
To examine or alter recurring events, select the ''recurring'' category (this will need further filtering for large databases). The currently supported recurrence rules include
#eachDay - for example, a 2-week vacation (give first and last dates).
#dayOfWeek - for example, every Thursday
#dayOfMonth - for example, on the first day of every month
#dateOfYear - for example, birthdays and many holidays
#nthWeekdayOfMonth - for example, the second Tuesday of every month #nthWeekdayOfMonthEachYear - for example, Thanksgiving (The Squeak PDA does not support the recurrence rule for Easter Sunday ;-).
Notes
Notes are simple a place to capture thoughts and information relevant to the different areas of your life while you are in the simple planning mood inspired by using a PDA. The ability to view the current item''s description only is especially useful for notes.
Spawn Entire Month
While this feature (accessible from bottom pane menu) is very crude and does not offer interaction, its real purpose is for printing. Expand the spawned window to full screen, use the morph menu to choose ''print PS to File…'', and then send the resulting .eps file to your printer. (At the time of this writing portrait and landscpe [sic] options were reversed ;-).'
PianoKeyboard (Multimedia category)
A piano keyboard. Pick out notes with the mouse. You can enable a chord from the menu that allows selection of multiple keys (see below). There are two tiles in the special viewer category keyboard.
- PianoKeyboard's allowing chord is true/false depending on whether multiple selection of keys is allowed or not to create a chord.
- PianoKeyboard's frequency returns the frequency of the key being played.
How does the user turn off a chord?
Pin (Connectors category)
An attachment point for Connectors that you can embed in another Morph. Drop a pin on a Morph. A menu appears, as follows.
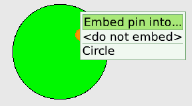
If you select <do not embed> or click elsewhere, the pin is not embedded, but lies on top of the Morph so that you can click it and move it. If you click the name of the Morph, the pin is embedded in the Morph, and you are invited to give it a name, which defaults to pin{number}, with the numbers increasing sequentially. The pin then becomes an attachment point for connectors. It remains possible to pick up and move the pin using its Halo. Right-click to get the object's Halo, then again to the the pin's Halo.
Pick a Connector from the Object Catalog, and drag one end into the Morph, as shown below.
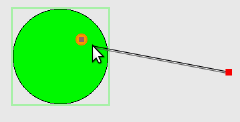
The nearest pin to the cursor will highlight. On mouse up, the connector will join to the pin. You can pick up the end of the connector by clicking the pin, and move the connector to a different attachment point, or out of the Morph completely. Pins can of course be given any desired appearance, such as the color of the object.
Players (Scripting category)
![]()
This is a tool that lists all players in the project and provides a variety of information about each.
This is supposed to be all objects in the current project that have user-defined scripts. However, other objects turn up on the list: dot and world, in particular. Why? They show up in an object inspector as UnscriptedPlayers. Creating a script turns them into Players.

Opening a viewer on an object adds it to the Players list, even without the user defining a script. Is this because the viewer creates an empty script for the object? It says that it is an UnscriptedPlayer.
The Players tool provides a quick way for the user to access objects in the project by providing a menu for accessibility, a quick button that shows a small thumbnail image of the object, object's viewer, and a tile representation of the object. A menu object opens a Squeak object inspector on the player.
Player Menu
where is this object?-this option reveals the object by surrounding it with its halo.
open viewer for this object- this option opens the viewer for the selected object.
tile for this object-this option creates a tile representation for the object selected.
destroy this object-the object is deleted and put in the trash can when this option is selected. Drag the object out of the trash can to retrieve it.
rename object-small text screen pops up when this option is selected. Type the text to replace the name of the object and press "ok".
forcibly rename object-If you want to give this object a name which conflicts with another object's name in the project, use this command. The other object with the same name will in the process be given a different name.
copy object's name to clipboard-As it says, this object name is copied to the clipboard.
inspect object-this launches a Squeak scripting window that shows the variables and codes used to create this object.Playfield (Basic category)

The Playfield can be thought of as a canvas on which you can place other objects. The Playfield object has certain special properties which allows you to group objects together in a Collection and send messages to all objects contained in the playfield. It is exactly like a holder with three differences which can be seen by in “playfield options…” which is found in the menu: Auto-line layout, Fence enabled (this keeps objects from moving outside of the playfield's visible boundaries when using the “forward” tile from the basic or motion categories) and Indicate cursor.
In the viewer it has the special tile categories playfield, pen trails and collections.
auto-line-layout
When checked objects in the playfield are positioned in rows starting at the top of the playfield. When unchecked the objects move back to their original positions.
auto-phrase-expansion
Whether tile phrase dropped onto me should automatically sprout Scriptors around them. By default this is turned off on all playfield's except one, the world's playfield.
automatic viewing
When checked if an object inside the playfield is touched (picked up or moved) a viewer is automatically displayed.behave like a holder
Sets auto-line-layout, indicate cursor and resize to fit. Warning: this will change the size and position of all objects in the playfield. Un-checking this option will NOT get you back to your previous playfield state.
fence enabled
This keeps objects from moving outside of the playfields visible boundaries when using the “forward” tile from the basic or motion categories. You can still position objects outside of the playfields visible boundaries by setting the objects x and y values.
grid visible when gridding
Displays the grid if "use gridding" is checked.
indicate cursor
Displays a border around the object at the current cursor position.
mouse-over halos
Displays an objects Halo when you leave the mouse over the object and no other Halo is visible within the your project.
Note: you may need to wait a second for the Halo to appear.
origin-at-center
Set the playfields origin to the center of the playfield. The default origin is the lower left corner of the playfield. The origin can also be set using "set grid spacing".
parts bin
If you drag an object into the playfield a copy of the object is made and placed inside a"Maker Button"This can be used to provide users with playing pieces or building parts for your project.
resize to fit
Resizes the playfield's height to fit the objects contained inside it.
BUG? - Place two items in a playfield of 200 x 200, then place both objects at the bottom left of the playfield, then check "resize to fit" it only adjusts the height. More specifically it only moves up the bottom edge to the lowest objest in the playfield. It does NOT adjust the width.
show thumbnails
Whether large objects should be represented by thumbnail miniatures of themselves. (HELP - define large, couldn't figure it out. I put a Rectangle in a playfield and when the rectangle was 100x100 and the playfield was 500x500, then I checked "show thumbnails" it showed a thumbnail of the rectangle. Can someone look at the code)
use gridding
Turns on gridding. When gridding is turned on objects "moved" within the grid will move in "grid spacing increments". For example if you set (using set grid spacing) the width=10 and height=20, the object will not visibly move, until its X is set to the next increment of 10. Ie: if Sketch.X=10 and you increment X by 5, it will take two increments to see X move.
Use "show gridding" to display the grid. Use set grid spacing to set the origin point and the grid size.
round up strays
Brings morphs that are off screen back to the visible screen.
shuffle contents
(see Tiles-Playfield-collection for content, same functionality)
set grid spacing…
Used to set the origin point of the playfield (specified asx@y) and the grid spacing (specified as width@height)
set thumbnail height…
Sets the height of thumbnail images on the playfield. Note: If you are currently showing thumbnails the new height will not take affect until you uncheck and recheck "show thumbnails"
make detachable
a playfield that has been designated as detachable can have its own local stop-step-go buttons which govern only the status of players within the playfield.use standard texture
Shows a graph paper background image of 10x10 squares.
make graph paper…
Allows you to specify a grid size, line color and background color for a square grid background image.
show viewers of all players
Shows the viewers of all objects within the playfield's collection that have user written scripts. In this case it does show the viewers of objects within objects in the collection that have written scripts as well.
Only one viewer will be fully visible, the rest will show the icons on the right edge of the World's playfield.
Simply click on one of the icons to expand the viewer. Did you notice that I said the World's playfield. Self Study
remove viewers of all players
Hides the viewers of all objects within the playfield.
playfield - Viewer - Category:playfield
graphic
The graphic shown in the background graphic of this object. The graphic is also one of the elements in the Playfield Objects collection. (NFP (Not For Publication) - At least I believe that was the intended behavior, would think a graphic is more like a background color and should not be part of the collection, but documenting as Etoys 4 works) (NFP - If you create a playfield graphic then move it with the using the "Move" icon from the Halo, it stays as the Playfield Graphic, but if you "Pick it Up" using the "Pick Up" icon from the Halo it is no longer the Playfields graphic)mouse x
You get the x coordinate of the mouse pointer relative to the playfield's origin. That means, you get a negative value for x, when you move the mouse to the left of the playfield and a value bigger then the width of the playfield when moving to the right.mouse y
You get the y coordinate of the mouse pointer relative to the playfield's origin. That means, you get a negative value for y, when you move the mousebelow the playfield and a value bigger then the height of the playfield when moving above the playfield.round up strays
Bring all objects in the playfield, whose x,y position is outside the bounds of the playfield back into view.Quick Quiz: So, is it possible to have objects that are in the playfield where you can see at least part of them, but they are "outside the bounds of the playfield"? How can you test your answer?
unhide hidden objects
All objects have a "hide" action that you can run from the "miscellaneous" category. This is telling all objects in the playfield to show themselves. Quick Quiz: After reading this section is it possible to click on "unhide hidden objects" and still not see all objects? Prove it!
playfield - scripting
tell all contents
Send a message to all the objects contained in the playfield. If an object recieves a message and the message matches the Name of a script, that script will executed once.playfield - collections
Certain Objects in Etoys such as Holder and Playfield allow you to group items together in a collection. The items in the collection could be of the same type (ex: all text) or different types (sketches, text, polygons, etc). The collection allows you to:
- iterate through each object using the cursor
- reference objects in the collection in other scripts
- reference graphics in the collection in other scripts
- reference attributes of the objects in the collection
- Send messages to all objects in the collection with a single Script tile.
Collections allow you to do many things such as:
- Create an animation by changing the graphic of an object by iterating through the graphics in a Holder's collection.
- Store a set of data you have collected and iterate through the items to create a graph, or find the sum, median, average, max or min.
- Send messages to all contents of the collection (see category scripting: "tell all contents") such as reset to the beginning position of a game and/or reset all scores in a game. Simply ensure that each object in the collection has a "reset" script. Then depending upon the object each can have its own specific "reset" behavior.
- Iterate through items to sort them based upon a certain attribute you wish to order by, such as numeric value, vertice count (to sort polygons), for those objects with color attributesby hue, or any other numeric attribute of an object.
cursor
The index of the chosen elementcount
How many elements are within mefirst element
The first object in my contents
graphic at cursor
the graphic worn by the object at the cursor
include
Add the object to my contents at the end of the collectioninclude at cursor
Add the object to my contents at my current cursor positionnumber at cursor
the index number at the cursorplayer at cursor
A reference to the object currently at the cursor.
This tile can be put into scripts replacing the scripting tiles object being sent the message. So lets say you have a collection (in a Holder or Playfield) where you store a set of numbers (from some data you collected) and you want to plot those numbers on a graph.
There is a special menu item for this Tile: "Tiles to get". "Tiles to get" lets you reference attributes of the "Player" (aka object) at the cursor.
remove all
Remove all elements from the playfield. The elements are removed forever.shuffle contents
Shuffle the contents of the playfield. Note if the Playfield contains a graphic as one of its element, this element is excluded from the shuffling and remains the last element in the collection.string contents
A concatenation of the the Objects Characters value (in the Basic Tiles Category) of if the Object's Name if the Characters value does not exist. (Question: why does is use the Characters for Text Objects, but the Object Name for everything else?)tell all contents
Send a message to all the objects contained in the playfield. If an object recieves a message and the message matches the Name of a script, that script will be executed once. NOTE: It does not send messages to objects contained in objects in the playfield.
For example:
- If you have a Sketch inside a Holder which is inside a Playfield
- Both the Sketch and the Holder have scripts named "script1"
- When th ePlayfield sends the message "script1" to all contents, only the Holder's "script1" will execute.
pen trails
These tiles have a different behavior from those in the "pen use" category. These tiles refer to the pen trails of the objects contained in the playfield. Where "pen use" refers to pen trails made by the playfield.
The Collections and Menu Items for "pen trails" are the same but different names.
batch pen trails
MenuName: "batch pen trails" Whether pen trails should reflect small movements within the same tick or only should integrate all movement between ticks
clear pen trails
MenuName: "clear pen trails" Clears the pen trails of objects in the collection. Does not clear the pen trails of objects within the objects in this collection or of the playfield itself.
has pen trails
This is a Boolean to indicate whether there are any pen trails in the playfield. It does not check for pen trails inside objects in the collection.
lift all pens
MenuName: "all pens up" Tells all objects in the playfield to set the "pen down" value to false for all objects contained in the playfield.
lower all pens
MenuName: "all pens down" Tells all objects in the playfield to set the "pen down" value to true for all objects contained in the playfield.
pen trail graphic
This is a graphic of all pen trails inside the playfield. It could be used if you had multiple objects drawing pen trails inside the playfield to make a picture. Then you could set the graphic of another object to the picture of the combined pen trails.trail style for all pens
Tells all objects in the playfield's collection to set their pen style to the value specified
- lines (MenuName "all pens show lines")
- arrowheads (MenuName "all pens show arrowheads")
- arrows (MenuName "all pens show arrows")
- dots (MenuName "all pens show dots")
initiate painting (Include Painting Image)
I am flagging "initiate painting" for removal. Reason as per Chapter Talk in Tiles Chapter this feature is flagged for removal) (NOTE: not documenting Unlock "NameOfGraphicSketchUsedAsBackgroung". This only shows up in the Playfield's menu, if you have a background graphic, see initiate painting above, which is one way to create a background graphic) Rita: I don't see where initiate painting hay anything to do with halo, so it should be removed from here.
playfield - sound
sound pitch pitch of soundsound levelevel of sound
dial number dial number of sound
listening whether the stethoscope is listening
playfield - input
last keystroke The last unhandled keystroke
playfield - preferences
use vector vocabulary Whether to use the Vector vocabulary with etoy scripting in this project
drop produces watcher Whether a drop of a value tile, such as "car's x", on the desktop, should produce a watcher for that value
allow etoy user custom events Whether to allow "custom events" in etoys.
batch pen trails Whether pen trails should reflect small movements within the same tick or only should integrate all movement between ticksfence enabledWhether an object hitting the edge of the screen should be kept "fenced in", rather than being allowed to escape and disappear
keep ticking while painting Whether scripts should continue to run while you're using the painting system
olive handle for scripted objects Whether the default green halo handle (at the top right of the halo) should, for scripted objects, be the olive-green handle, signifying that use will result in a sibling instance.
implicit self in tiles Whether tiles representing a player should be suppressed in Viewers and Scriptors belonging to that player
Polygon (Basic category, Graphics category)

Polygons are graphical objects with defined corners orverticesthat can be grabbed and dragged to change the shape and size of the object. Although the technical definition of a polygon is a closed plane figure with straight edges, polygons in Etoys may be open with curved edges.
A new polygon has four vertices and four sides.
Select "Show handles" from the Halo Menu to display circles at each of the vertices. You can also click on the polygon holding the shift key down to bring up the handles. Grab the circles to adjust the lengths of the sides of the polygon. "Show handles" will also display triangles at the midpoints of each side. Grab a triangle to "split" the side and create a new vertex at the triangle.
The number of vertices may also be controlled via the polygon pane of the Viewer ("vertices count"). Vertices may only be removed via the Viewer or via a script.
An Etoys polygon with two vertices looks like a line segment. An Etoys polygon with one vertex looks like a point (and is somewhat difficult to click to add a point!). An Etoys polygon may not have less than one vertex.
Each vertex of the polygon is assigned a cursor number. Reference a vertex by assigning the vertex's cursor number to the polygon's "vertex cursor" property on the polygon pane of the Viewer. The currently-referenced vertex appears as a blue circle if the polygon's handles are visible. The "x at cursor" and "y at cursor" properties reference the selected vertex's location.
The polygon pane of the properties view also provides access to the following Etoys polygon properties:
- line is curved (Boolean, controls if sides of the polygon are straight or curved).
- line is opened (Boolean, controls if the vertex with the highest cursor number is connected to the vertex with cursor number = 1). This creates an open figure.
- showing handles (Boolean).
The polygon pane of the Viewer also contains scripting tiles to add a vertex at the beginning (creating a new vertex at cursor number = 1, at the current cursor position, and at the end. Note that new vertices have the same location as the vertex at the currently selected cursor position. Creating new vertices will not appear to change the shape of the polygon until the location of the new vertex changes.
The polygon pane of the Viewer contains a scripting tile to remove the vertex at the current cursor position.
The polygon pane of the Viewer also contains a scripting tile to "shuffle vertices". This action shuffles the cursor position of the vertices in the list of vertices (not the x@y location of the vertices). As a result, the shape of the polygon may change, as the vertices appear to be connected in different ways.
The angle at a vertex may be calculated by determining the lengths of the sides of a triangle formed by the vertex and the endpoints of the segment sides, and using the Law of Cosines. Although Etoys does not have an arccos function, it does have an arctan function. The following identity may be used to find the arccos from the arctan:
ArcCos(x) = ArcTan( Sqrt(1 - Sqr(x)) / x )
Unique Tilesvertex cursor The index of the chosen vertex of vertices
vertices count How many vertices are within me
x at cursor The x coodinate value at the vertex cursor
y at cursor The y coodinate value at the vertex cursor
add a vertex at beginning Add a vertex at the beginning of my vertices list
insert a vertex at cursor Add a vertex at my current cursor position
add a vertex at end Add a vertex to the end of my vertices list
remove all vertices but cursor Remove all vertices but my current cursor position vertex
remove the vertex at cursor Remove the vertex at my current cursor position
shuffle vertices Shuffle the vertices
line is curved Whether the line is curved
line is opened Whether the line is opened
showing handles Whether the handles are showing
Previous Page (Multimedia category)
A button which, when clicked, takes the reader to the previous page of a Book. It can be used as an additional page turner in a Book. The button can be made opaque or not from its menu.
(I saw no difference between opaque and not - can someone describe the function here?)
Random (Scripting category)

This tile, when added to an expression in another tile, generates a random number in a given range. This functionality is also available in the Gold Box in ScriptEditor toolbars, among other tiles that can be used for scripting. The Random tile can be placed in tiles that take a numeric argument. When it is in a script, clicking the Random tile brings up a menu of numeric functions, shown in the chapter on Tiles.
Random Connectors (Connectors category)

A button that will create random arrows each time you drag one from it.
Exploration Challenge: Drag out multiple "Random Connectors" and look at the attributes in its "connector" category. See if you can figure out what attributes to change to create your own special connectors. Then if you like drop them into a maker button or a Button Flap for re-use.
Rectangle (Basic category, Graphics category)
![]()
This is a basic rectangle.The Rectangle object is not related to the Polygon object and does not provide the polygon category in its viewer. Rectangle has a color category of tiles that allows you to choose its color from a color picker, and to use its red, green, blue, alpha, hue, brightness, and saturation properties (in the color category) in programs.
Rectangle is implemented in the RectangleMorph class, a subclass of BorderedMorph, in the Morphic-Basic category in Squeak.
RoundRect (Basic category, Graphics category)
![]()
A rectangle with rounded corners. It has the same color category as rectangle.
RountRect is implemented as a special case of the RectangleMorph class, a subclass of BorderedMorph, in the Morphic-Basic category in Squeak.
Same (Games category)
The object of Same game is to maximize your score by removing tiles from the board. Tiles are selected and removed by clicking on a tile that has at least one adjacent tile of the same color (where adjacent is defined as up, down, left, or right). The first click selects a group of adjacent tiles, a second click in that group will remove it from the board, sliding tiles down and left to fill the space of the removed group. The square of (the number of tiles deleted-2) is added to the player's score, so it is advantageous to remove tiles in a way that brings larger groups of tiles together. Removing all of the tiles adds a bonus of 5 times the original number of tiles on the board.
Schematic Connector (Connectors Category)
A connector that connects to the nearest connection points on the objects it is linked to. This is in contrast with Connector, which connects to the nearest point on the boundary of the objects. Otherwise, they are the same. The difference in these behaviors can be seen in the illustration below.

The Connector that lies higher in this image connects the two Circles at their nearest points, and thus lies on the line joining their centers. The Schematic Connector that lies lower connects the Circles at connection points, eight of which are spread out equally around the circumference of each circle. Thus it connects at the leftmost point on one circle, and the point halfway between the right most point and the lowest point on the other.
Schematic connectors, before they are connected to anything, look exactly like Connectors. When connected, however, they differ from connectors in two ways. First, they cannot have arrow heads. Instead, when their ends are dropped on other connectors, they automatically decorate their ends with junction dots, thus.

This behavior is designed for use in electronic schematic diagrams.
Second, as you move the objects around the ends of Schematic Connectors snap to the closest connection points, thus.

ScorePlayer (Multimedia category)
The ScorePlayer object plays MIDI music scores. MIDI stands for "Musical Instrument Digital Interface", a standard format for digitally representing musical scores.

Click the Menu button to display a menu of ScorePlayer options. Click the "open a MIDI file" menu option to load a MIDI score. Etoys will display all MIDI files in the Etoys folder. You can also save as AIFF file, save as WAV file, save as Sun AU file, reload instruments, play via MIDI, and make a pause marker from the menu. Once a MIDI file is loaded, the instruments referenced in the MIDI score will appear as part of the ScorePlayer object. >
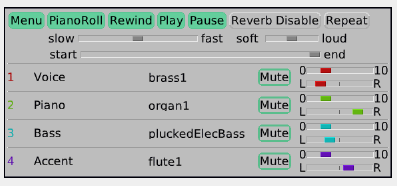
Click on an instrument name to select a different instrument.
Click the PianoRoll button to display a PianoRollScore object representing the loaded MIDI file. If no MIDI file is loaded, the PianoRollScore will be blank.
Click the Play button to listen to the MIDI score.
Scratch Client (Scratch category, v5)
What is Scratch Client supposed to do?
Scratch Client has two special viewer categories, Configuration and Command.

host Variable holding the IP address of a network connection
is connected Boolean variable stating whether the network connection is up
port Variable holding the port number of the connection, in decimal representation

What do these really mean? What gets sent from where to where, and why?
broadcast Command to transmit the specified text
send values Command to transmit a specified set of values
sensor update Command to send values from sensors
update light Command to send the specified numeric value
update resistance a Command to send the specified numeric value
update resistance b Command to send the specified numeric value
update resistance c Command to send the specified numeric value
update resistance d Command to send the specified numeric value
update slider Command to set the value of a slider
update sound Command to set a sound to a specified value
Halo menu options
verbose Toggle ??
debug mode Toggle debugging
Scripting (Scripting category)
This creates a small but resizable sandbox for confined scripting. The space includes a small but resizable playfield, a trash can and a dedicated script controls button bar, just like the AllScripts object. The player will be limited to the scripts within the Scripting area. This scripting area as well as the playfield within this space can be enlarged using the resizing tools on their respective halos.Objects can be dragged into the playfield, and scripts taken from their viewer menus to put in the scripting area.
Scrolling Text (Basic category)

A scrollable, editable holder for entering and editing text. From the menu, you can
open and close editing (Does anyone know what this means? It has no evident effect.)
make the scroll bar retractable, popping up on the outside of the window when the mouse comes into position, or inboard, always visible.
put the scroll bar on the left or right side.
Sector (Graphics category, v5)

A Sector Morph looks like a pie slice. Its border shape is two radii of a circle meeting in the center, and joined by an arc of the circle. The Halo menu contains one special item, to toggle display of the handle for adjusting the internal angle of the Sector. The radius can be changed with the Resize tool in the Halo in the usual way.
Sector has one special viewer category, called sector.
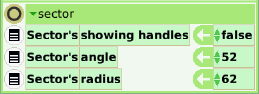
These variables are for showing or hiding the one handle, and for viewing or setting the Sector's angle in degrees and radius in pixels.
Slider (Basic category)
![]()
A scriptable control that allows you to choose a numeric value by dragging a knob. It has the same color category as rectangle. From the menu you can open and close editing (does anyone know what this means?), set action selector (does anyone know what this means?), change arguments (does anyone know what this means?), set minimum value (see below), set maximum value (see below), switch between number values ascending and descending as you move the slider up and down (see below), and turn on and off truncation (see below). Slider's viewer has the extra category slider with 9 tiles.
- slider's width sets the width of the slider. This can also be set using the yellow change size button on the slider's halo.
- slider's color changes the color of the slider's background.
- slider's descending determines whether the max val is at the top or bottom of the slider.This can also be set on slider's menu.
- slider's height sets the height of the slider. This can also be set using the yellow change size button on the slider's halo.
- slider's knob color changes the color of the slider's knob.
- slider's max val sets the value at the top of the slider. This can also be set on slider's menu.
- slider's min val sets the value at the bottom of the slider. This can also be set on slider's menu. By choosing a negative value, you place zero somewhere between the top and bottom.
- slider's numerical value is the value of the slider position measured from zero. The value read and position of zero on the slider depend on the numbers you input to sliders max val and min val.
- slider's truncate is a true/false value that can also be set in the slider's menu. To see its intended purpose set the Max Value to 10, Drag out a watcher for slider's numeric value and move the slider. With truncation=false, the numeric value acts like a float, With truncation set to true it will only return integer values.
Note that you can change the slider to horizontal by using the yellow change size button on the slider's halo or the slider's width and height tiles. When the width is greater than the height, the slider is horizontal and then up and down go to left and right in the above descriptions.
Sound Library (Multimedia category)
This tool allows you to view and manage the "Sound Library", which is the list of named sounds that can be used in the tile-scripting system. Click on a sound name in the list to select it. The buttons at the top of the tool apply to the sound you have selected.
Play button -- press this to start playing the selected sound.
Stop button -- if the selected sound is playing, pressing this will stop it.
Tile button -- Click on this to obtain a scripting tile representing the selected sound.
Rename button -- Bring up an edit window to enter a new name for the selected sound. None of the built-in sounds may be renamed. Sounds loaded into the Sound Library with the Load button may be renamed.
Delete button -- allows you to delete the selected sound from the Sound Library. All tiles that formerly pointed to this sound will be changed to point to "croak" instead.
Load button -- allows you to load a sound into the Sound Library from a file. You can also add sounds to the Sound library using the Sound Recorder, and also by dragging an external sound file (e.g. a file with extensions .wav or .aif) into Etoys.
The Halo menu for Sound Library contains these special functions.
show compression A check box to toggle compression (but not on built-in sounds) using one of the following three choices:
GSM compress sound
Ogg Vorbis compress sound
Ogg Speex compress sound
Wave editor open a sound waveform editor tool on the selected sound.
Sound Library has a question mark button at the upper left with excellent help for using this object. The above text is from that help section.
Sound Recorder (Multimedia category)
Basic tool to record sound.
Note : You must have microphone input for this tool to record.
Press "Record" to start recording. Press Stop when finished recording. After making a recording, you can: Press "Play" to play back the recording. Press "Record" to start a new recording (the old one would be discarded). Press "Save" to save the recording in the sound library. Press the menu icon to get a menu with further options. The menu icon:
- Shows the duration of the recording
- Allows you to open a help flap which displays the information above and below.
- Hands you a sound token (see below).
- Let's you choose from the following compressions:
- Speex (for speech)
- Vorbis (for music)
- GSM (basic noise inducing compression)
- No compression, Note: sound can be huge without compression!
5. If the eToyFriendly preference is turned off, one more option appears on the menu: trim. This removes blank space from the beginning and end of the recording. It appears to be buggy, and should only be used on material that has been saved to a file so that it can be recovered in case of problems.
6. Allows you to open the sound in wave editor (see description below).
If you wish to refer to the sound in scripts, you need to add it to the sound library; press Save to do that; you will need to supply a name for it.
If you want to retain the sound but do not need to refer to it in scripts, you need not name it; instead, use "hand me a sound token", found in the menu, to obtain a little "sound token" object that you can subsequently use in a variety of ways:
- You can double-click on the sound token to hear the sound again.
- You can decide to save the sound after all, by using an item in the sound token's halo menu.
- You can drop the sound token into a PianoRoll or an EventRoll.
Spectrum Analyzer (Multimedia category)
A digital sound analyzer that uses Fast Fourier Transform to determine the frequencies in the incoming signal. It has buttons along the top to start and stop the analyzer. When the analyzer is running, the "on" button at the right turns yellow. The menu button allows the user to set the sampling rate, FFT size and select the display type (signal, spectrum and sonogram).
Menu options are:
set sampling rate with choices of 11025 per second, 22050, or 44100.
set FFT size with choices of 128, 256, 512, 1024
set display type with choices of signal, spectrum, or sonogram.
There are buttons to start and stop the analyzer, and a slider running from 0 to 10.
What does the slider do?
What is the signal source?
Speech Bubble (Just for Fun category, v5)
A cartoon-style speech bubble containing an editable Text object. Click in the text area to get a cursor and begin editing.
Viewer category bubble contains three tiles, the command attach to dot, the information tile attachment, and the command stop attachment. Drop an object tile into attach to dot to replace dot in order to create a command to attach a Speech Bubble to the chosen object.
Speech Bubble (graphic) (Just for Fun category, v5)
A cartoon-style speech bubble containing an editable Sketch graphic object. Right click twice to get the Halo for the sketch, then click the gray pencil icon to get a PaintBox and begin drawing. The user can edit the existing drawing, or start by clicking Clear in PaintBox to start over and create a new drawing.
Viewer category bubble contains three tiles, the command attach to dot, the information tile attachment, and the command stop attachment. Drop an object tile into attach to dot to replace dot in order to create a command to attach a Speech Bubble to the chosen object.
Star (Graphics category)

Star is a simple Morph of a stellated pentagon, that is, a five-sided polygon with its sides extended so that they meet in new vertices. In addition to its use as decoration, it can be useful when simulating gears.
You can change the number of points via the halo menu or tiles in the star category in the viewer, as described below.
Shift clicking brings up a novel tool at the center of the star. Green triangle up (implemented using a Polygon) adds a point to the star, pink down removes a point. Green right widens the points (Twinkle fatter), pink left narrows the points. The sequence of widths is 0, 58, 87, 100 and back to 0. The yellow circle in the center (implemented using an Ellipse) is for moving the Star with no changes. A second yellow dot, attached to a vertex, is for adjusting size and rotating the Star when clicked and dragged. Turn off these handles in the Halo menu.
The balloon help on the second handle says that one can shift-click it to adjust the pointiness attribute, but this does not work.
The viewer for Star has a star category with these tiles:
vertices count How many vertices are within me
star ratio A measure of the width of the points.
The menu options are
- more sides
- fewer sides
- twinkle fatter
- twinkle thinner
Sticky Pad (Just for Fun category)
One cannot drag Sticky Pad from the Object Catalog to the world. Instead, when one clicks it in the Object Catalog, one gets a tear off object attached to the cursor for dropping in the world. These tear offs come in a predictable sequence of six pastel colors. However, they do not accept typing, nor can one drop text objects on them, so they are not usable as sticky notes.
Sticky Pad is implemented in the StickyPadMorph class, a subclass of RectangleMorph, in the MorphicExtras-Demo category in Squeak.
The tear off object is implemented as a borderless Rectangle.
Tetris (no category)
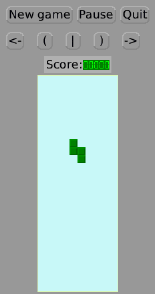
Tetris, yes, Tetris, and yes, it is not in the Games category. The top row of buttons is to start a new game, to pause in the current game and continue, and to quit. The game controls are labeled '<-' (move piece left), '(' (rotate piece counterclockwise), '|' (drop piece to bottom), ')' (rotate piece clockwise), '->' (move piece right). Keyboard equivalents are
left on cursor pad left
right right
up rotate clockwise
down rotate counterclockwise
spacebar drop
The control toolbars are Alignments of Buttons. The score line contains a String and a Led. The Tetris pieces are made of Rectangles.
Tetris is implemented in the following classes in the Morphic-Games category in Squeak.
- Tetris, a subclass of AlignmentMorph
- TetrisBlock, a subclass of Morph
- TetrisBoard, a subclass of PasteUpMorph
Text (Basic category)
![]()
Text can be used just as for any other program. It can be used for stories, labels, or other purposes. Drag the text into the playfield and change the font, size, color, and style by right clicking on the text and using the appropriate handles at the bottom of the halo. From the menu, you can turn text autofit off and on, wrap text to bounds, make the text translatable, and use pango (Can someone describe how using pango affects layout, rendering and internationalization, IE: Why would someone use this). The menu also provides text formatting options like text properties (including some not available through the bottom handles like text color), text margins, add predecessor (does anyone know what this means?), add successor (does anyone know what this means?), code pane menu, code pane shift menu, and fill owner's shape. The menu also allows you to make a holder for the characters. It has the same color category as rectangle. Text's viewer has the extra category text with ten tiles.
- text's all but first returns all the text but the first character in the text object.
- text's character at cursor returns the character at the cursor which can be set by text's cursor (see below).
- text's characters returns all the text in the text object.
- text's count returns the number of characters in the text object.
- text's cursor the position of the cursor in the text object.
- text's first character returns the first character in the text object.
- text's insert characters abc inserts the character appearing in the abc section of the tile at the current cursor position. The characters in abc can be edited by clicking abc and typing new characters. Accept the changes with the return key.
- text's insert contents of dot inserts the contents of dot, or any object dropped in to replace dot.
- text's last character returns the last character in the text object.
- text's numeric value the numeric value of the text string, if all the text will be replaced by a string representing the numeric value
additional tiles in color category:
- color- The color of the text
- background color- The color of the background behind the text
The Halo menu for Text contains the following items.
text auto fit
text wrap to bounds
choose font...
text properties...
text margins...
add predecessor
add successor
code pane menu...
code pane shift menu...
fill owner's shape
holder for characters
accept on CR
accept on focus loss
Add explanations for menu loss
Text Ellipse (Connectors category)

Text Ellipse is implemented as an NCTextMorph together with a Text object. Type your text inside the box, which resizes to fit the words.
Halo menu items
lock text
add text block
add text
add line
hide lower text
add explanations of menu items
Text Rectangle (Connectors category)

Similar to a Text Ellipse except that it is rectangular. Type your text inside the box. It will resize to accommodate the words you type. When you right-click the Text Rectangle, you get a tool Halo for the rectangle. When you click a second time, you get a tool Halo for the text, including tools for styling the text. These are the same tools as for Text Ellipse, including the options on both Halo menus.
Thought Bubble (Just for Fun category, v5)
The same as Speech Bubble, except for its outline, which has the conventional form from comic strips for thoughts rather than speech. It has the same viewer category, bubble.
Thought Bubble (graphic) (Just for Fun category, v5)
The same as Speech Bubble (graphic), except for its outline, which has the conventional form from comic strips for thoughts rather than speech. It has the same viewer category, bubble.
Title (Connectors category)

Enhanced Text that is pre-formatted to be large and bold.
Trash (Basic category)

A tool for discarding objects. For convenient access to the trash can, drag it onto your playfield. Then any object can be dragged into the trash easily. To remove an object, drop it on any trash can. To view, and maybe retrieve, items that have been thrown away, double-click on any trash-can. Things are retained in the trash-can if the "preserveTrash" preference is set, otherwise they are purged immediately. From the menu you can choose to make the trash can opaque or solid. Trash's viewer has the extra category trash with two tiles.
- trash's empty trash canempties the trash can if if the "preserveTrash" preference is set.
- trash's page countreturns a number of pages in the trash can. Every object you put in the trash can goes into a new page.
Triangle (Graphics category)
A three-sided Polygon. One can also create this object using thePolygonobject. It shares much of the functionality and tiles of thePolygonbut is created with three vertices by default. It is also different from a Polygon in that if you "shift-click" on it, it doesn't have the option of adding vertices using the green triangle handles. However, apart from that property, one can turn a triangle into a polygon with more than three sides by adding vertices by using the "add vertex at beginning (or end)" tiles. The new vertex appears in the same location as an existing one, so it looks as though nothing has happened until the user drags one of these vertices out to form another side to the triangle.
V Number Line (Graph category, v5)

A line of positive and negative integers, such as one might use for the Y axis in a graph.
VideoCamera (Multimedia category, v5)
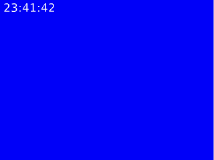
When connected to an internal or external video camera, VideoCamera displays what the camera sees, and can record videos from the camera. Without a camera connection, it displays a blank colored background and the time.
How does one connect to a camera?
Halo menu
configure video device Open this preferences window:
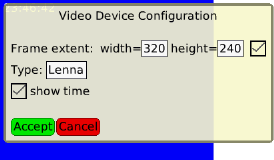
Controls are
- width In pixels
- height In pixels
- keep aspect ratio Check box
- type Choice of Lenna photo or Color Bars test pattern

Lenna color test pattern, photo of Lena Söderberg
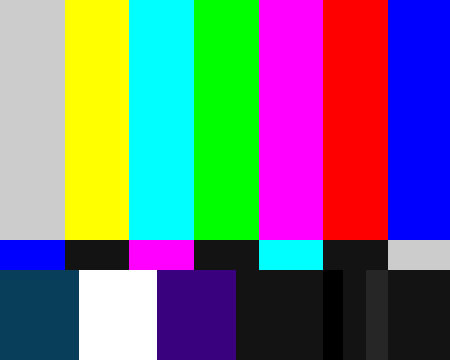
Standard color bars test pattern
- show time Toggle time display in test image. Defaults to 24-hour digital time
- accept Keep changes
- cancel Discard changes
start showing statistics (in Transcript) Send periodic messages to a Transcript window in the form
a VideoMorph<VideoCamera>(952): 1ms/frame - 1000 frames/sec
The video category in the viewer for VideoCamera contains these tiles.

play Command
stop Command
is running Booleanvariable
auto extent Boolean variable
brightness Floating point variable
configure video device Command
contrast Floating point variable
last frame Tile referring to a PlayerReferenceReadout representing a saved frame image
resolution Selection from original, 256 colors, 256 grays, 4 grays, or black and white
Add further descriptions of these tiles
WaveEditor (Multimedia category)
A workbench for seeing and editing wave forms. It has a row of buttons with balloon help across the top, followed by a row of data readouts and a slider. [purpose?] The sound data are shown in a Graph, and at the bottom is a PianoKeyboard.
Bug: There is no evident way to save and reload files. The Save button accepts a file name, but gives no indication where the file is stored. Right-clicking on the Graph twice to get its Halo gives access to its menu, which includes the read file function. Unfortunately, this does not give access to a file dialog, but requires the user to type the full name of the file. Given the name of a file saved with the Save button, it fails to find that file.
The buttons are:
X Close WaveEditor
menu
- play straight through
- play before cursor
- play after cursor
- play test note
- play loop
- trim before cursor
- trim after cursor
- choose loop start
- jump to loop start
- make unlooped
- make unpitched
- show envelope
- show FFT
play
play before
play after
play loop
test
save
set loop end
set one cycle
set loop start
Provide definitions for the buttons and menu items above.
Using the menu attached to a sound recorded in Sound Recorder object (described above), you can open the sound in the Wave Editor object. (Is there another way to open a sound on Wave Editor. Can someone supply the details?)
World Stethoscope (Multimedia category)
With the WorldStethoscope object, tiles use sound signals from the computer's microphone input to create programs. WorldStethoscope Etoys tiles read the frequency and level of the microphone input. The WorldStethoscope object is brought into the world from the ObjectCatalog multimedia category by grabbing the WorldStethoscope object and dragging it out onto the world.![]() Click the Start button on the WorldStethoscope object to begin receiving the signal from the microphone input. The On button will turn yellow. The Menu button at the left allows the user to set the sampling rate, set the FFT size, show adjustments and add a graph. Show adjustments allows the user to show and hide sliders for adjusting the cut off level and calibration. The "add a graph" choices show a sonogram, the signal, the frequency spectrum or data. The stop button discontinues the signal acquisition. The AC and Bias buttons were designed specifically for the XO computer, which allows for AC or DC signal input.
Click the Start button on the WorldStethoscope object to begin receiving the signal from the microphone input. The On button will turn yellow. The Menu button at the left allows the user to set the sampling rate, set the FFT size, show adjustments and add a graph. Show adjustments allows the user to show and hide sliders for adjusting the cut off level and calibration. The "add a graph" choices show a sonogram, the signal, the frequency spectrum or data. The stop button discontinues the signal acquisition. The AC and Bias buttons were designed specifically for the XO computer, which allows for AC or DC signal input.
To access tiles that allow you to develop programs using the input signals, open a viewer for the WorldStethoscope object from its halo and choose the Sound category. The WorldStethoscope's sound category has 13 special tiles not available to other objects.
- WorldStethoscope's cut off level filters out sounds with levels greater than this value.

- WorldStethoscope's dial number is a DTMF (Dual Tone Multi Frequency) decoder. This value reflects a decoded dial tone number. This function is useful for using a cell phone as a remote controller. Pull out the watcher for this tile with WorldStethoscope on, drag out a PhonePad object from the Multimedia category of Object Catalog, and click a key on the PhonePad. The watcher shows the clicked key.

- WorldStethoscope's frequency1 returns the frequency of the highest peak in the FFT spectrum.

- WorldStethoscope's frequency2 returns the frequency of the second highest peak in the FFT spectrum.
- WorldStethoscope's frequency3 returns the frequency of the third highest peak in the FFT spectrum.
- WorldStethoscope's level1 returns the input level of the highest peak in the FFT spectrum.
- WorldStethoscope's level2 returns the input level of the second highest peak in the FFT spectrum.
- WorldStethoscope's level3 returns the input level of the third highest peak in the FFT spectrum.
- WorldStethoscope's listening returns true/false when WorldStethoscope is/is not working.
- WorldStethoscope's pass over filters out sounds with frequencies less than this value.
- WorldStethoscope's pass under filters out sounds with frequencies greater than this value.
- WorldStethoscope's read out is for DC signals input on the XO computer. The "bias", or the internal voltage from the plug can drive the sensor plugged into the audio plug. When the sensor changes resistance,read outis the (digitized) raw value from the sensor. (IIRC, 0V to 5V outputs are mapped to 0 to 32767.)
- WorldStethoscope's update interval specifies how often the input is read.
Note: You cannot use multiple WorldStethoscopes and/or SoundRecorders at the same time. If you want to use the frequency1 tile to build a meter, the tile can be dropped onto the value of the length of rectangle, which will reflect the value of the input.

TheWorldStethoscopewas developed in Japan by Kazuhiro Abe and Tetsuya Hayashi. Hardware developed by Kazuhiro Abe and Tetsuya Hayashi turns a voltage signal into a frequency so any circuit element that outputs a voltage can be turned into a sensor. For example, thermistors can be used to measure temperature, light sensitive diodes can be used to measure light levels and variable resistors can be used for control signals. Using the WorldStethoscope tiles young learners can develop an interface for data acquisition, control and display. The learner has more ownership and can develop a deeper understanding by creating the interface as opposed to simply using a canned data acquisition program. It could be used in creating a meter to display the frequency reading or to control a process based on the frequency reading. Depending on the element connected to the input, the frequency may be a measure of temperature, light level, resistance, location, or many other things. By calibration of the output of WorldStethoscope the reading can be converted to an actual temperature, light level, etc. Perhaps the easiest thing to do with WorldStethoscope is to attach a microphone to the computer input and measure the frequency and level of the sound input.
The "add a graph" choices on the menu button are most useful for a sound signal input. If you choose "data", "spectrum" or "signal", you get an object with the following additional tiles:
data color The color hue of the data
sampling
cursor The current cursor location, wrapped back to the beginning if appropriate
sample at cursor The sample value at the current cursor location ong>
last value The last value obtained
Clear the graph of current contents
relative scale Whether the display scale is relative to the actual maximum and minimum values in data
max val The maximum of the range drawn in the graph
min val The minimum of the range drawn in the graph. If you choose "sonogram", you get a Sonogram object with the following additional tiles:
data color,color The color hue of the data
samplingscroll delta The horizontal scrolling stride when data is going off the edge
As an example of a more complex classroom project, students could make their own position sensor by laying a series of nearly connected wires along a track and as a metallic ball rolls across the nearly connected wires the circuit would be completed and a signal would be sent to the WorldStethoscope Etoys project. The signal could be monitored as a function of time and the speed of the ball could be determined. Although there are many canned devices available to accomplish this goal, the process of creating sensors and designing an interface to analyze and display the results is far more valuable than merely taking the data.
x-y Plane (Graphing category, v5)

A rectangular area with X and Y axes and a grid.
x-y plane has the following Viewer categories, described elsewhere.
collections
pen trails
playfield
Get references for these categories.