ETOYS REFERENCE MANUAL
License: The Etoys Manual will be dual-licensed under GPL (standard for FLOSS Manuals) and MIT (standard for Etoys). By contributing, you agree that your edits can be used under both the GPL and MIT licenses.
2. Getting Started
The best way to get started with Etoys is to try everything. Click every object, every button, every menu item. (Beginners will need help with the idea of the three-button mouse, or clicking with the mouse while holding down a key on the keyboard.) Put the mouse pointer on things and read the balloon help. Not everything will be clear at first, no more than the world is immediately clear to the exploring infant, or language is clear to the beginning speaker. But children start out as born explorers with no fear of failure.
Children need minimal guidance at first, since so much of Etoys is so easy to discover unaided. However, they soon need help here and there to understand features of Etoys that are not obvious or discoverable. They also need pointers to many of the fruitful avenues for their own further exploration of the workings of Etoys, and much more so to all of its applications to learning a wide range of subject matter.
By default, Etoys starts with a tutorial example, a scripted drawing of a car, on the screen, plus links to many more in the clouds marked Tutorials and Demos, and Gallery of Projects. The first few projects in the Gallery demonstrate how the car tutorial was constructed, and give some ideas for expanding it. Many more interactive tutorials can be found on the Squeakland website at http://www.squeakland.org/tutorials/demos/ .
These tutorials take you step by step through some of the basics of Etoys. Each one has an "About" tab that you can read to find out more about the topic introduced in the project.
Don't be intimidated by the depth of these tutorials and examples! Though the first ones take you through the very basics of defining "objects" and the "halo," some of the other tutorials are quite complex and are offered as an illustration of the range of activities that can be created with Etoys.
Another way to find out how complex the modeling can be is to view the Showcase at the Squeakland website. This is where Etoys users from around the world upload their work to share with the international community of Etoys users. Looking at the scripts can help you discover new capabilities.
2.1 Installing
First, download the software. You can find it at the Squeakland website (http://www.squeakland.org/download/). Free downloads are available for Macintosh, Windows, and Linux operating systems. It is also available for the One Laptop Per Child XO computer.
There is a mobile version called Etoys-To-Go which you can download to your USB-Stick. You can put this stick on any computer and start Etoys without any installation directly from the stick. All your projects will automatically be saved on the stick. Since you have installation on the local computer, the browser plugin does not work if you use Etoys-To-Go.
Windows Installation
1. Click on the download link on the Etoys download page.
2. When the dialog box appears, Choose Save.
3. Save the file on your hard drive in a temporary folder. If the folder does not exist, you can create a folder by clicking on the folder with the asterisk in the menu bar.
4. Choose Start - My Computer - C: - Sugar - the install file (Etoys4-final-win).
5. A Dialog box will appear. Choose Run. When the License Agreement appears, click I Agree.
6. Choose a folder to install the program (i.e. C:\Program Files\Etoys)
7. When the Choose Start Menu Folder dialog box appears, click Install
8. Once the Install is completed, Click Close.
9. To run the program, choose, Start - A;; Programs -> Etoys -> Etoys
10. Enjoy!
MAC OS Installation
This installation was tested with Macintosh OS 10.5.8 and Mozilla Firefox.
1. Click on the download link on the Etoys download page.
2. When the dialog box appears, choose Save File.
3. Double click on the Etoys4-Final-Mac.zip icon. This will unzip the installer file.
4. Double click on the Etoys 4 Installer.
5. A Dialog box will appear. Read the information and click Continue. Follow the prompts and agree to the licensing terms.
6. Choose a location to install the program (i.e. Macintosh HD)
7. Click Install.
8. Once the Install is completed, click Close.
9. To run the program, choose Etoys 4 from within the Applications folder.
10. Enjoy!
XO/Sugar Installation
Etoys should come pre-installed in each XO machine. In the event that it's missing or deleted, here are the steps to take to get Etoys in this hardware/OS configuration:
- Open Browse.
- Go to http://activities.sugarlabs.org/
- Enter "Etoys" in the search box and press Enter.
- Click Download. This will transfer a copy of Etoys to the Journal on the XO.
- Open the Journal and click on the downloaded Etoys. It will launch and install itself.
In environments where no Internet connection is available, it is possible to transfer activities from one XO to another using USB flash drives.
- Open Etoys and quit to get an instance in the Journal.
- Go to the Journal.
- Insert a USB drive.
- When the USB drive icon appears, drag the Etoys instance from the Journal to the USB drive icon.
- Right-click on the USB drive icon, and eject it.
- Remove the USB drive from the XO, and insert it into the other XO.
- Go to the Journal.
- Click the USB drive to display its contents.
- Drag the Etoys icon to the XO icon to copy it to the Journal.
- Eject the USB drive.
- Click Etoys in the Journal to launch and install it.
Etoys-To-Go is a version of Etoys that can run without installation directly from a USB drive. Projects are saved to the USB drive by default. All versions should run on Mac, Windows, and Linux. Follow the following steps to download and install Etoys-To-Go on our USB drive (Installation instructions based on Windows Vista):
1) Go to http://squeakland.org/download/![]()
2) Click on Etoys To Go. This will open a dialog box in Windows Vista that will ask if whether you'd like to open the file Etoys-To-Go4-Final.zip (or latest version) or Save it in a directory. Click "Save File", which will put the file in the Downloads directory.
3) Open the Downloads directory. Double click on Etoys-To-Go4-Final.zip this will reveal the file Etoys-To-Go4.app(or latest version of software)
4) Copy Etoys-To-Go4.app (or latest version) to your USB drive.
The main difference between Etoys-To-Go and the regular Etoys is the way it finds the default project directory. In Etoys-To-Go, the projects directory is in the same place as the Etoys-To-Go application. Presumably that is a USB memory stick, so projects are stored on the stick, too, and can easily be transported. In regular Etoys, projects are saved to the user's documents directory on the machine's hard disk, so transporting them to a different machine needs copying.
Another difference is that the web browser plugin requires installation on the user's machine, because the browser needs to find the plugin, and the plugin needs to find the Etoys application. So Etoys-To-Go does not provide a web browser plugin.
Running the Etoys-To-Go Application
1) Insert the drive to a USB slot in your computer. Make note of the drive location on your computer.
2) In Windows, you can double-click the drive to reveal the contents of the drive. If it's a newly created drive, you'll see two folders: ".etoys" and "Etoys-To-Go4.app"(or latest version with .app at the end of the folder name).
3) Double-click the ".app" folder. Amongst the files contained in this folder is the Etoys application indicated by the Etoys logo.
4) Double-click the Etoys application to run/launch it. You will see the familiar welcome window.
Saving and Re-running Your Project Files using Etoys-To-Go
When you first save a project, an "Etoys" folder is created within the USB drive. This will contain all your project files (or PR files). Each subsequent saving of your project file will result with the original file name that you used plus an incremented number at the end. Example:

This is useful so you can always go back to old versions of your projects and work from there.
When you first go back to run your project, it will be tempting to double-click on the project file from the "Etoys" folder or directory. Unless Etoys is also installed in the machine, this will not run Etoys or open your project file. This is another difference with Etoys-To-Go and the machine installed version of the Etoys. With Etoys-To-Go, you have to launch/run the Etoys application first and THEN open the file from Etoys.
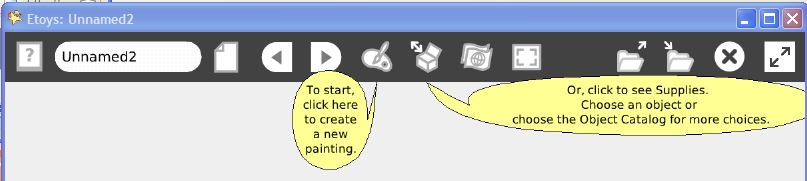
2.2 Loading, Saving, Quitting
Open Etoys and you will see a car driving around a screen, bouncing off the sides and off of three clouds. This is a project. This is also the main Etoys opening page. You can see the script that controls the car, along with suggestions for changing the variables in the script to see how the car responds.
The three clouds suggest places to start:
"Gallery of Projects" will take you to a selection of twenty two projects that you can look at and explore to learn some of the many things you can do with Etoys.
"Tutorials and Demos" will take you to three projects that will help you get started with learning Etoys.
"Make a Project" will bring you right into a blank Etoys project page, where you can create and manipulate your own objects.
Loading
To load a project into your Etoys application, click the find-icon. 
If you hold the mouse button pressed for some seconds, there will be a menu with more options for loading projects. These options differ in the places where you will look for the project and in the kind of files you can open. The first option "find a project" is the same that happens if you just click on the icon. It will open the default Etoys folder on your computer (or the folder on your usb drive if you are using Etoys-To-Go) to load your project. Here you can also choose "My Squeakland" and "Squeakland Showcase" to open a project directly from the squeakland website. Keep in mind that you need internet access to do this!
The second option "find a project (more places)" lets you search throughout your whole directory structure.
The third option "find any file" allows you to load images into your project. The currently supported formats are .jpg and .png.
To open an existing project from a Windows or Macintosh computer, click on the "Find (load) icon, login if you aren't already, and find the project you wish to work on.
Saving
Once you have a project, you'll want to save it so that you can work on it again and pick up where you left off. Saving a project is different on the XO than it is on a Macintosh or Windows computer.
Saving to an XO
If you click the X on the top right corner of the menu bar, your XO will automatically save to the Journal. You will know it's saving because you'll see a stick figure doing jumping jacks.
To retrieve a saved file from the XO, click on the folder with the arrow pointing up. Choose the project you want to work on and it will load into Etoys. (It's a good idea to name your projects so that when you go back to work on them, you can distinguish them from one another.
Saving to a Macintosh or a Windows computer
Near the right corner of your menu bar, you'll see the "Publish (save)" icon. 
When you are ready to save a project, click on the Publish icon, and you will see a screen waiting for you to "describe this project." You need to fill in a project name, and can optionally add a description, your name, and tags, too, then click OK.
The next screen you see where you will be saving the project. You have two choices of places to save your project. Choose one and then click "save" to finish saving.
If you save to "Etoys" you are saving to your local computer. It's a good idea to save locally until you feel you are ready to share your project. If you save to "My Squeakland" you will be saving to the Squeakland website, where you can choose to make your project public so that others can view it. You will need to create a Squeakland account if you want to save to My squeakland. Login, and click "Save" to upload your project to the Squeakland website. Don't worry, Squeakland doesn't sell or rent your information.
Whether you choose to save to "My squeakland" or to "etoys" you will be able to retrieve and edit your project to make changes.
Quitting Altogether
To quit Etoys, simply click on the X on the top right of the menu bar. You will be prompted with "Are you sure you want to quit Etoys?" Select Yes, and your Etoys window will disappear.
2.3 How to make a Script
Scripts are instructions written in a computer language that tell the computer what to do. In the case of Etoys the script is constructed by using graphical tiles that can be added together to create a set of instructions. The computer language behind the graphical tiles is Smalltalk, but you don't need to know the language to construct a script in Etoys. Everything in the Etoys world is an object and you can use the tiles to tell any object what to do.
Start by opening Etoys and clicking on the "Make Project" cloud. You will see a gray blank page. That is the world or stage where you will have your objects or actors perform by telling them what to do with scripts. Click on the Supplies bin, the box at the top middle that looks like a toy box, to find objects to work with. Select a Rectangle object, click on it (it will stick to your cursor) and drag it out onto the world.
The next step is to open a Viewer for the object. Right click on your object (on a Mac command or apple click) and you will see a halo of actions in the form of small colored, circular buttons surrounding your object. Click on the light blue button and the center left of your object to open a viewer.


On the left you see a viewer for the Rectangle object. There are many categories of tiles that you can read about in the Common Tiles section. For now, we will focus on the basic category that you see to the left. The tiles are the 5 green rectangles that are below the word basic. The easiest way to create a script is to grab a tile and pull it out onto the world.

Here we have pulled the Rectangle forward by tile out onto the world and a ScriptEditor is automatically opened with the first instruction for the Rectangle object to go forward by 5 pixels. You can run the script once by clicking the yellow exclamation point at the top center or run it continuously by clicking the clock to the right of the exclamation point. There is much more information about the ScriptEditor in the User Interface section.
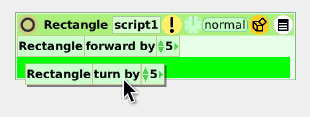
To add more commands to the script, simply drag out more tiles and add them to the script. The ScriptEditor will show green when it is ready to accept the tile. Simply let go of the tile and it will drop right into the script. Now when you run the script, the Rectangle object will go forward 5 pixels and turn 5 degrees.
This was just a start on scripting. You can read much more about using Etoys in the following chapters.
2.4 Object as Player and Costume
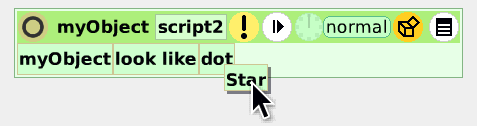
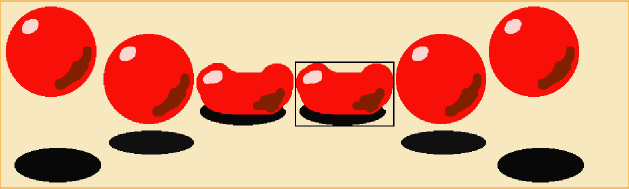
In Etoys, every visible object consists of two components, an unchanging player that holds the scripts for the object, and a variable costume, giving the object's appearance. A tile in the graphics category says "look like", which means that the player for that object will wear another object as its costume when the tile is executed. This behaviour is used for animations, as you can see in the Frame-based animation example projects.
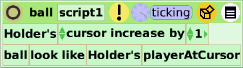
The Holder in this case holds an ordered sequence of drawings, and the script chooses one of them each time through to be the ball's costume.
Be careful! When putting the "look like" tile into a script, at start it says "look like dot" and that is exactly what will do should you start the script right away.

Make sure that you assign the graphic object you want before you start the script!